

Product
Stealth Whimsy Side Table: The Build
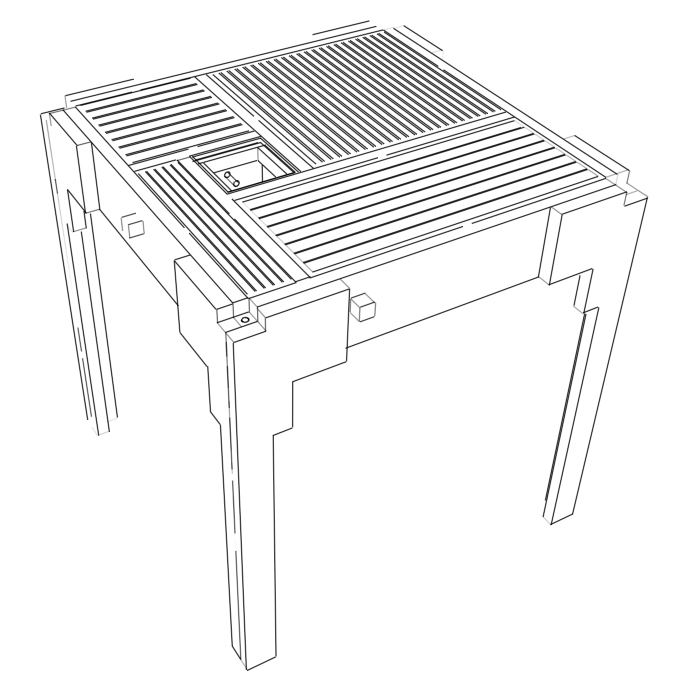
A consolidated collection of posts on the construction/build process for the Stealth Whimsy Side Table, a one-off piece of conceptual furniture. Composed of ApplePly, laser cut acrylic, and hot rolled steel, the Stealth Whimsy Side Table was built by hand in the wood shop at the University of Oregon School of Allied Arts.

March 12, 2010
Welcome to the Wood Shop
This quarter of my Master of Architecture program, I decided to explore a different realm of design and signed up for the furniture studio, rather than yet another architecture one. The term's assignment: select a piece of IKEA furniture (past or present) and use it as a place from which to leap into the design of a remixed, reloaded, and reinterpreted furniture piece, which we will then build ourselves, from scratch. These will not be your average, “nice-looking” pieces of handcrafted furniture, but instead pieces that have a greater design objective than just function and aesthetics: they will reside in the storied realm of conceptual furniture.
If your journey here didn't come by way of the Stealth Whimsy Side Table: Design Process post, you may want to take a peek at it first, as it tells the story of how we made it to this point. Or, if you're only interested in the construction of the Stealth Whimsy Side Table, by all means, carry on. As I did for the design process posts, I've consolidated a great pile of in-the-thick-of-it furniture build blog posts into one, sorted below by the date of the original entries. Enjoy!
February 10, 2010
The Build Begins
Using the 3D model I made of the design, I created a set of construction drawings for the newly dubbed Stealth Whimsy Side Table, so that I know exactly what I need to pull this all off. On Friday, I purchased the major materials to build the piece, and tomorrow, I start cutting them out!
The main material of the piece is ApplePly, a type of plywood, which I picked for its uniformity and density. Typical plywoods often have intermittent gaps within the layers, which if cut through, will appear as holes in the edge. Every single piece of the table has exposed edges, which is part of the attraction; using ApplePly will ensure that the edge quality will be up to the application. The locking mechanisms and the axial rods about which the elements spin are hot-rolled steel. And, lastly, two of the four sections of the table top will be composed of acrylic pieces. These will have a wood veneer applied to the flat, functional surface, obscuring the secret hidden below.
And, so, it all begins. I've mapped out a calendar of the build so that I stay on track to hit all the milestones with time to spare, and will have the piece complete and in tip top shape, ready for its big reveal at the end of the term. I'm so excited!
February 15, 2010
Rough Cuts & the Router
After the making the initial “rough cuts,” I am now working on the “fine cuts” for the wooden spin pieces that will compose the tabletop. In the first picture, you see some pieces cut out roughly in the left pile. This I did with the band saw, quickly and easily, staying comfortably away from the pencil lines marking the final edge. In the pile on the right, you can see that the top piece has made it through the process. It needs some sanding, but it's not bad!
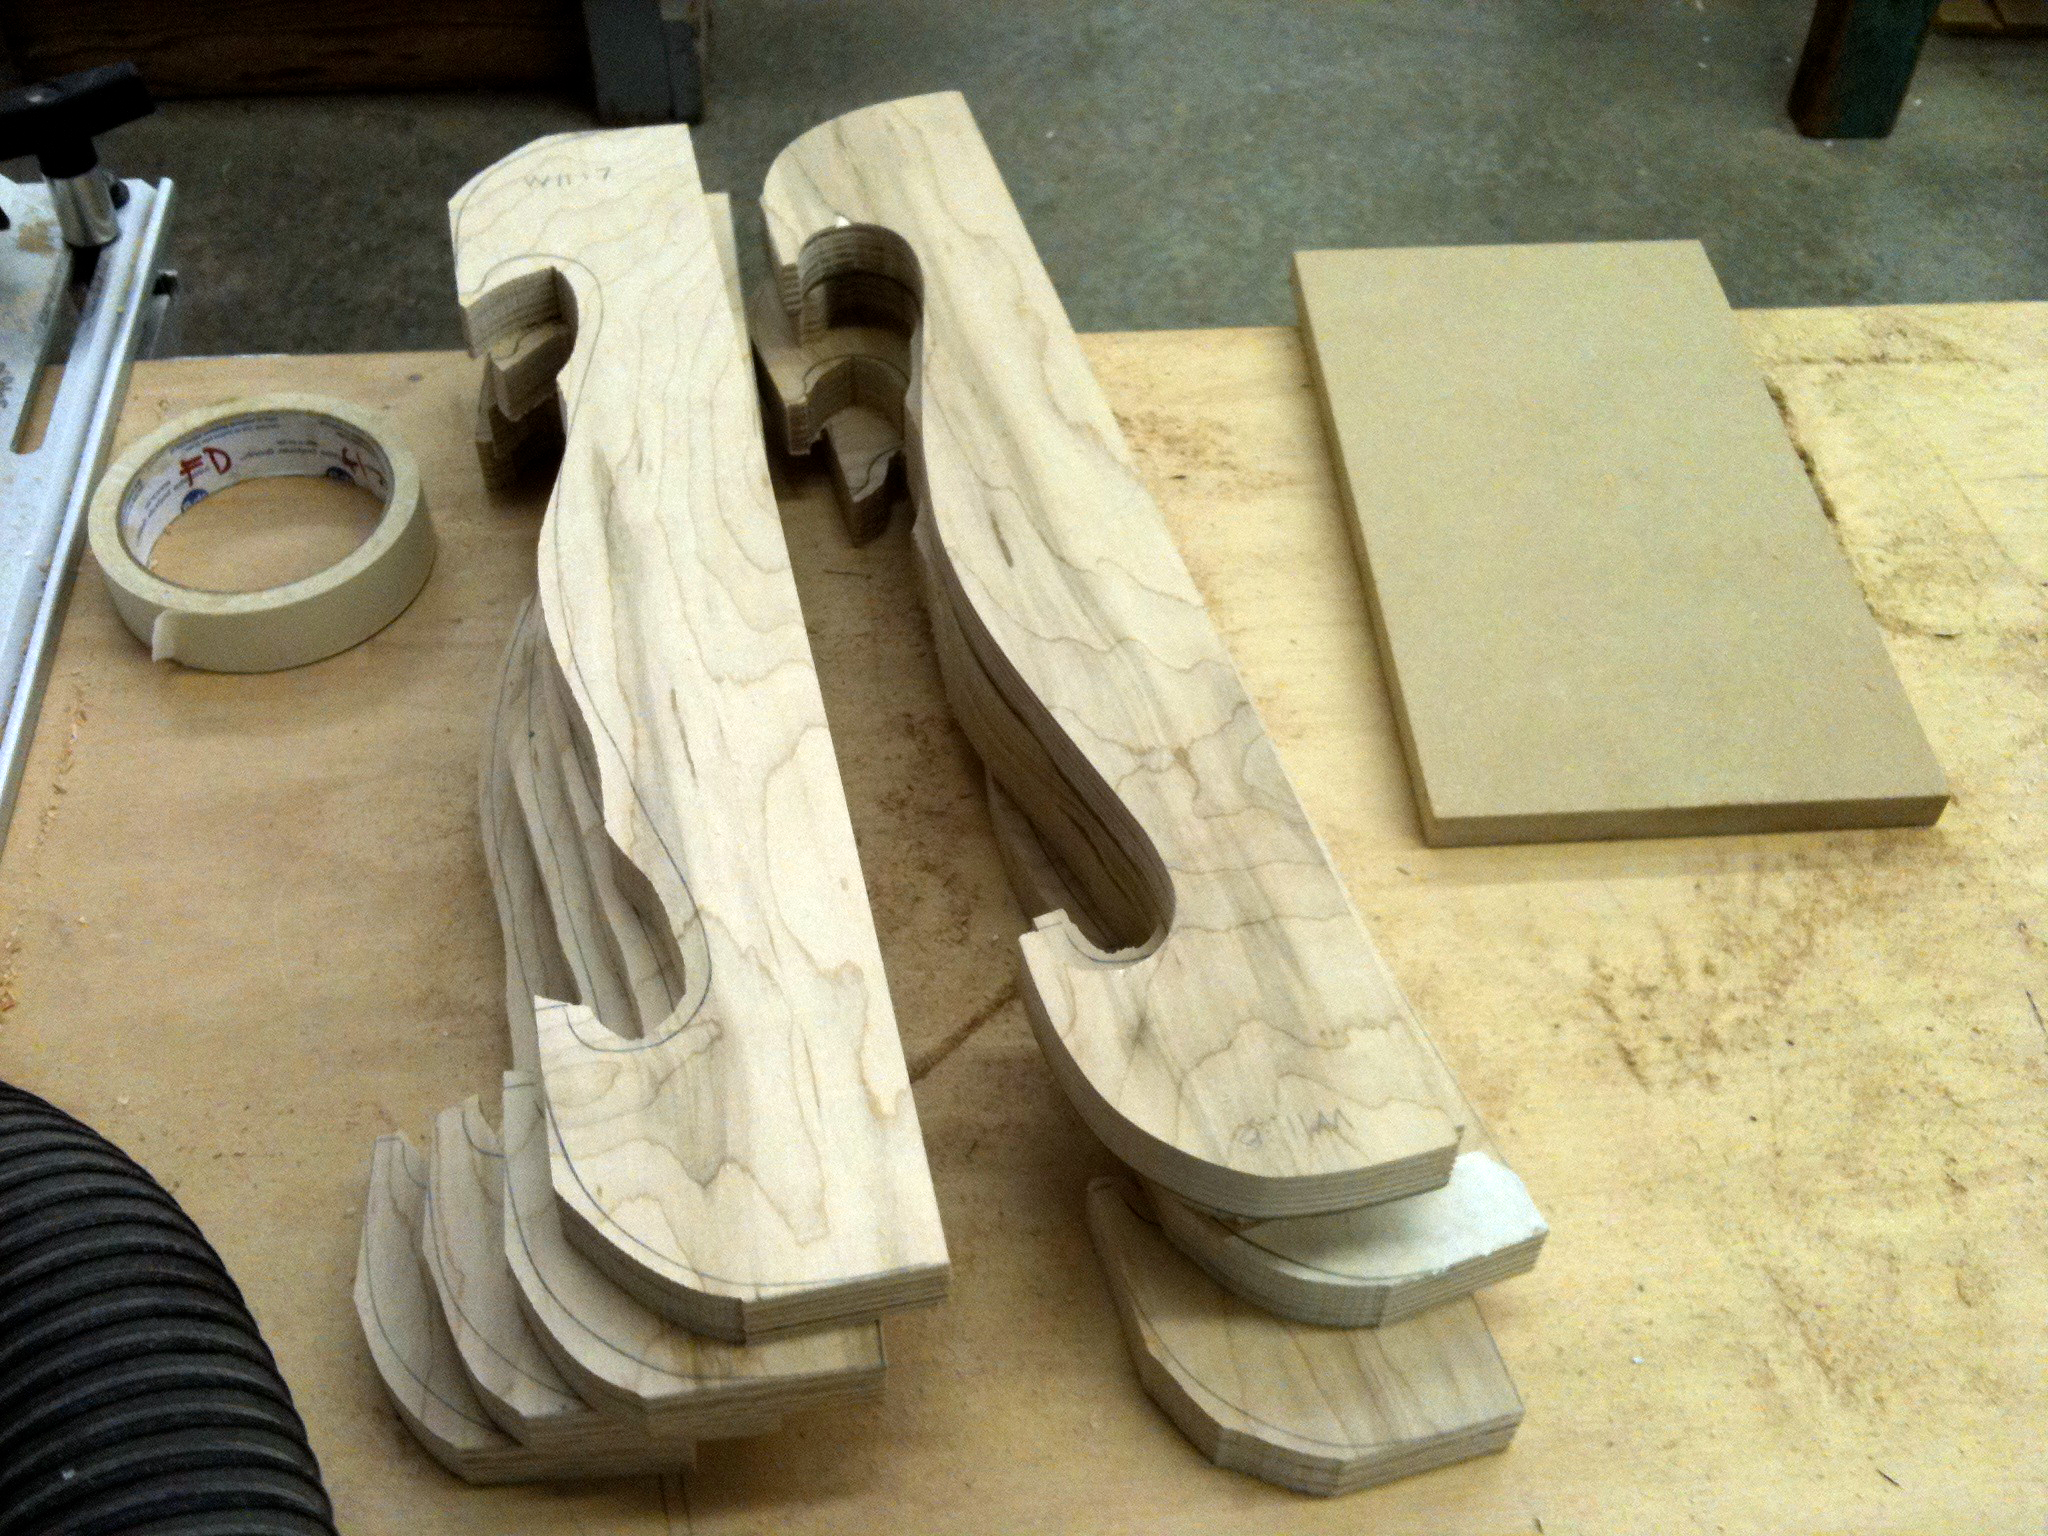
Rough Cuts Headed to the Router
The top piece on the right pile has been through the router process, trimmed to the pencil line. The remaining pieces have only been cut out roughly with the band saw, and are next in line for the router.
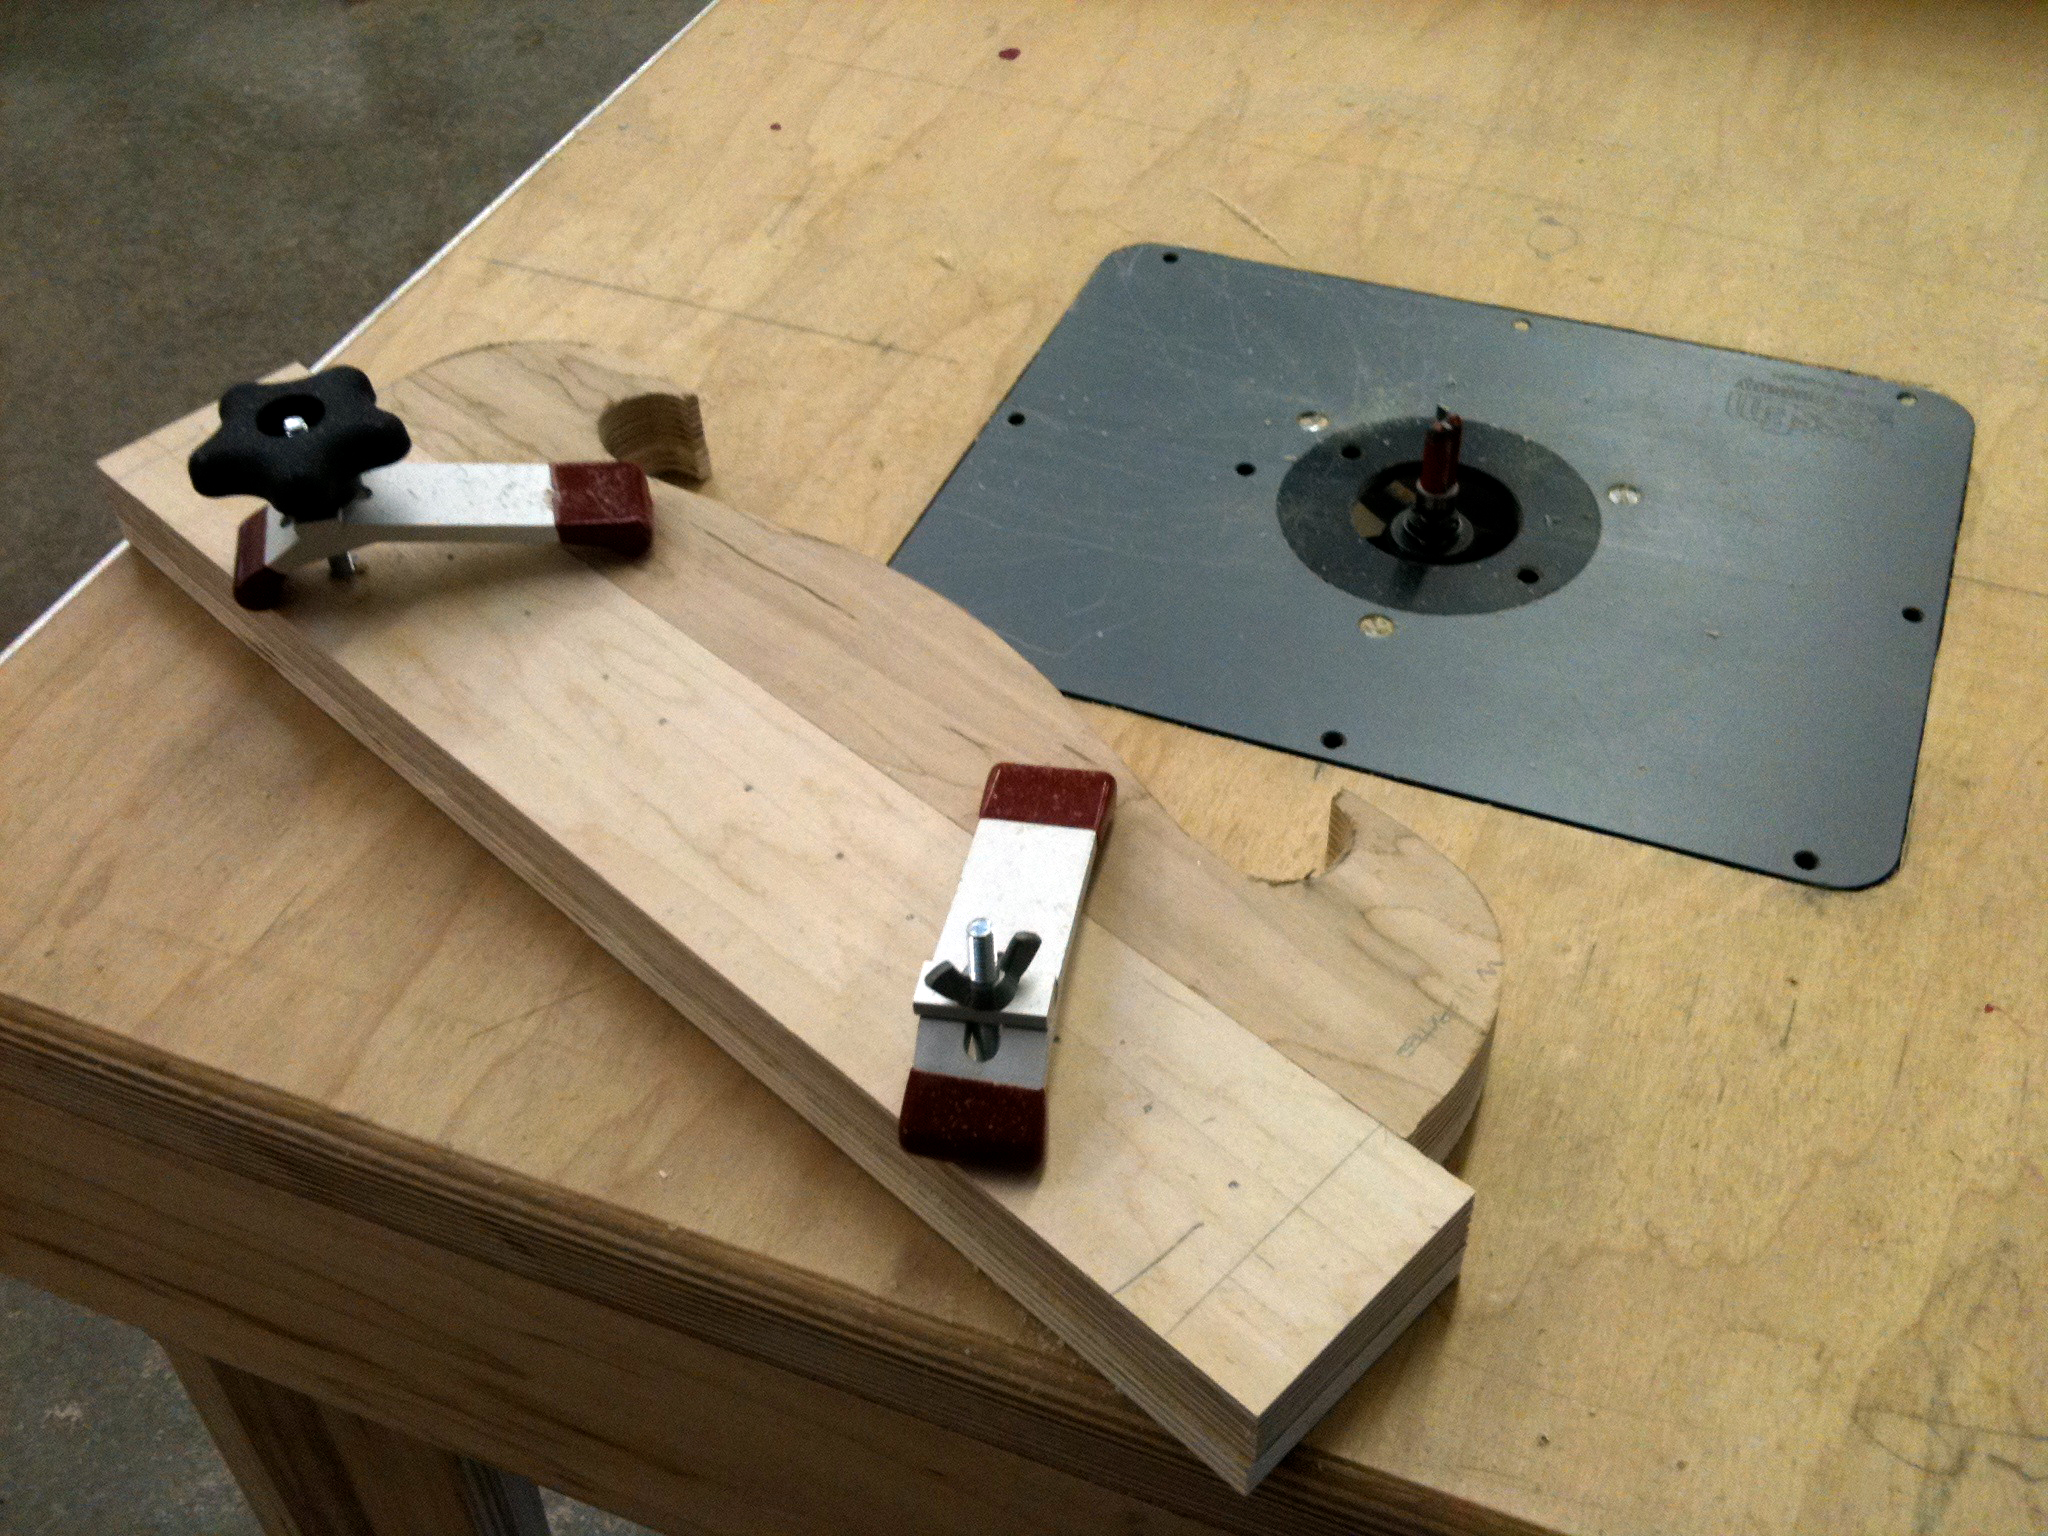
Router Jig
Using a carefully cut and sanded piece of MDF affixed below as a guide, the router bit will trace along it while trimming the rough-cut piece above.
So, how do you get from one to another? You can’t see it in the image, but underneath the rough piece, there is a piece of MDF that I have cut and sanded down precisely to the curve of the finished pieces. Using this jig, the router bit will trace the curve of the MDF piece, thereby cutting the piece of ApplePly on top to match. Simple, yet, nonetheless nerve-wracking.
February 18, 2010
Piles & Piles of (Organized) Pieces
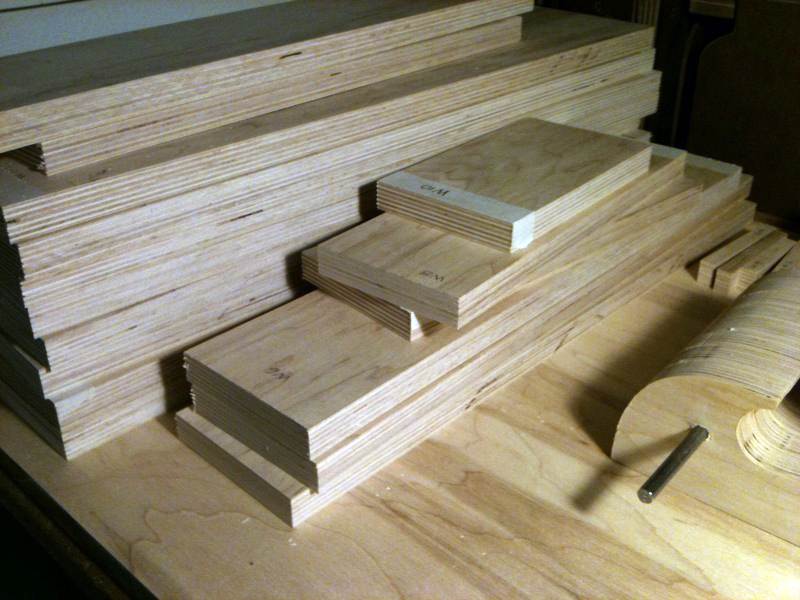
Piles & Piles
They may be in piles, but they are carefully labeled and sorted. Organization is key.
Right now, this is what my studio desk looks like: piles, and piles, of pieces. But, see those little labels in pencil on each piece? Those correlate with the set of construction drawings I made for the piece. Organization is everything when it comes to making a beautiful product efficiently. There are some students in this studio (to remain comfortably nameless, of course), who spend at least half their time correcting the mistakes they make, and getting more and more frustrated in the process. It boggles my mind that they don't see the value and ease of staying organized, and thereby preventing a lot of that in the first place.
February 23, 2010
Laser Cutting
Half of the four rotating sections of the table are made up of acrylic pieces, rather than wood. For these, I sketched out a whimsical design, then made a digital version of it to feed to the laser cutter. Because this particular laser cutter is not as powerful as they come these days, and since 3/8” thick acrylic is therefore pretty hard for it to manage, this is a very slow and tedious process. The laser moves along at a snail’s pace, finishing the cut for only one of my pieces every 30 minutes. (I need 28 of them.) Furthermore, I have to keep an eye on it constantly as it cuts because, if it doesn't get enough air flow around a tight curve, the acrylic will light up in flames. If I don't put it out fast enough, the acrylic melts, and the entire piece is ruined.
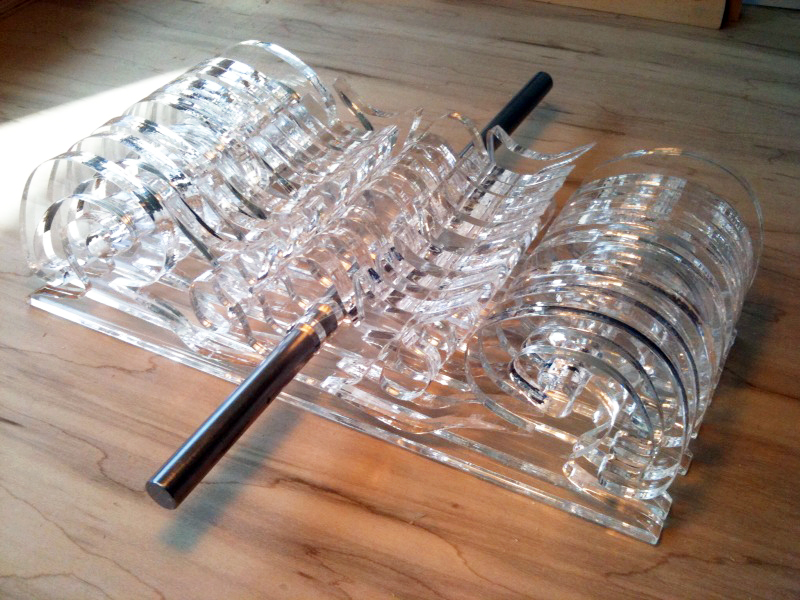
Laser Cut Acrylic Pieces
Though they take agonizingly long to cut, it's worth it because they end up looking like glistening cut ice.
This is all worth it because, once they come out of the machine and I carefully extract them from the sheet, they look like cut and polished ice. Later on, I will iron wood veneer onto the flat side of each. This way, when the table is “at rest,” the entire table surface will appear to be wood, and the acrylic will be one more surprise upon the table’s release.
February 24, 2010
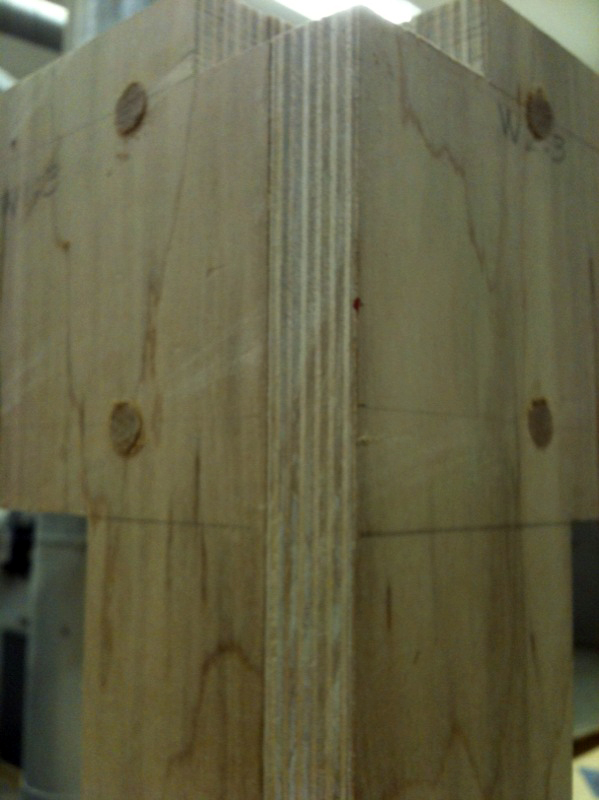
(Another) Corner / Leg Revision
Simplifying the Legs
Rather than finger joints, which would have been really busy with the striations in the ApplePly, the legs will now use tongue and groove joints.
Several critiques later, I've decided that finger joints along the legs of the table would look much too busy, since the layers of the ApplePly already form a striped look. So, the design now has a simple tongue-and-groove joint where the two pieces of each leg meet. Additionally, I have dropped the upper corner of each leg, which provides easier access to the unlocking keys when the table is in action, creates a larger “stage” for the beautiful striations of the ApplePly, and provides more of a gradation at the table edge.
March 5, 2010
It Looks Like a Table!
Finally Starting to Look Like a Table
For the first time, it looks more like a table than just a heaping pile of wood: such a relief!
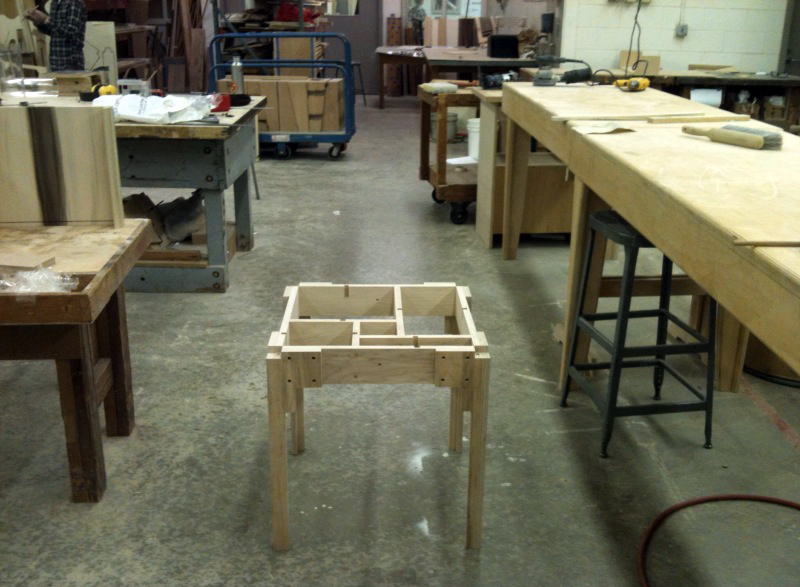
After much frustration trying to get the pieces together (I needed another set of arms, burly ones), it finally looks like a table! I cannot even tell you how good it felt to finally get it this far. Because of the way the pieces meet each other, I had a disaster of a time trying to screw them together, mostly just because I didn’t have enough physical strength (or quantity of arms) to hold the pieces still while simultaneously using the power screwdriver to put them in place. Fortunately, I was able to get a buddy to play his Man Card and help me out. There is still a ton of finishing work to be done on the piece, but it’s great to have it finally looking like something other than a million separate pieces of wood. Phew!
March 6, 2010
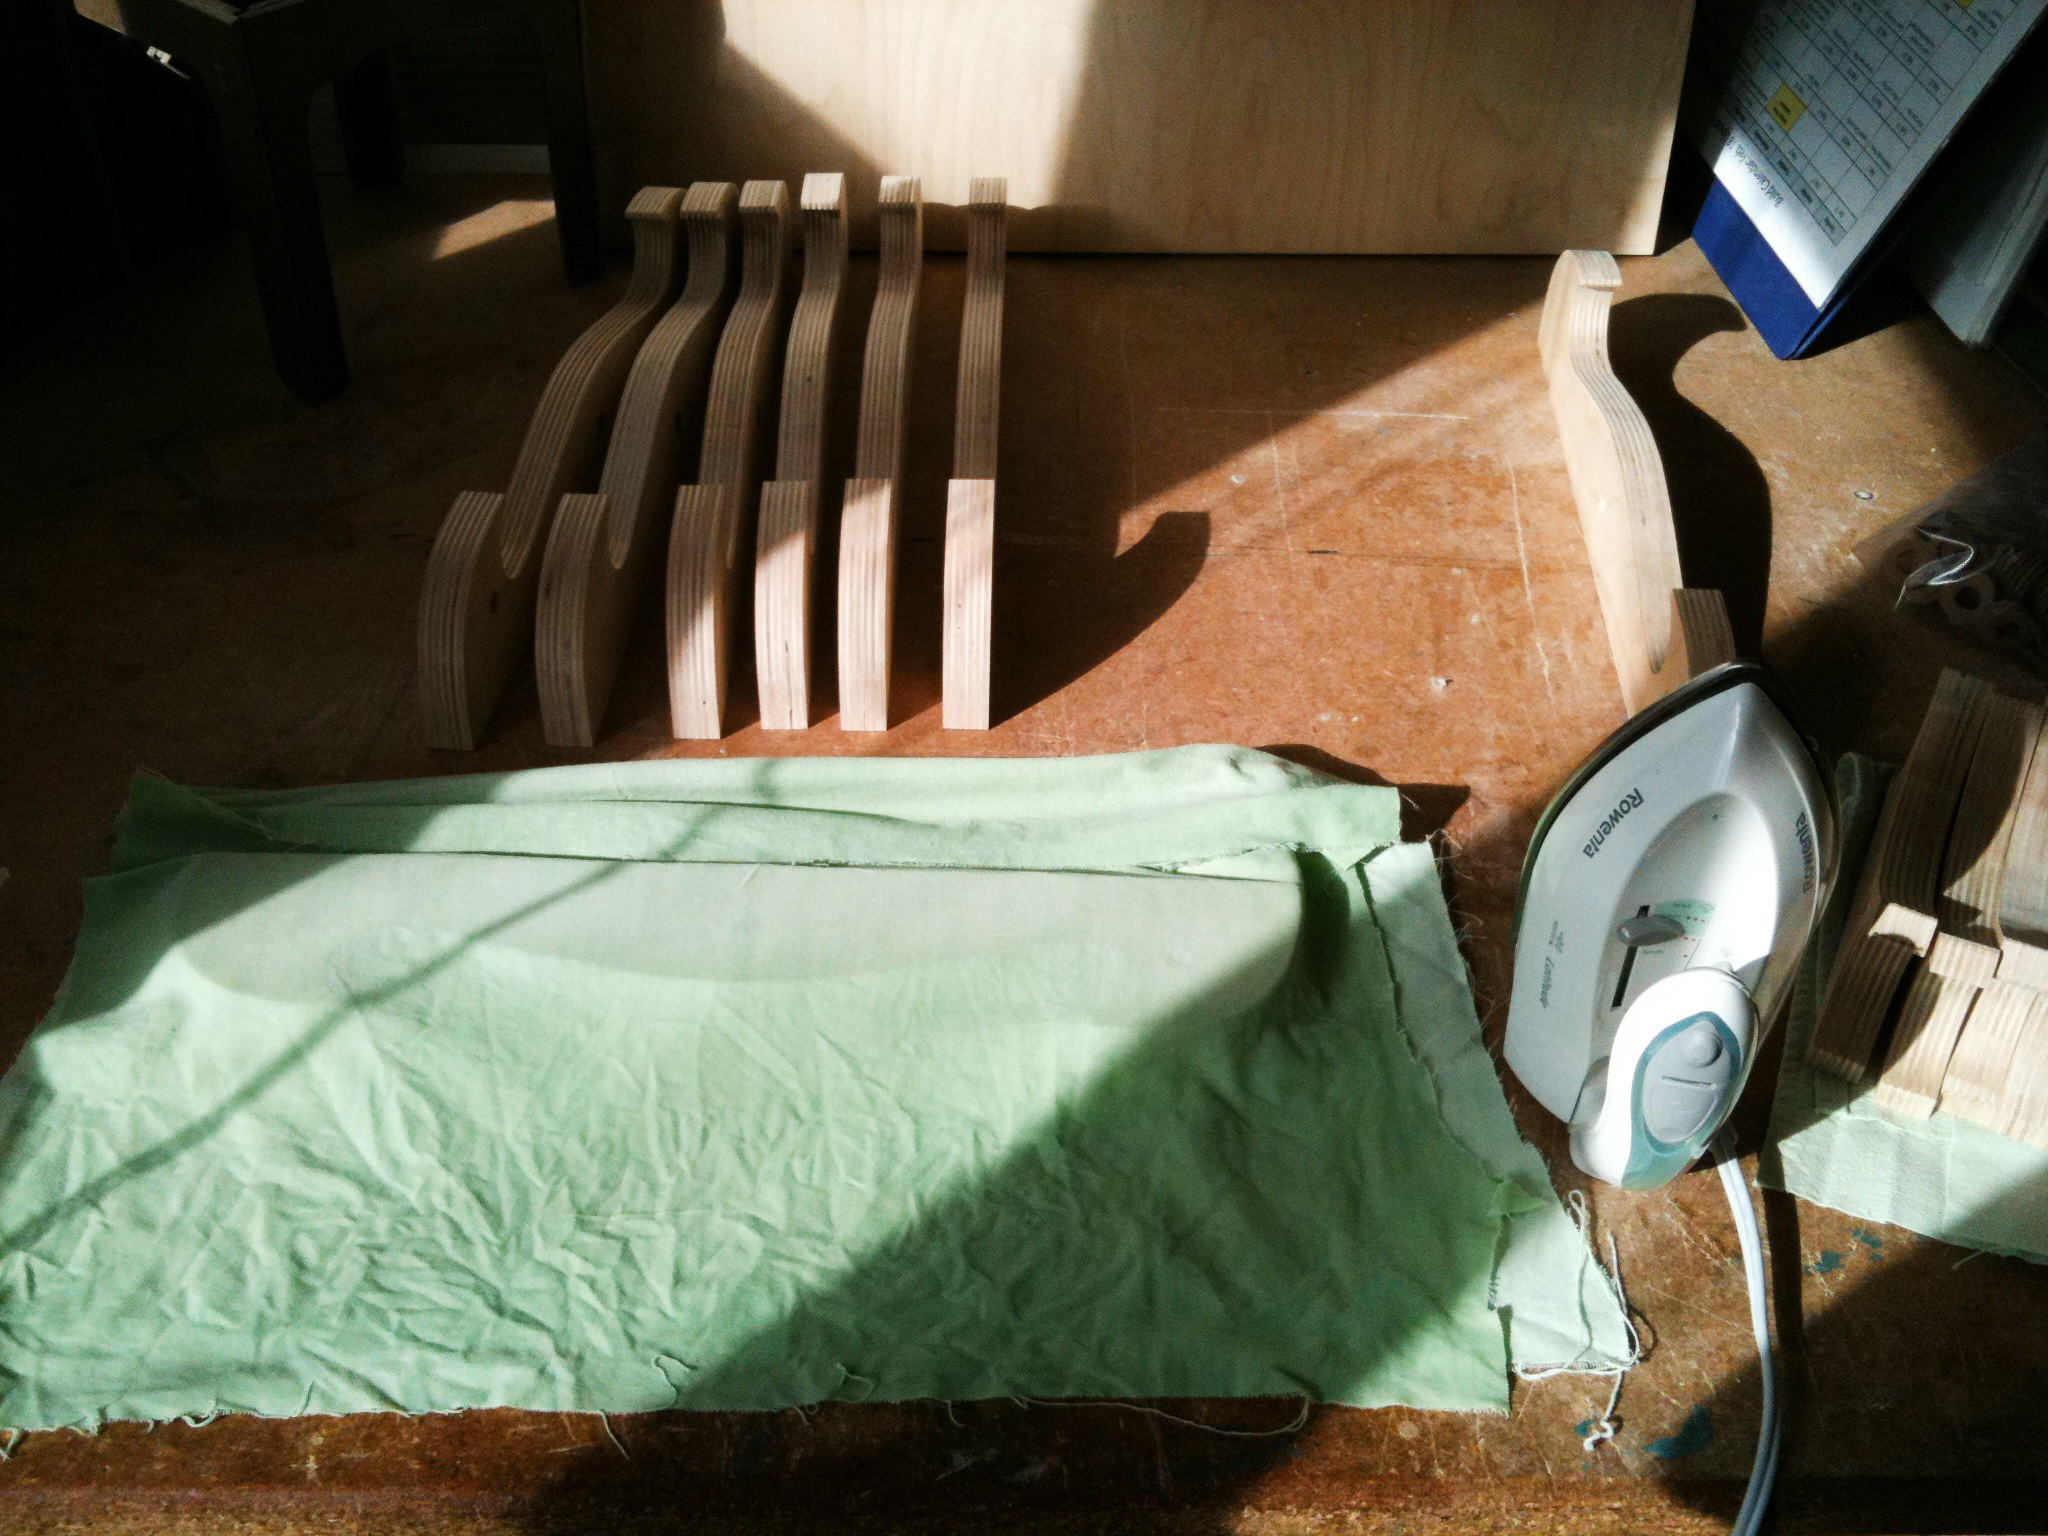
The Long Haul
The spinning pieces for the table top are still in the works, but coming along. Just today, I finally cut the last piece of acrylic. All but a couple of them have had their jagged tips frosted, and I will finish the last few by tomorrow, most likely. (In retrospect, one of the points in the whimsical acrylic flourish was too pointy for the thickness of the material and the particular laser cutter. So, more often than not, these tips would snag and chip when pressed out of the sheet. The solution, which I am now fond of anyway, was to sand them down until they are smooth to the touch, for a beautifully frosted tip.) Next, all the acrylic needs to be veneered on the top, and finished with whatever technique I choose for the rest of the piece. It’s going to be a long haul to get this all done...
Sanding My Heart Out
A Scratched Up Mess
The struggle to get the pieces together before I recruited help left the poor table a bit banged up. Next up: so much sanding.
For the next couple of days, and for the previous two or three, I have been, and will be, absolutely sanding my heart out. As you can see in the picture, the struggle I had getting the pieces together left a bit of a mess all over the surface of the wood: from gouges with the screwdriver and the chisel, to nasty scrapes from the saw I used to cut off the dowels that hide the screws. It’s going to take a lot of work to fix, and some of it might end up staying there if I run out of time to keep sanding. Not to mention that I can only sand so far: because this is a composite material of thin layers of wood, if I sand through the thickness of the top layer, it will be obvious, and will look terrible. I have to plan this all very carefully so that I can get enough coats of finish on the piece, with the appropriate time to dry between each, before the final presentation of the project next Friday.
I haven’t settled for sure on a particular finish either, since my original plan, that I was quite eagerly looking forward to, backfired in a fit of assholery that I should have seen coming, but didn’t. (Pardon my French, I've already censored it considerably.) But, whatever route I take, it’s going to take a hell of a lot of sanding, which, it turns out, is somewhat therapeutic, other than how much is wears out my wrists. But, whatever. They’re just wrists.
March 9, 2010
Getting Closer

Testing & Adjusting
Nothing like putting it all together to work out little issues: like needing tiny felt washers between all the spinning pieces to keep them nicely aligned.
I snapped this shot while testing things, making little adjustments to the holes so it all operates smoothly, etc. Those are the pieces of acrylic in there with their veneer on them, although, so far, nothing has a finish on it. Also, they are all just stacked in there roughly, and look crooked as they wiggle. To solve that, I am hand cutting almost 100 felt washers, which will fit in stacks between each spinning piece. (I maxed out my laser cutter time with all those acrylic pieces, so fabric shears and blisters it is.) With the felt washers in place, the spinning pieces will stay in line with one another, evenly spaced, and quiet. Right now, in their loose state, they clank against each other, which is decidedly not stealthy!
Ironing!
By the time the pieces were all put together and ready to be finished, as careful as I generally try to be, they had all sorts of gouges, dents and scratches on them. It was all mostly on the frame, and I did the best I could to sand it all out, but it was just not perfect. (Pro Tip: Try to be zen when building furniture, not all frustrated and angsty.)
Ironing Out the Dents
Lucky for me, it turns out, if the wood fibers are only crushed, not torn, you can iron them out!
But, now I’ve discovered that as long as the wood fibers are just crushed and not torn, you can steam iron out the dents! Who knew?! (Lots of people, I guess, since it’s a tip in our textbook. But, it was new to me.) It turns out, it’s like magic. (Ok, science.) My pieces went from being all gouged up to looking like new. It was such a relief to see what I thought I had ruined go back to looking good again! Of course, this does raise the grain a little too, so it’s best to do it before you start sanding, so you can sand off the raised grain while you're at it.
March 10, 2010
The Cut Off Point

Time’s Up
If I don’t stop sanding and ironing, and start applying the finish, there won’t be time for the last coat to dry before the final presentation.
For days I have sanded and sanded, and still I see all sorts of mistakes in my piece: places where the veneer got too thin, places where the joints aren’t perfect, places where there are still scratches that I couldn’t sand away, etc. etc. But, last night I had to cut myself off and put on the first coat of finish. I have to keep telling myself, “It’s a prototype, it’s a prototype, it’s a prototype,” because, of course, I wanted it to be completely perfect, but really, it’s just a prototype, and the first thing I’ve ever made out of wood. So, I suppose, I’m being a little hard on myself. Anyway, I know that this picture is a bit blurry, but it shows the first coat of finish, and gives a much better sense of how the wood is going to look when it’s all done. I’ll get there. It’s a prototype... Relax, Myself. Chill.
Experimenting with Finishes

Test Strips
Unfortunately, since I shot this in poor lighting with my phone, the color variation isn’t that clear. But, trust me, the bottom piece (with a linseed oil finish) is much yellower than the top one, which I coated with a natural floor finish. I prefer the non-yellowed look, so floor finish it is.
I snapped this photo with my phone, so, unfortunately, the colors didn’t come out as defined as they could have. But, take my word for it, the bottom piece is much yellower than the top one. The bottom test strip samples of all the woods in my project — the ApplePly, the teak veneer, and the waddell wood dowels — so I can see how each will look with the others. It is finished with linseed oil, but I am disappointed with how much it yellowed the wood from its unfinished, natural state, which I've come to love. So, instead I am using the product sampled on the top piece, a natural floor finish that is clear, so it lets the wood remain closer to its original color, while still bringing out the grain to its best showing. This is important to me, since I picked this particular piece of ApplePly from the massive stack of sheets precisely because it had an uncharacteristic top sheet with a much more marbled veneer.
Finish Factory

Drying Racks
Each piece needs three coats of finish applied. Between each coat, it needs to dry and have a light sanding. I’ve got a chart to track progress, and alarm timers set. There is no time to rest: I have to stay on schedule or risk not completing it in time.
I’m now deep into the thick of the finishing process, and this is my little set up. Each piece needs at least 3 coats of finish, which have to dry, and then must be lightly sanded in between each coat, and the lock and spin holes have to be sanded out enough to still function as designed. I’m too sleep-deprived at this point in the term to keep it all straight in my head, so I have a little chart mapped out that keeps track of which pieces are at which point, how many hours they have been drying, etc. With any luck, I will be done with it all by tomorrow night! But, we’ll see...
Before & After the Finish
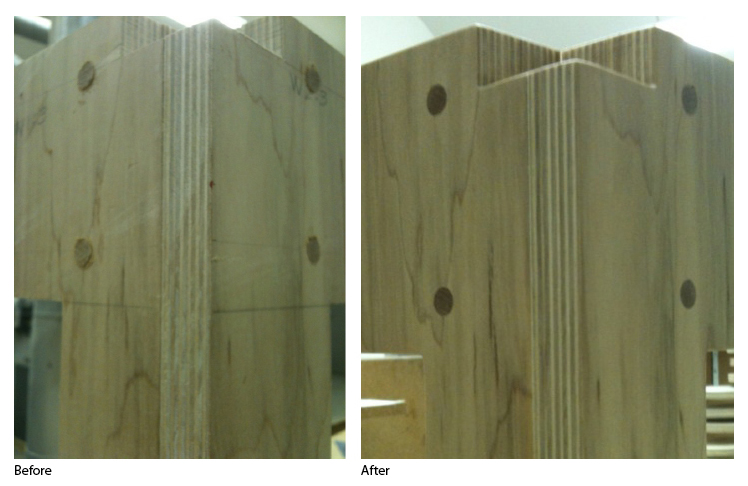
A Major Upgrade
Many, many hours of sanding, and four coats of finish later, and there really is a big improvement in the surface of the piece.
That is the same corner, before and after hours, and hours, and hours, (and hours) of sanding and finishing. I definitely feel better about it when I am reminded of how bad off it was when I started! Four coats of finish and it is now technically done. I think. Tomorrow, I will work out any kinks, and drop in the spin pieces. BOOM. I hope you’re psyched. I am. Really. I am just so le tired that I can barely move or think. So, stay tuned.
March 11, 2010
Done! Almost, At Least.
Getting there, but not quite yet. But, yes, it already feels good. It's such a relief! I pulled it off, worked it out, I did it. BOOM. So, here's the... let's call it, the Member's Preview, or (ahem) the Soft Opening.
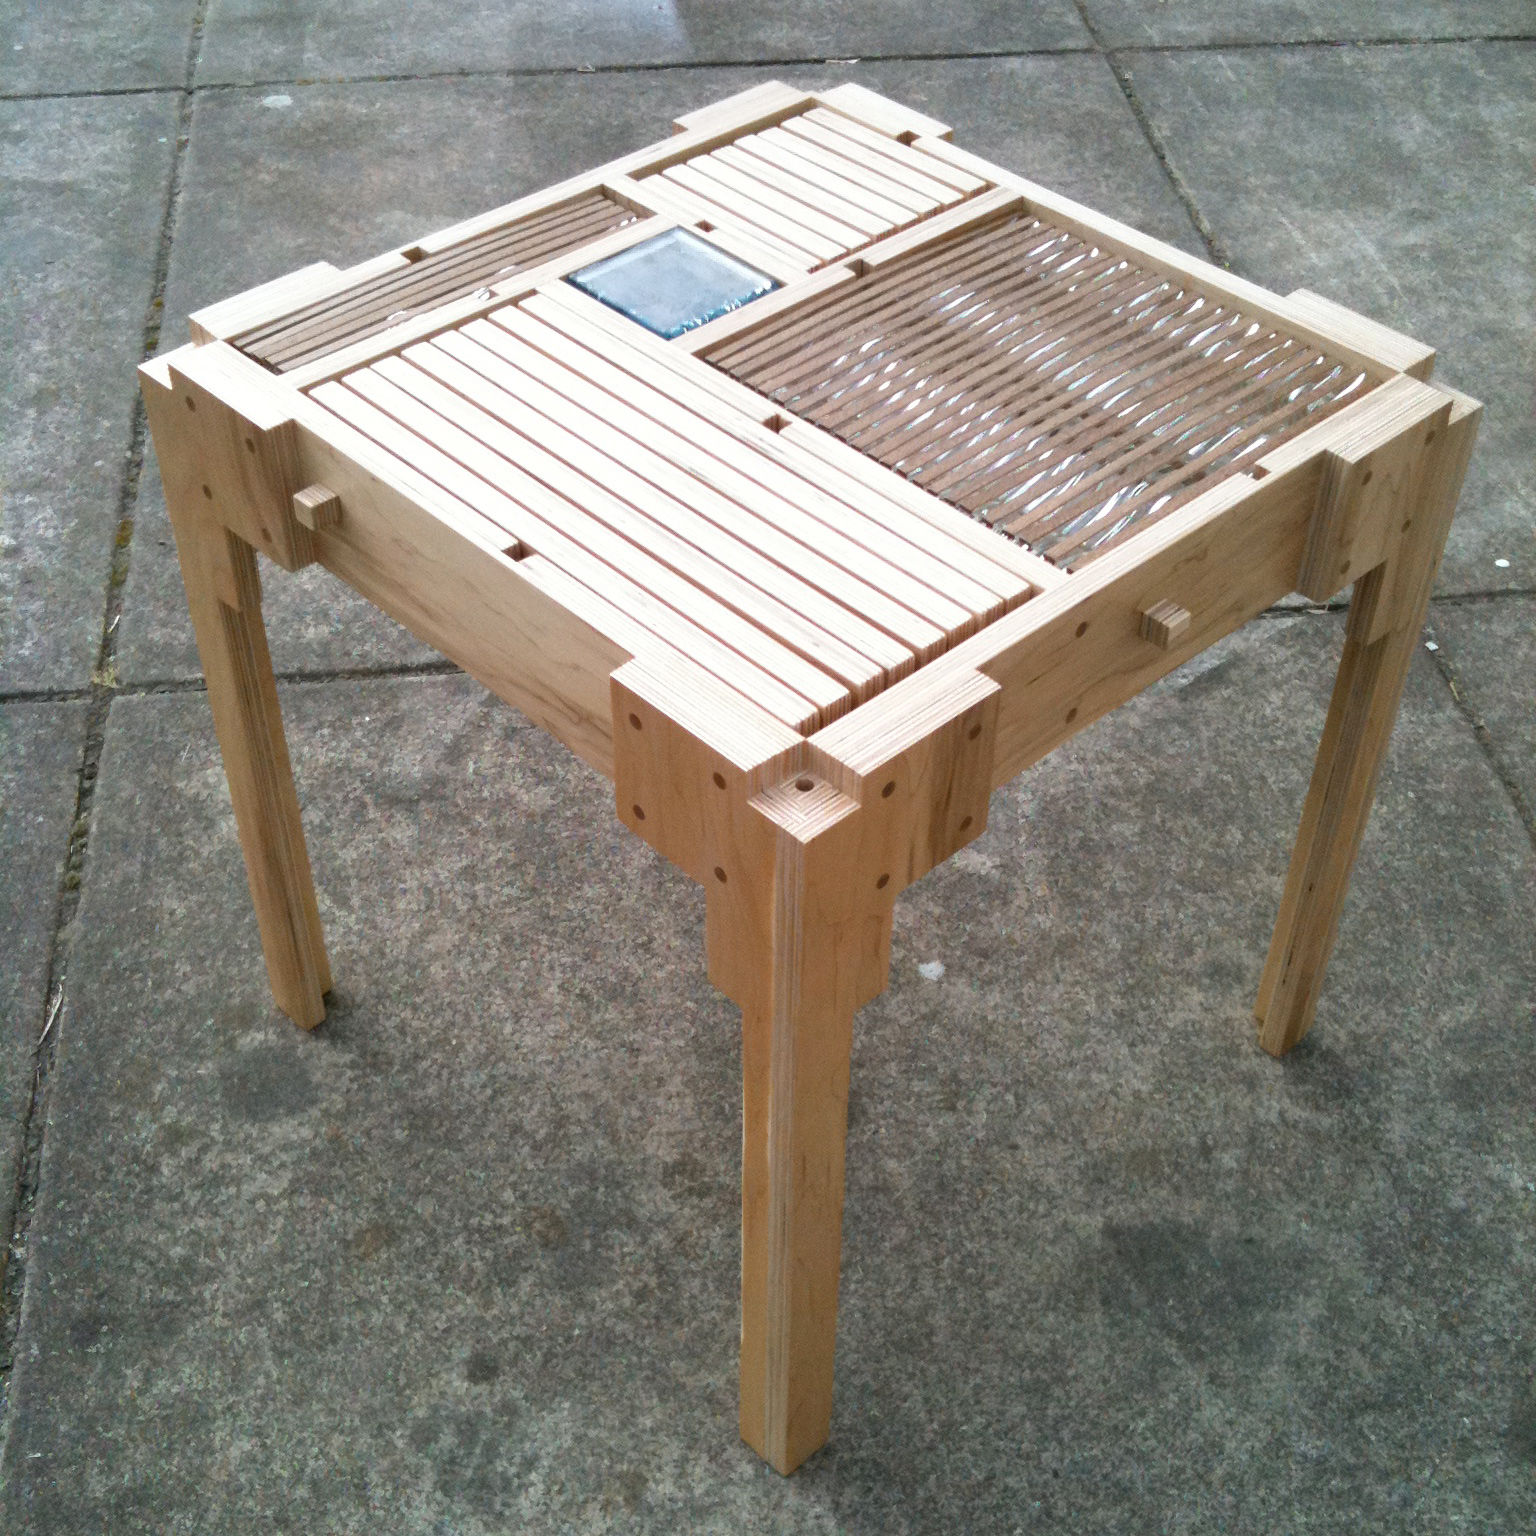
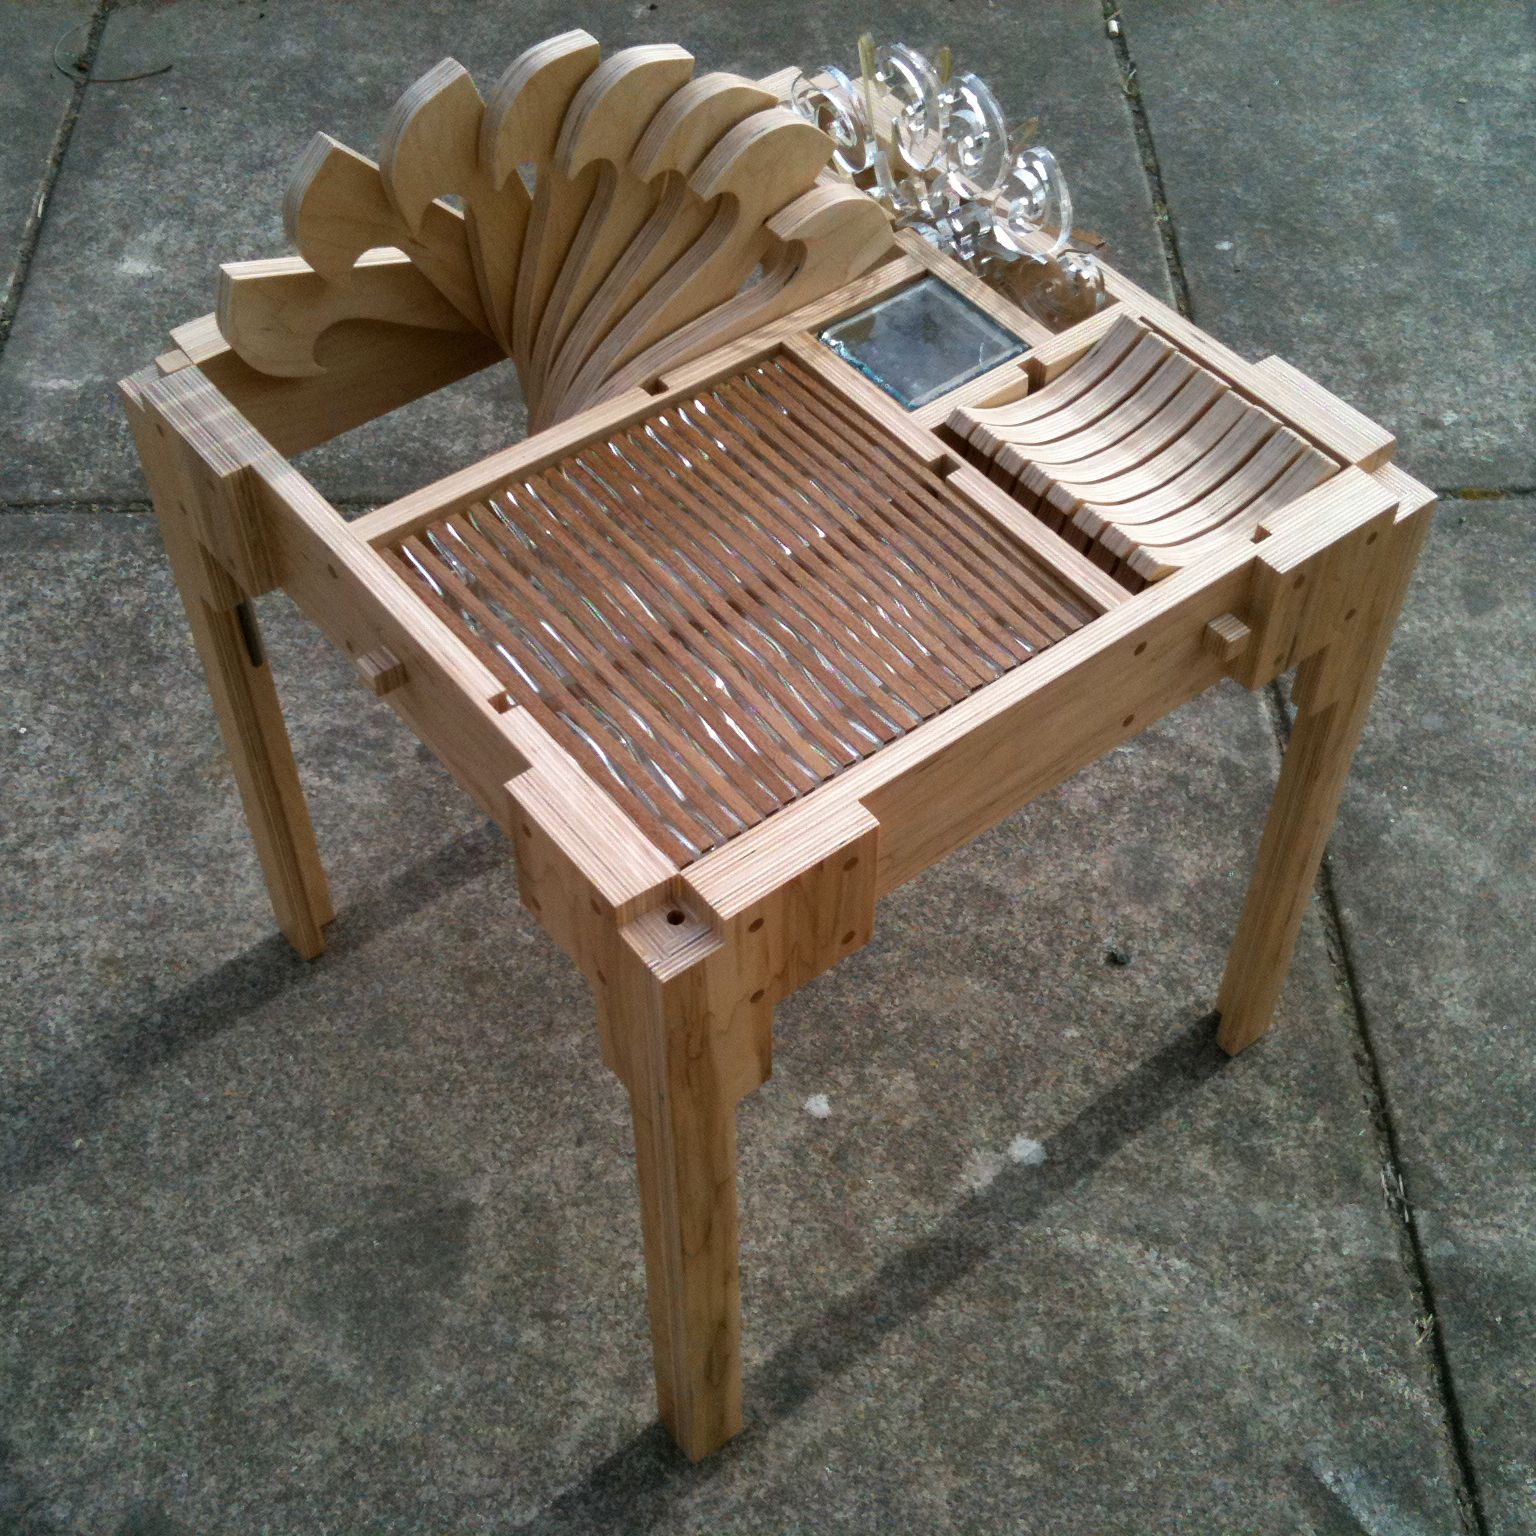
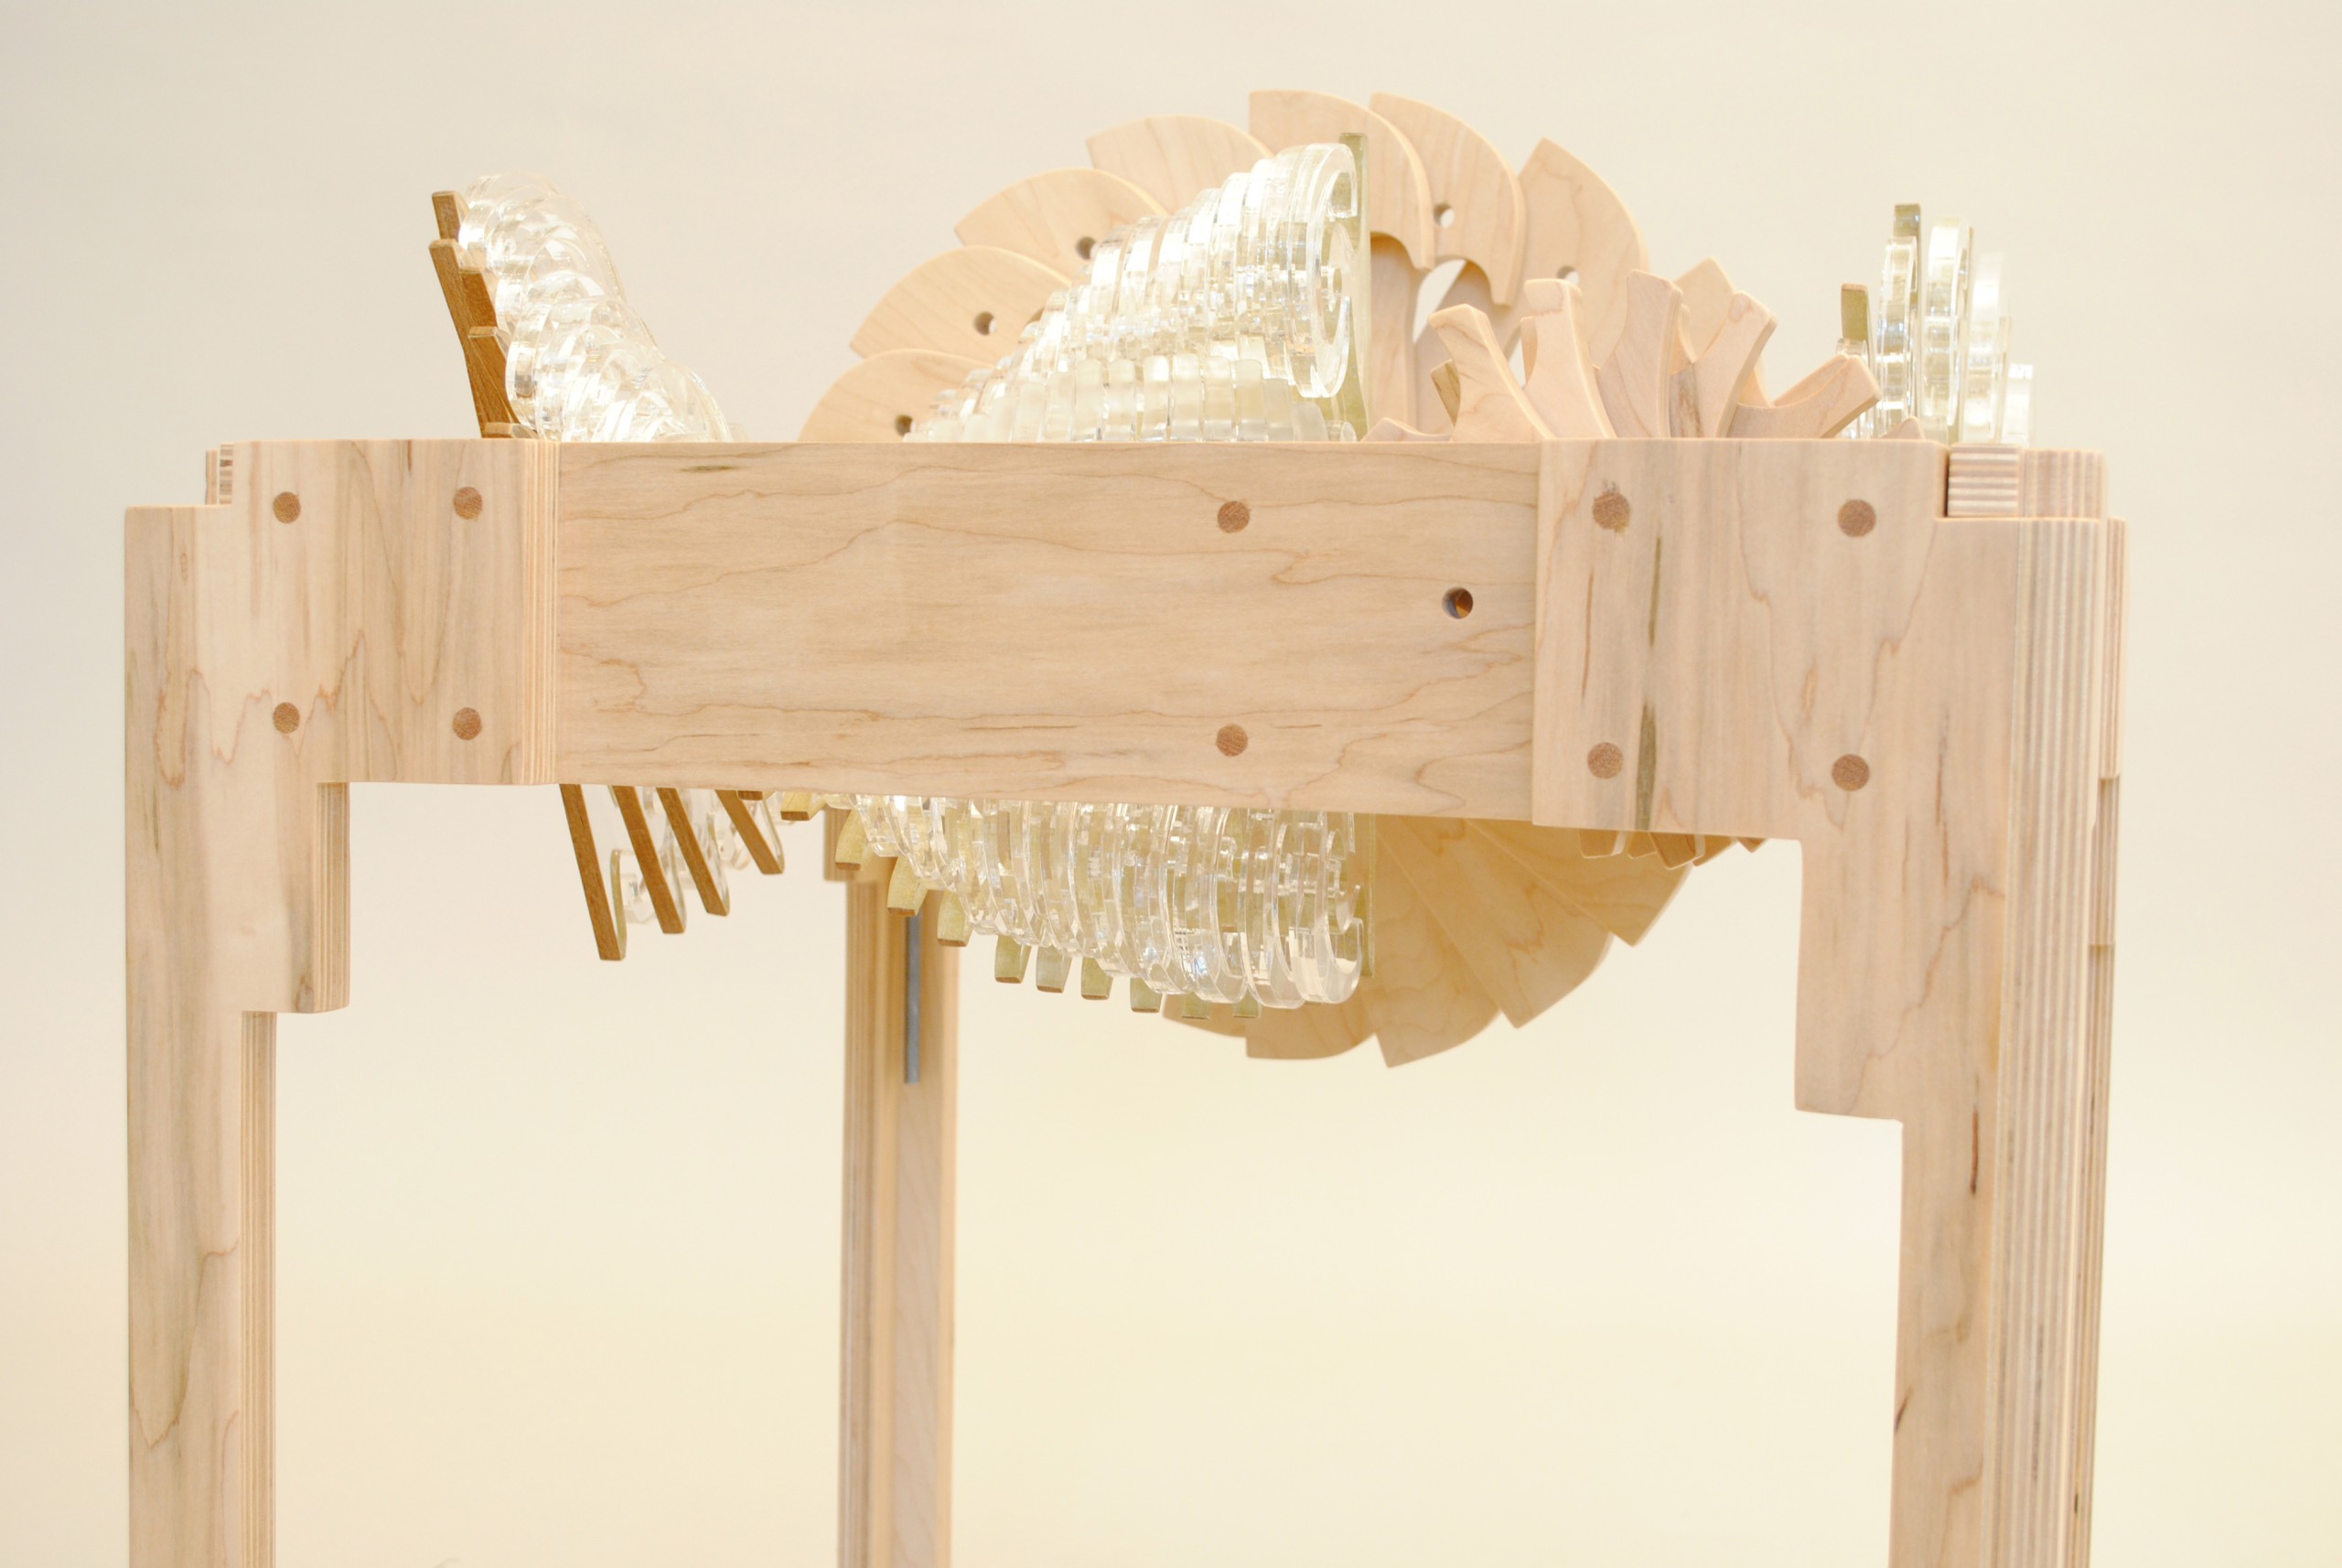
A Table at Rest
Just a cool table, nothing that unusual.
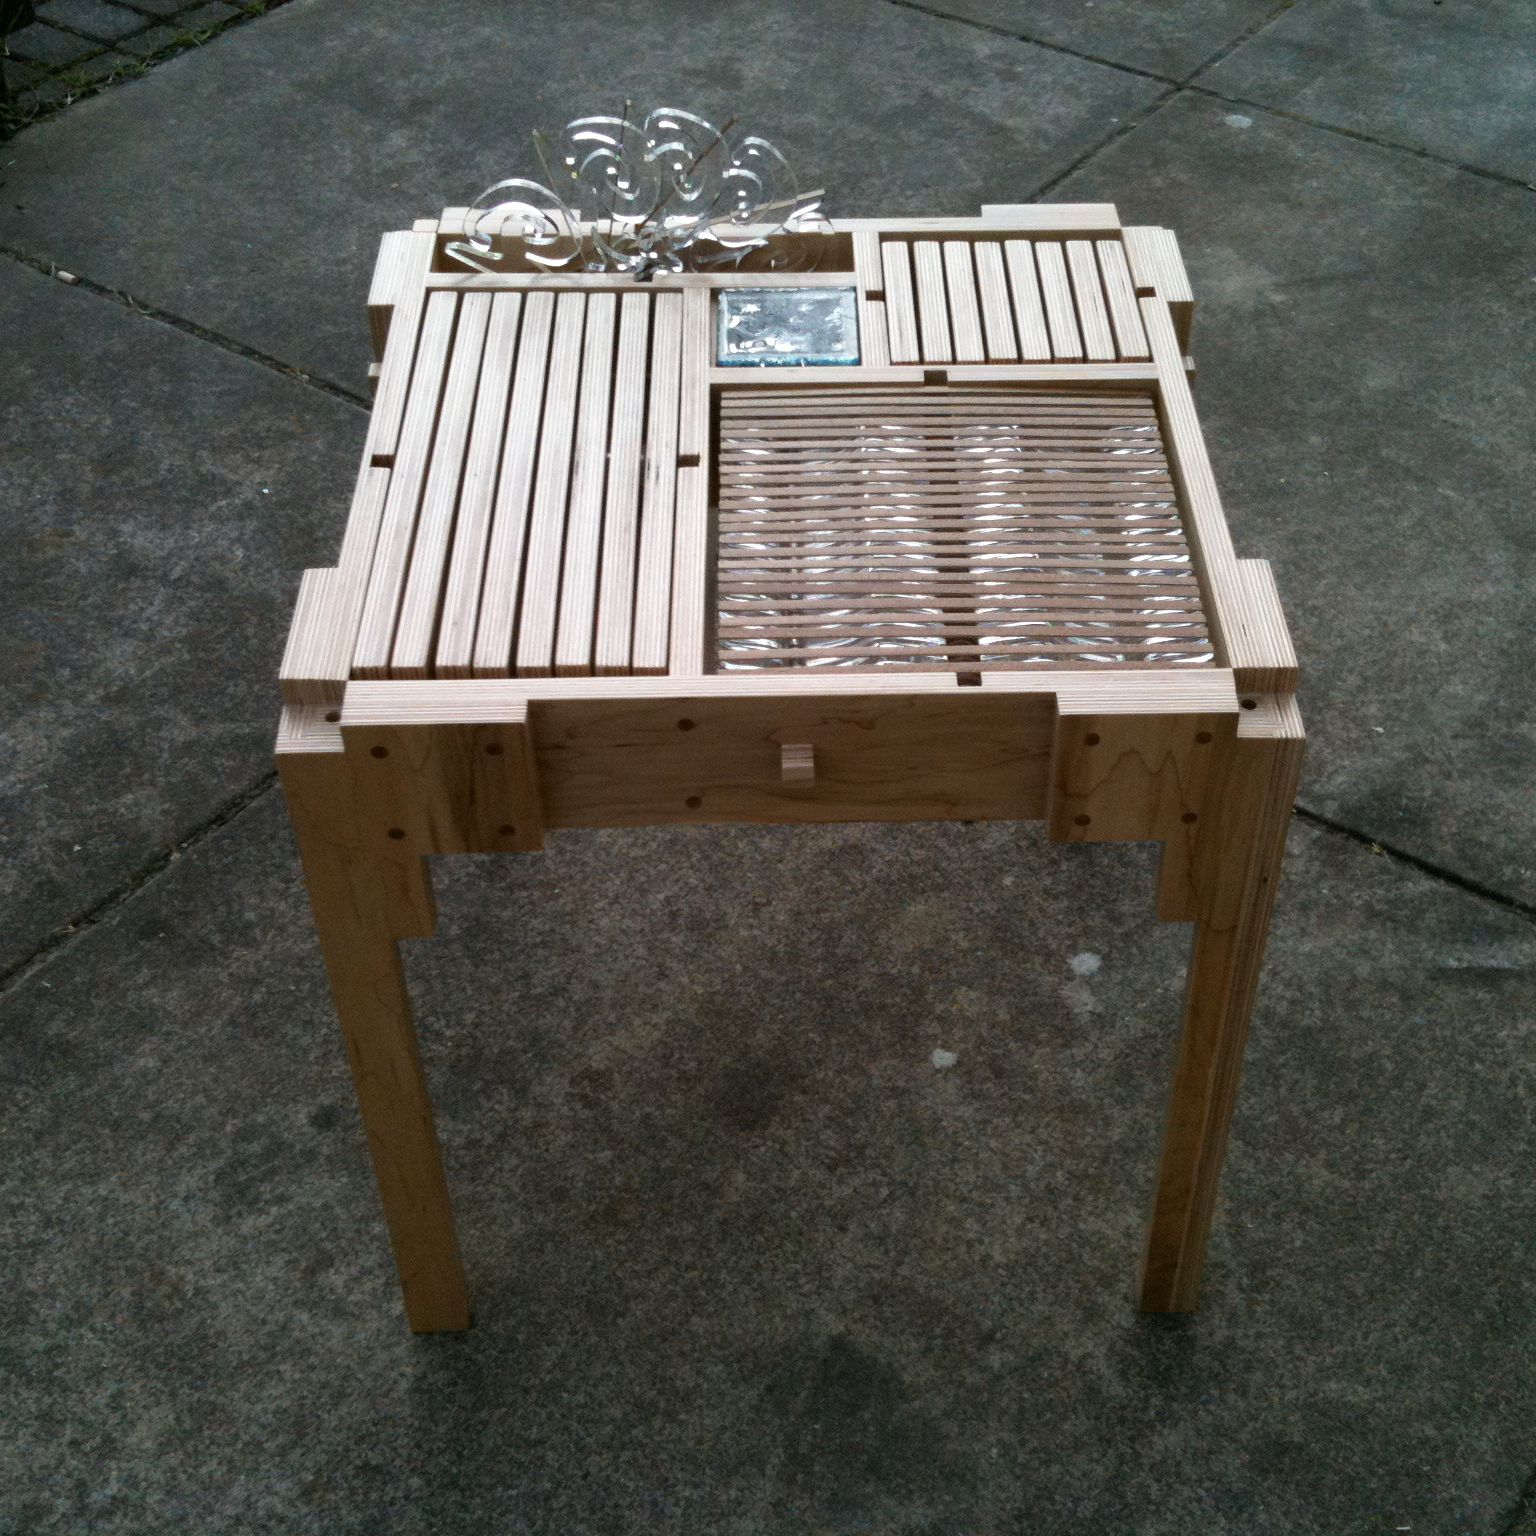
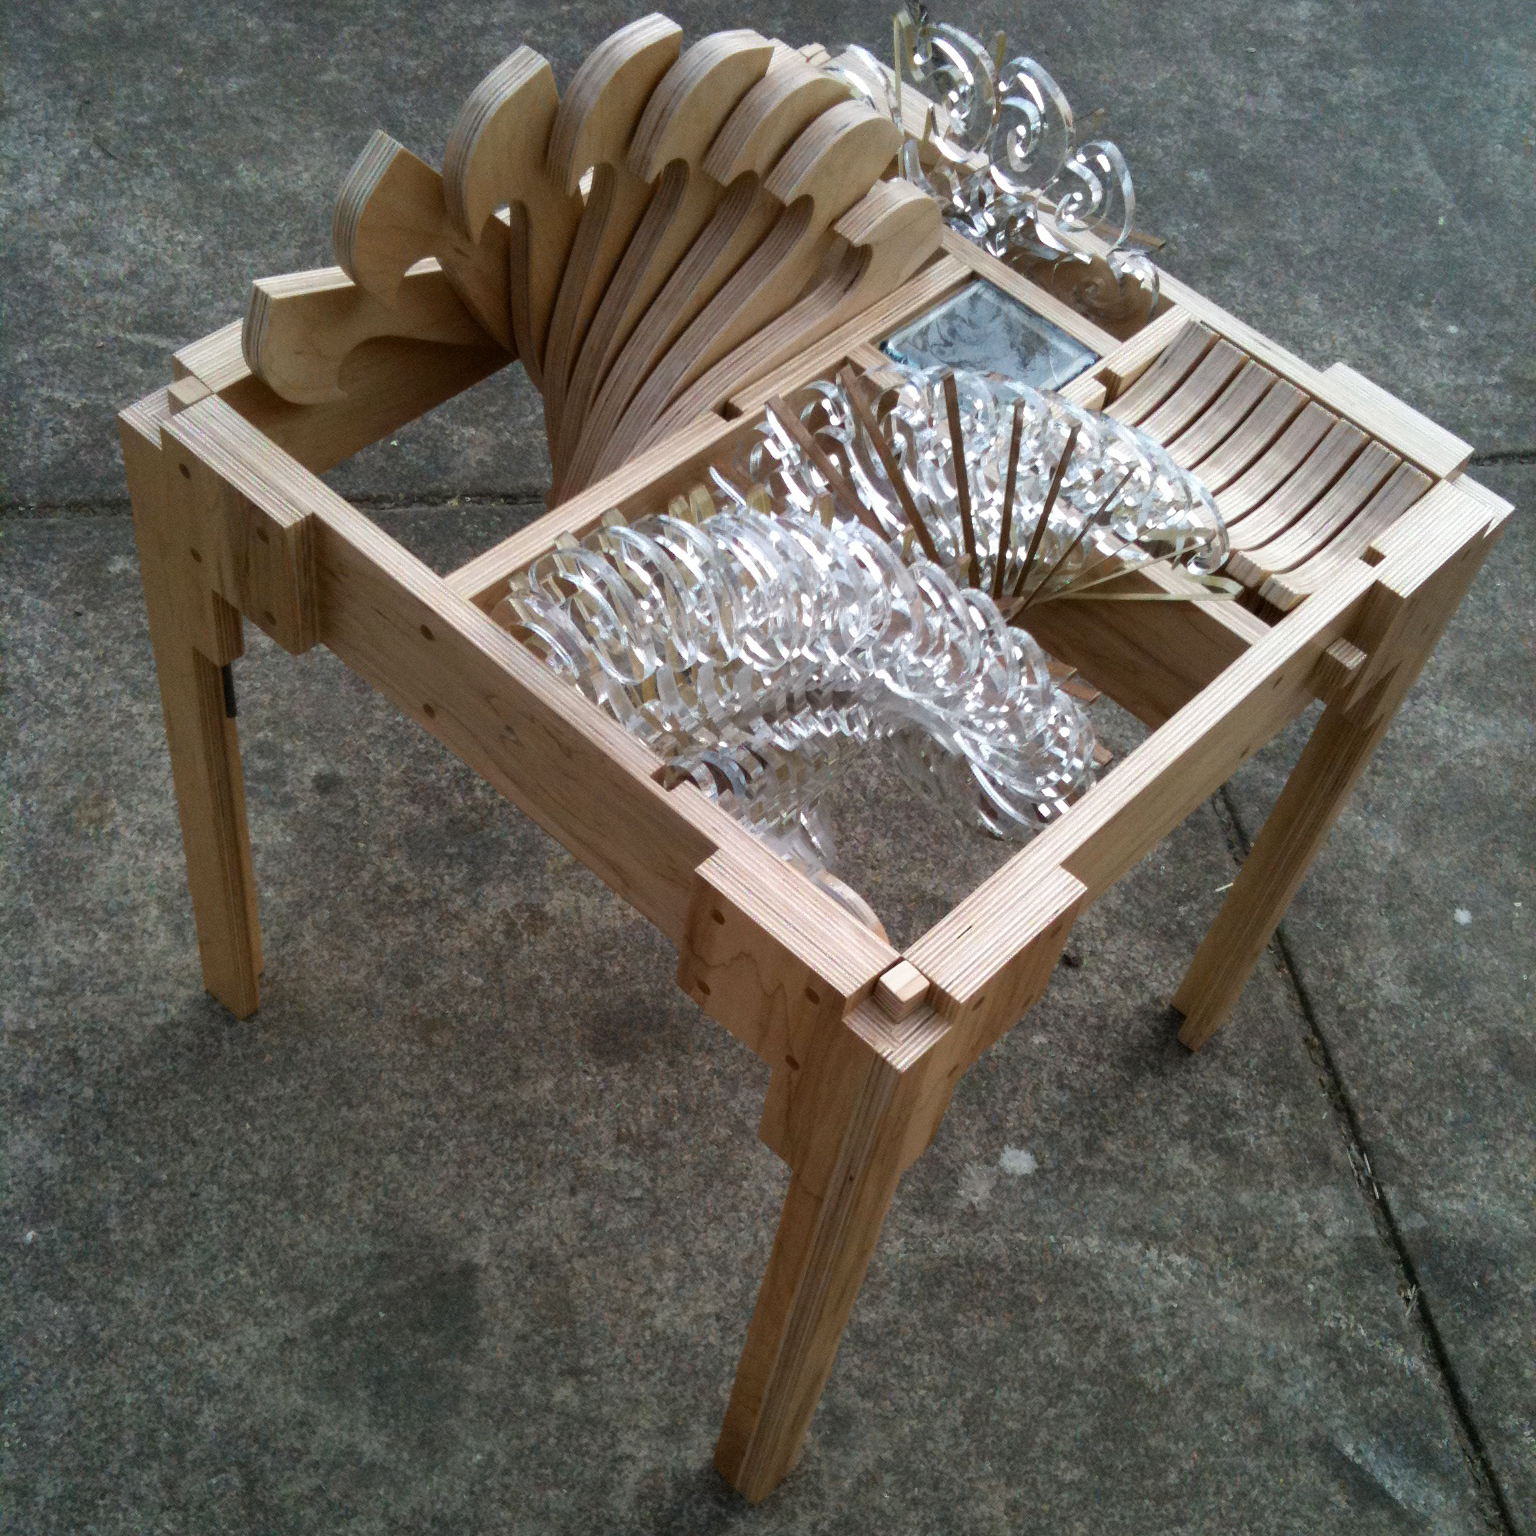
Waking Up
Oh, maybe just a little something stirring...
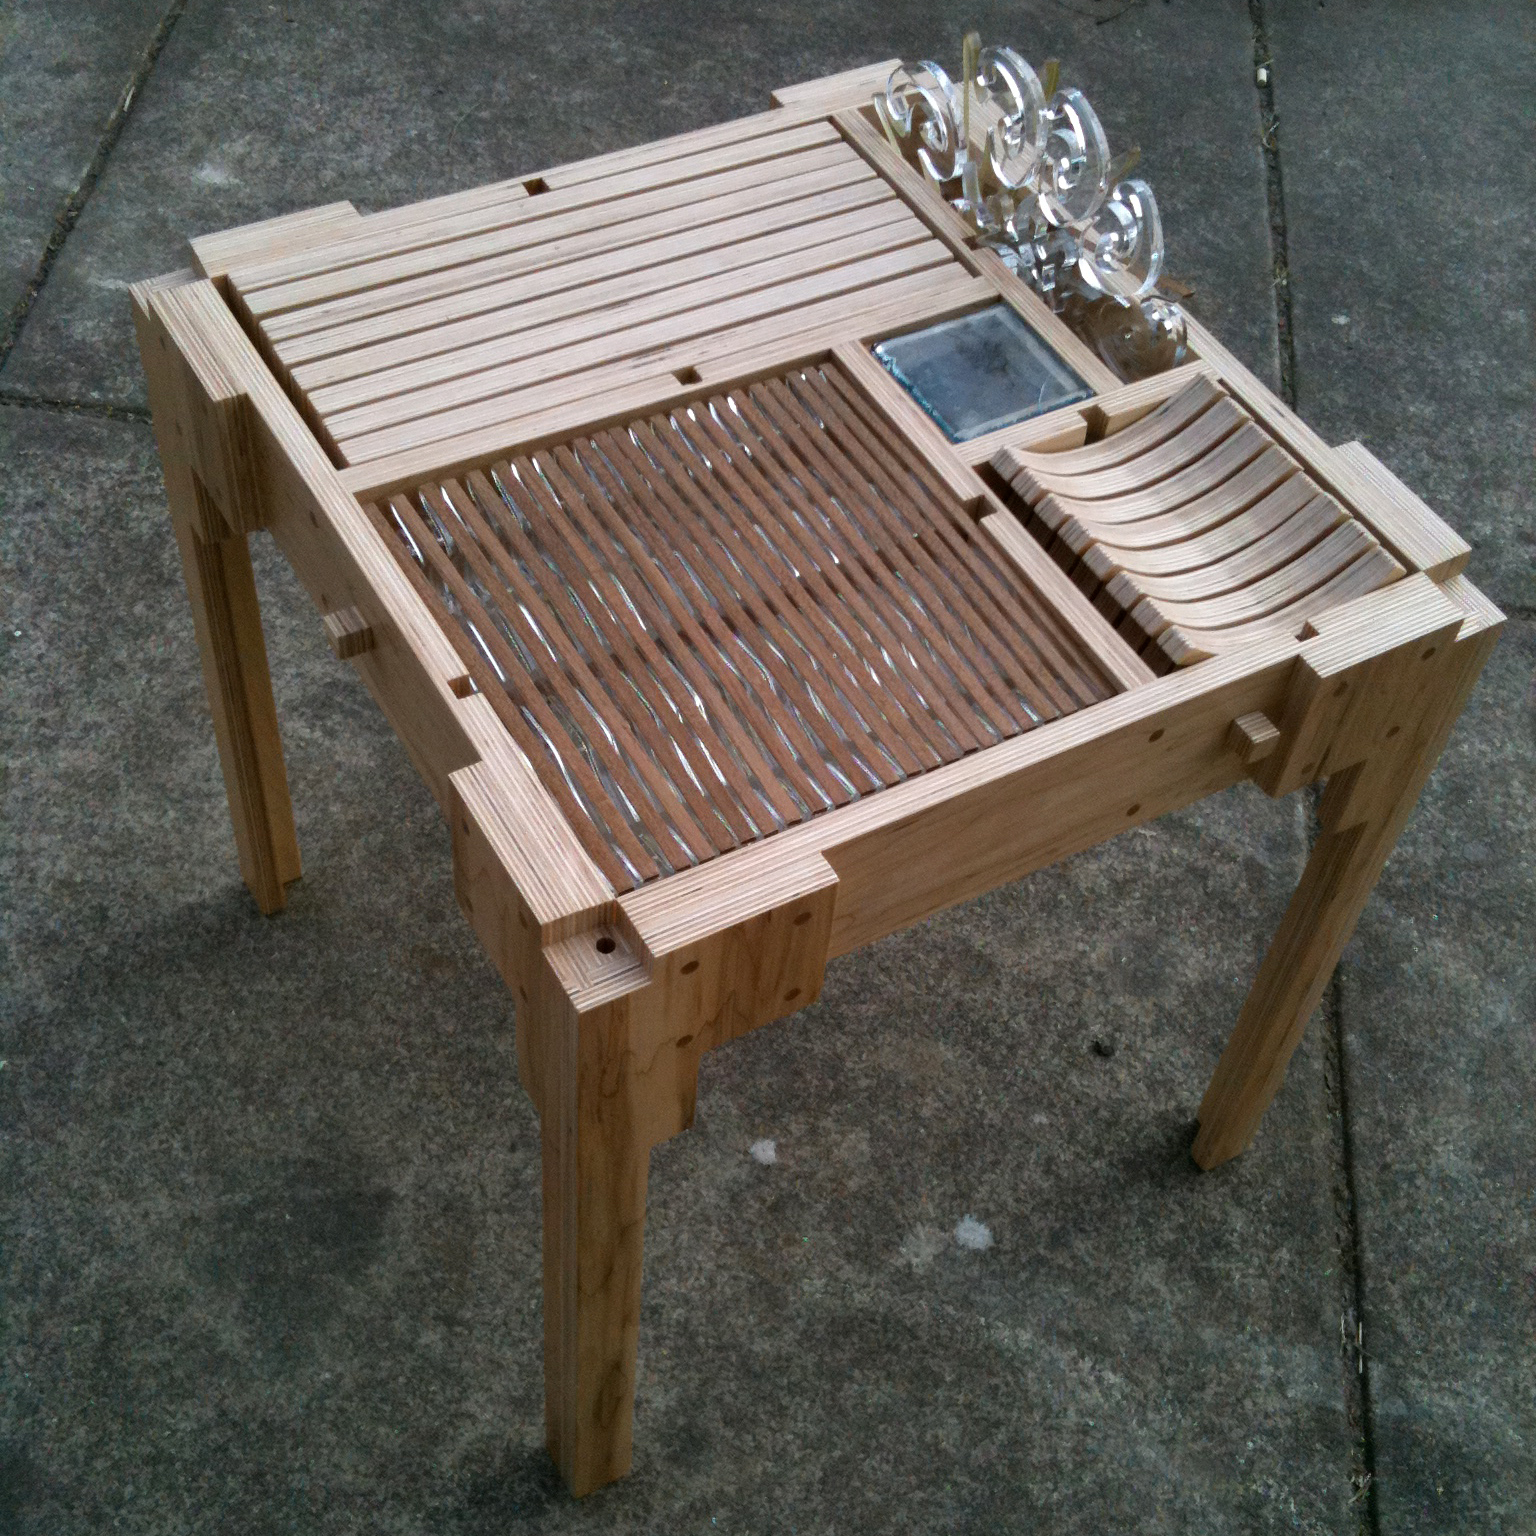
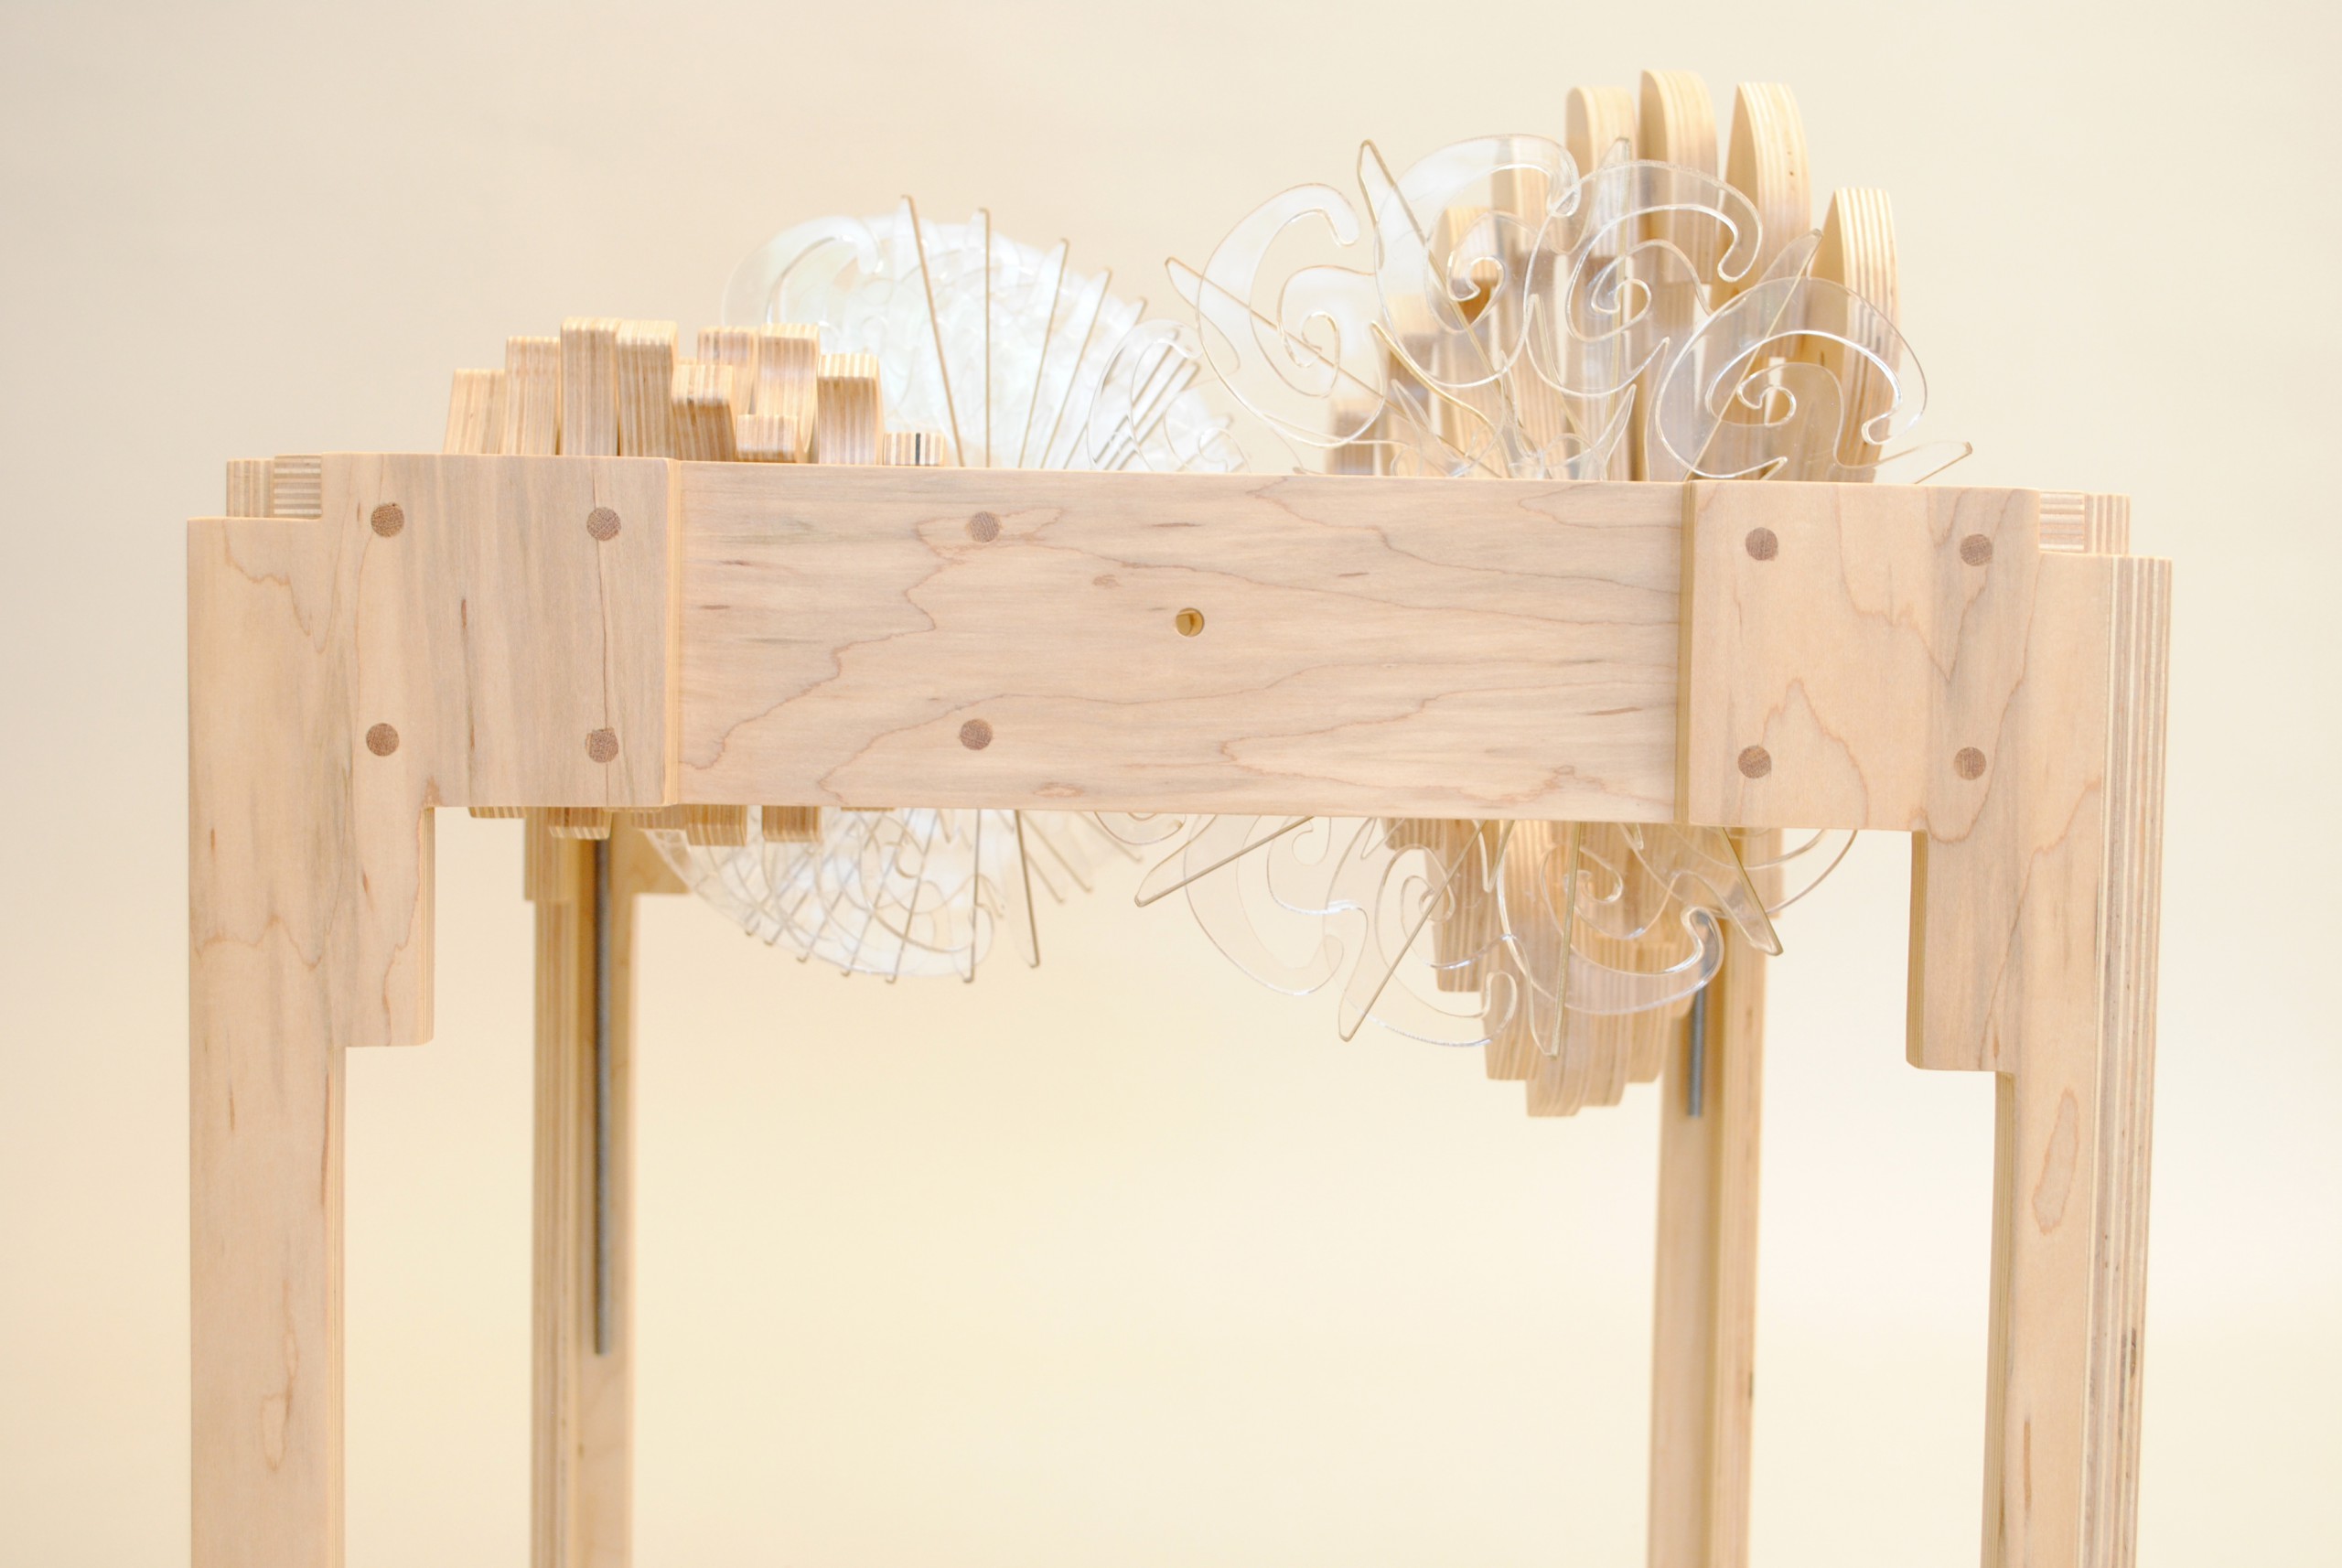
Maybe a Stretch
Oh, wait, more is happening…
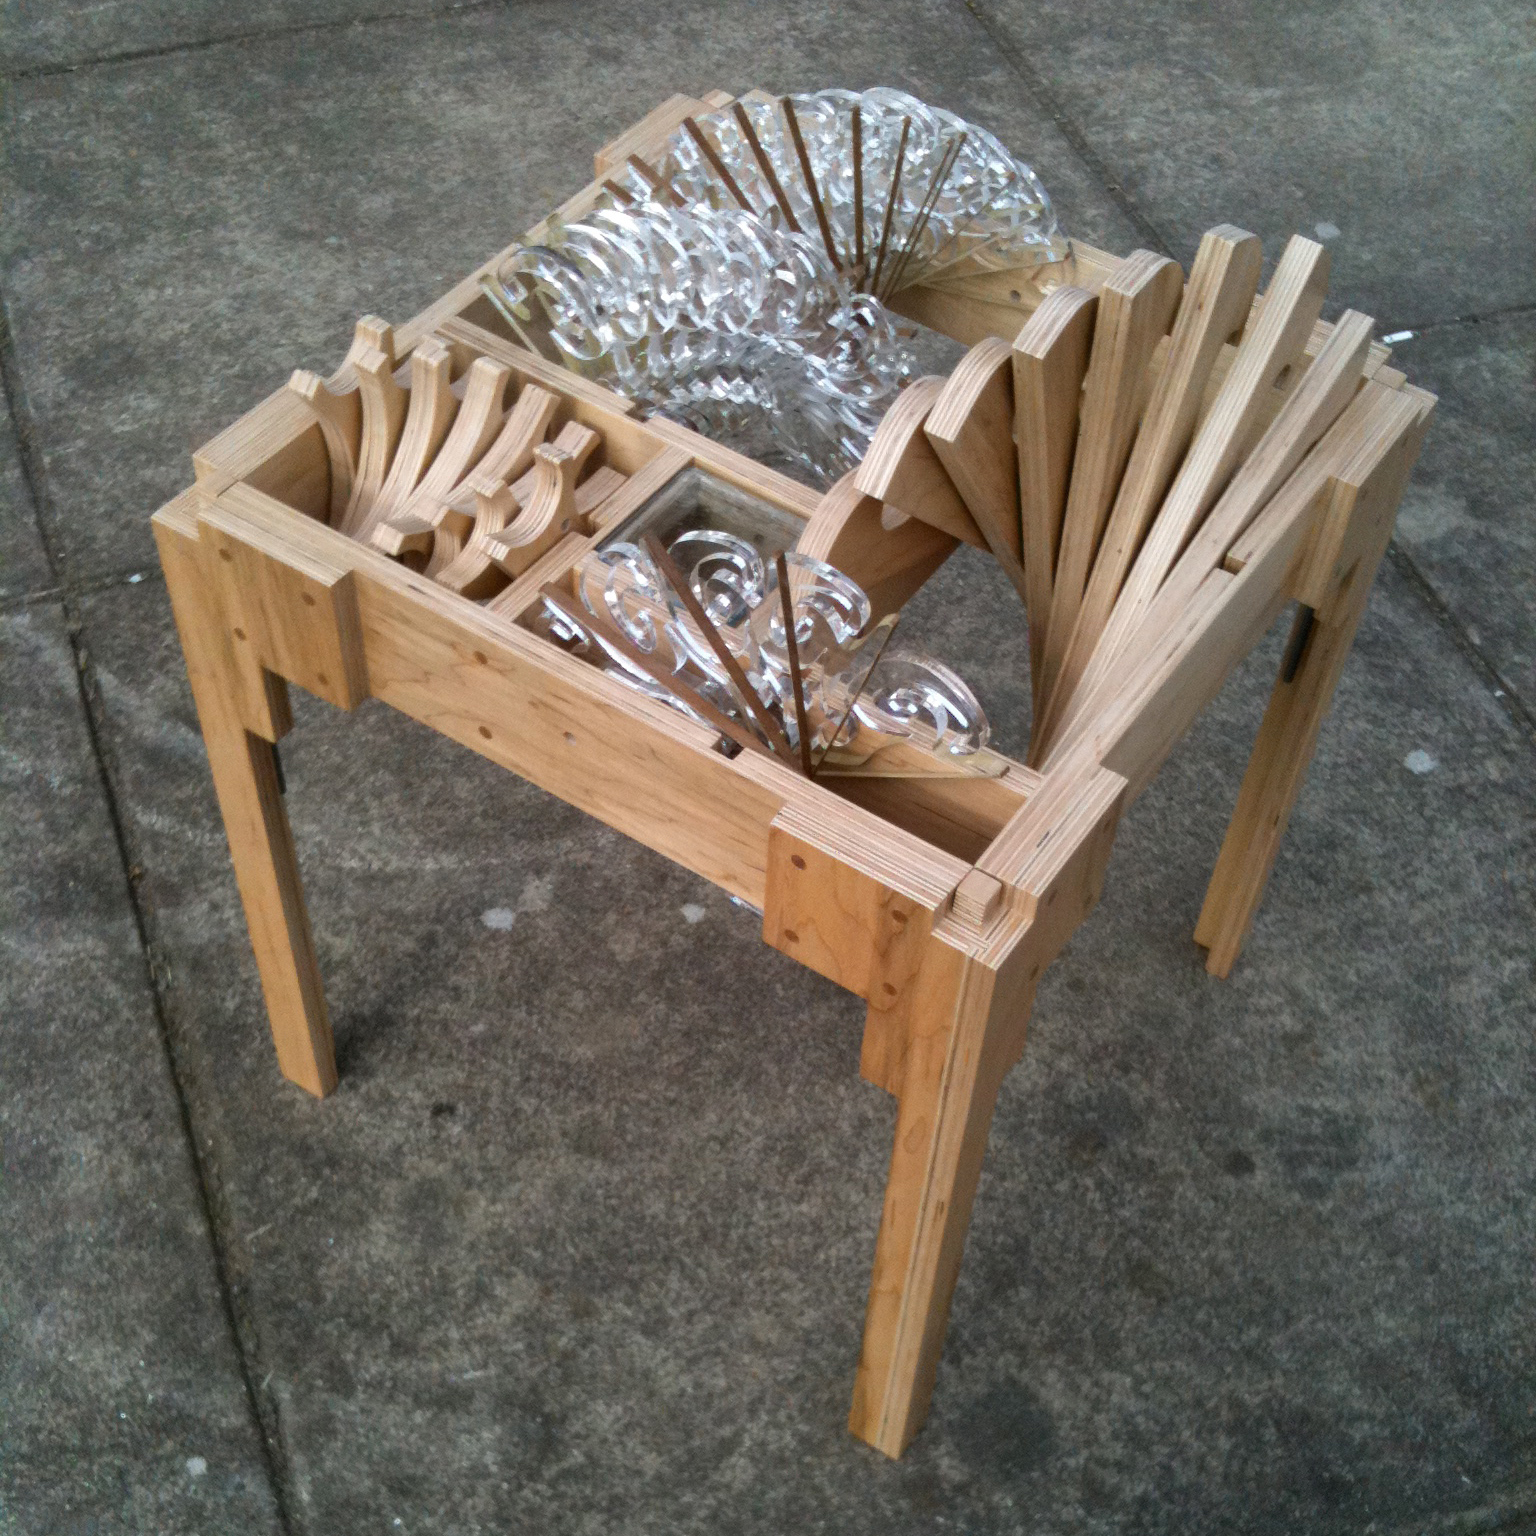
It’s Alive!
Uh-oh. Should I be alarmed?
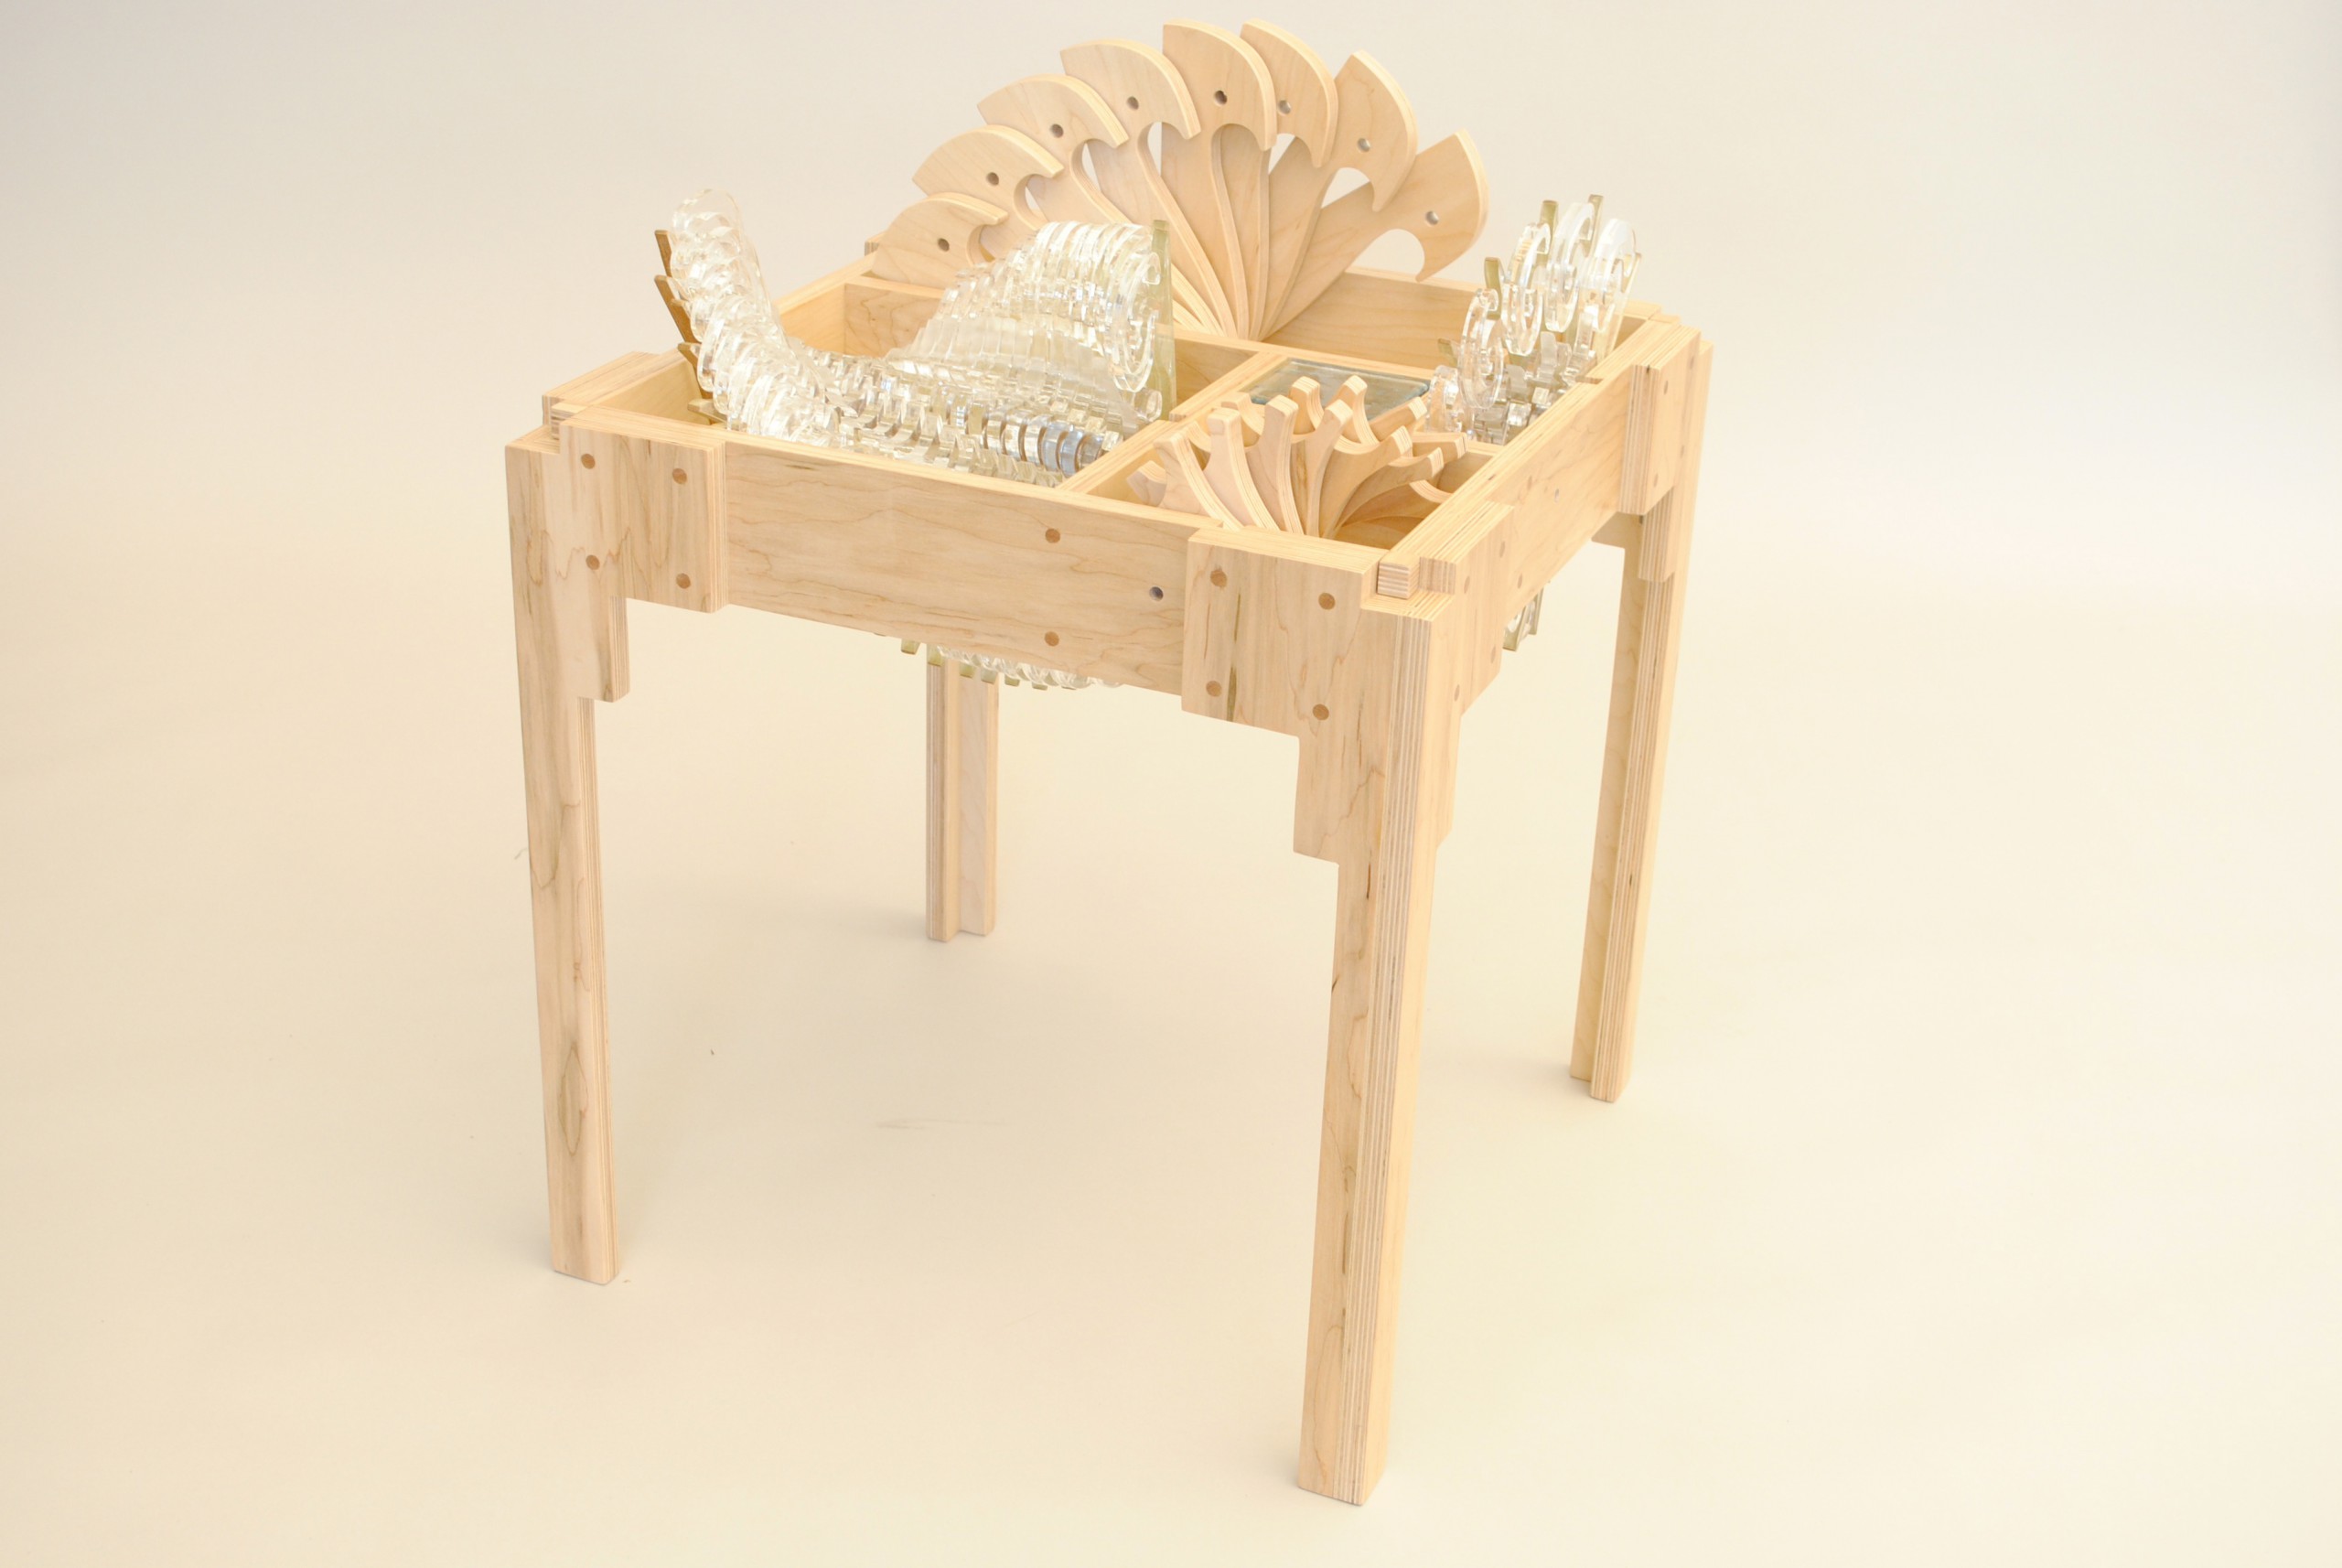
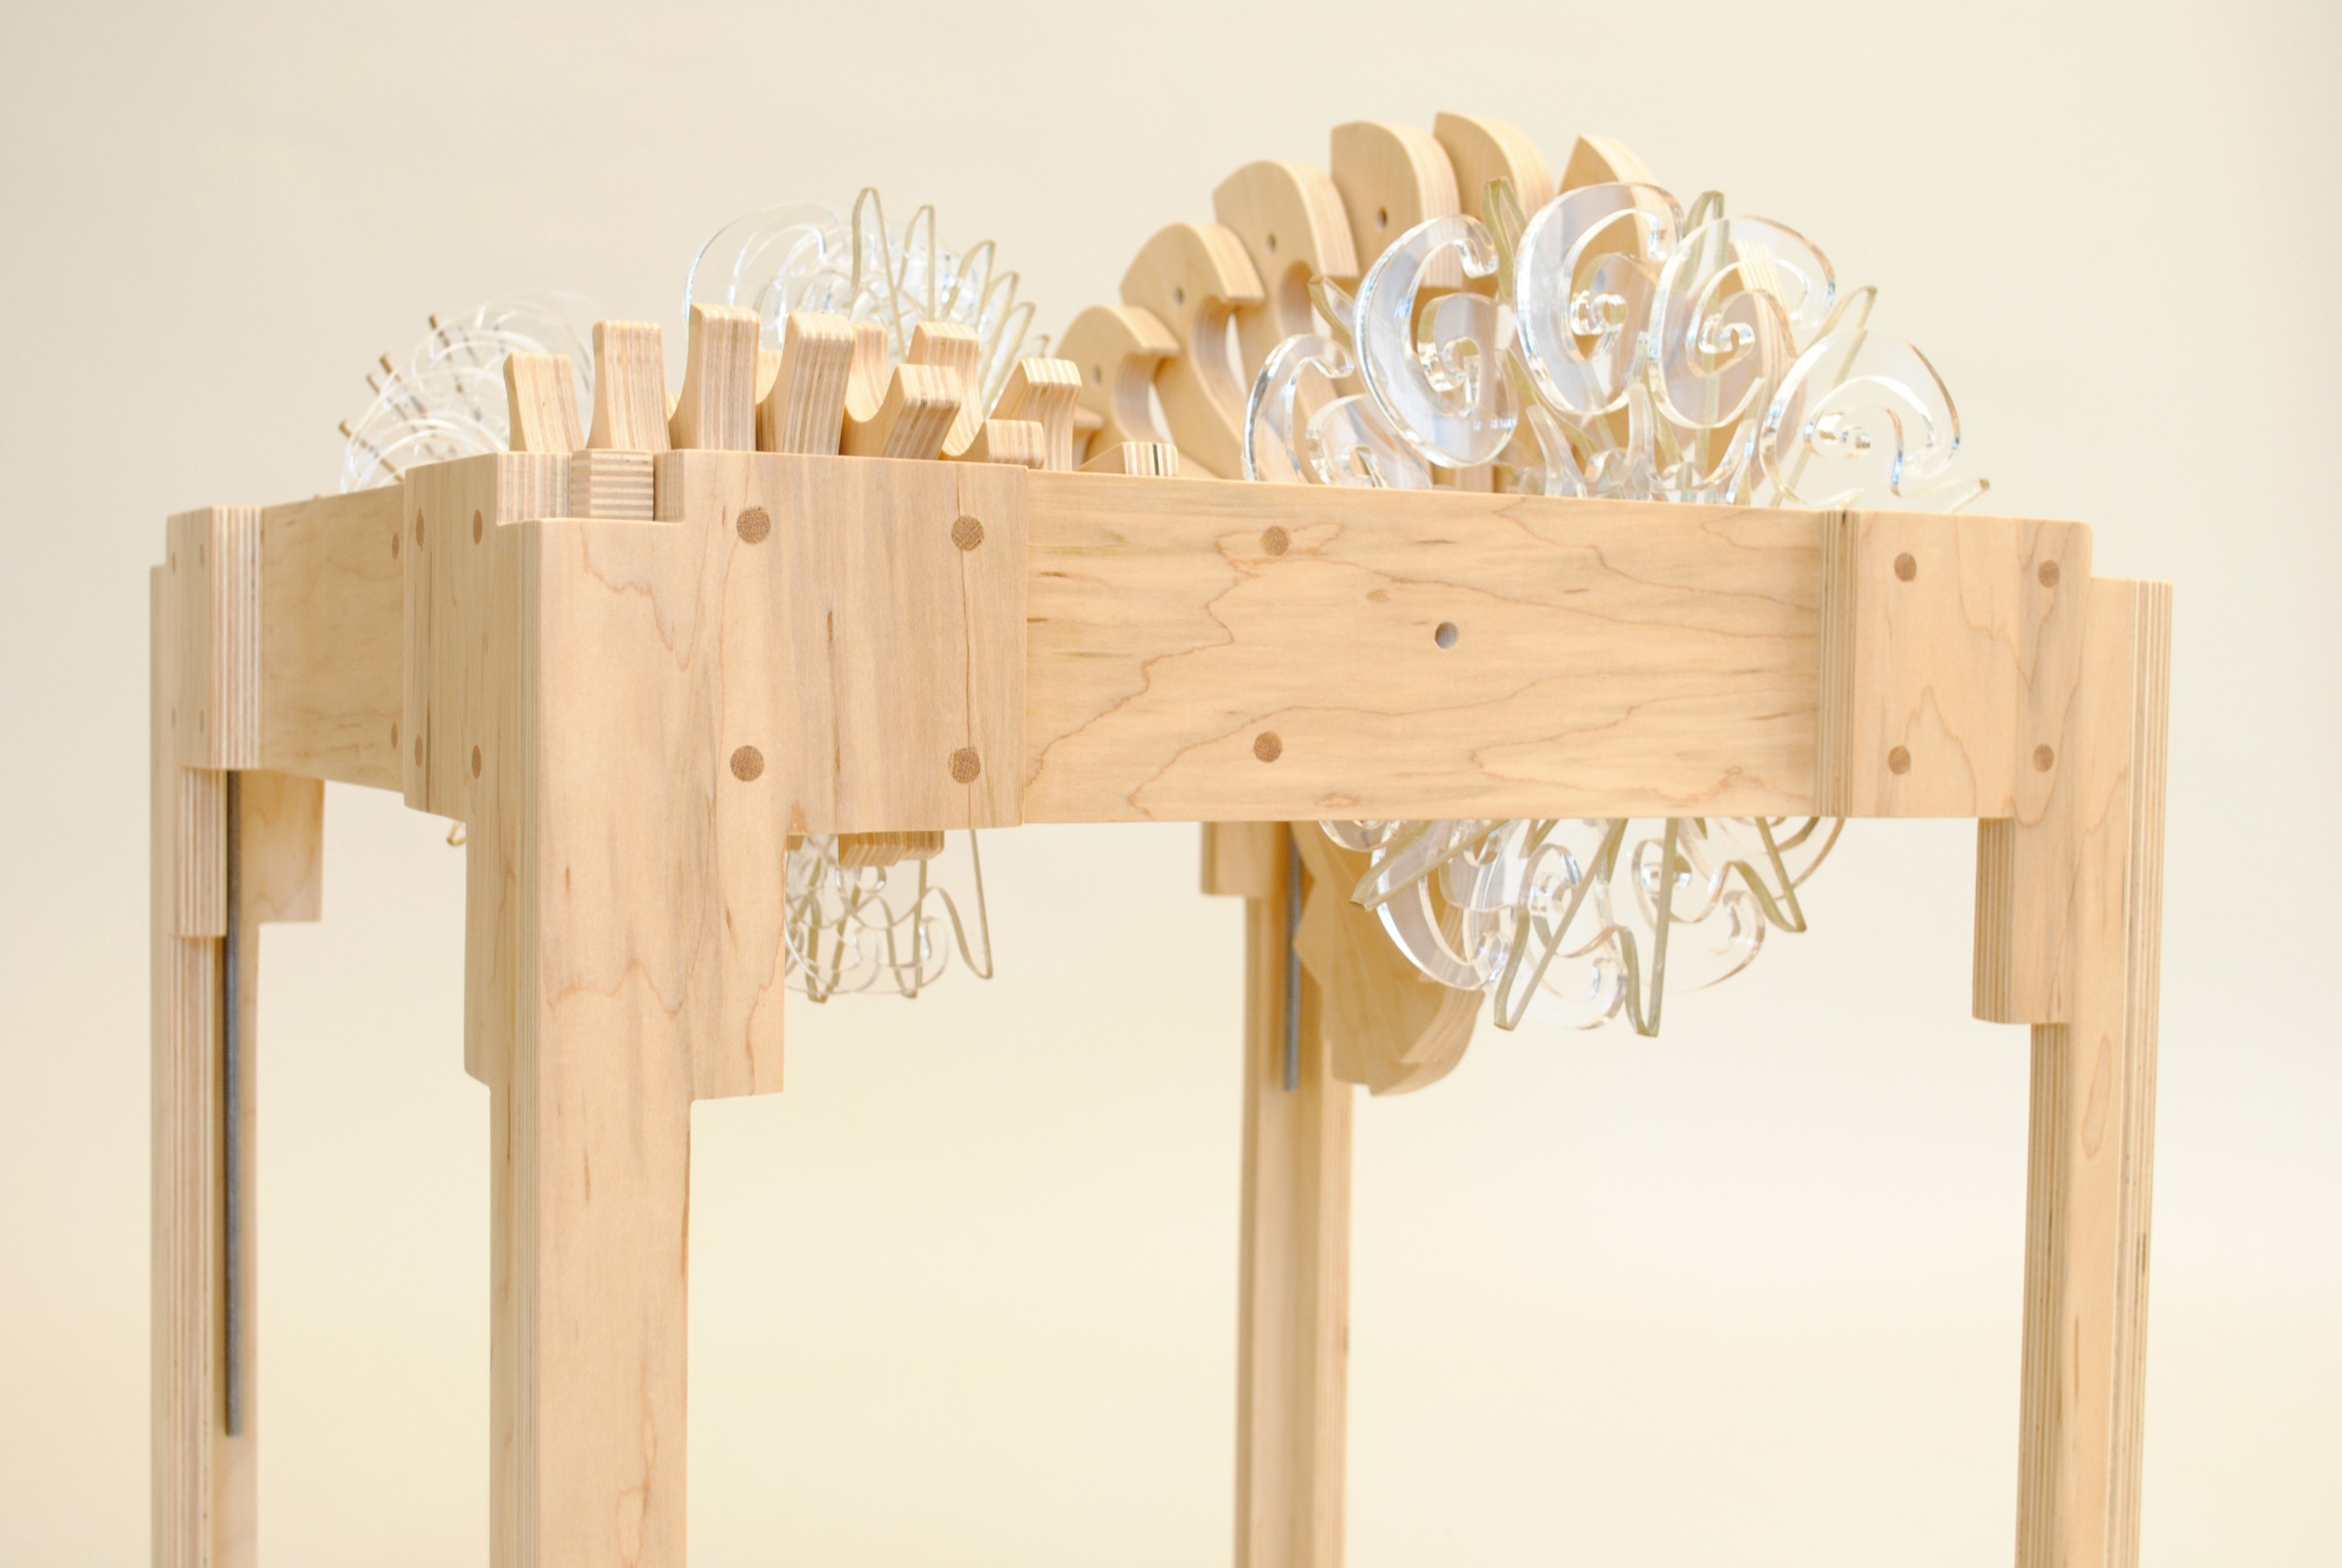
It’s Party Time
While we’re at it, let’s do this, too.
Revolution!
Yep. Not just a side table, anymore.
I'm so glad that I kept such a tight schedule on this! There are still people in the shop feverishly sanding and putting things together, and we present tomorrow. Those pieces definitely will be shown with out a finish on them, I guess. But, not this one, and I think it's totally chill if I'm proud of myself for it.
I've learned a tremendous amount this term, and it's not only woodworking skills and project management. More importantly, the opportunity to design something at a completely different scale than the standard mixed-use buildings they have us do so often, has been invaluable. Good designers design at all scales, and I think the school would be wise to make the furniture design studio a requirement not an option. I'd recommend it to anyone.
March 12, 2010
Finally, Ladies & Gentlemen: The Stealth Whimsy Side Table
Well, after the presentation and photoshoot, I'm finally done! The long haul paid off. I give you, the Stealth Whimsy Side Table, taking part in a little slice of revolution!
We’ll Call It, “The Soft Opening”
Time for the glamour shots, baby.
Look to the Left
Mm-hmm, looking stylish.
Now, Look Right at Me
Work it.
And, Look to the Right
Now, spin! Nice.
Now here's the tough choice: celebratory drink, or celebratory nap? Perhaps both. Thanks for following along on this journey with me! Cheers!
Of course, if you're hungry for more, or just want to see how it looks in the portfolio, then pop on over and have a look.


