

Product
Wedged Walnut Cabinet: Design Process
A consolidated collection of posts on the design process of the Wedged Walnut Cabinet, a one-off piece of hand-built furniture designed to become a modern heirloom. From early conceptual sketches and schemes that didn’t make the cut, to a final rendered proposal, trace the evolution of the project before it was realized in the wood shop.

May 5, 2011
Not Your Usual Storage
More than any other class, I have been hearing that, if at all possible, I must take the furniture design studio. It's not that I've been avoiding it. Rather, I've been hoping for it. Finally, it is happening this quarter, and (do I even have to say it?): I am stoked. This time around, the theme for the studio is storage. Of course, we aren't talking boring bookshelves or standard drawer sets here. The whole point is to take it further, to make something that is well-designed, and meaningful – something that hasn't been made before. And so it begins: we will all design, then build, our own furniture pieces, all in a matter of a few short months. I'm ready. Let's do this.
Below, for your reading convenience, I’ve consolidated the collection of furniture design process blog posts about the Wedged Walnut Cabinet into just one post, sorted within by the date of the original blog entries. Enjoy!
April 5, 2011
It All Starts with Sketching
Quantity, Not Quality
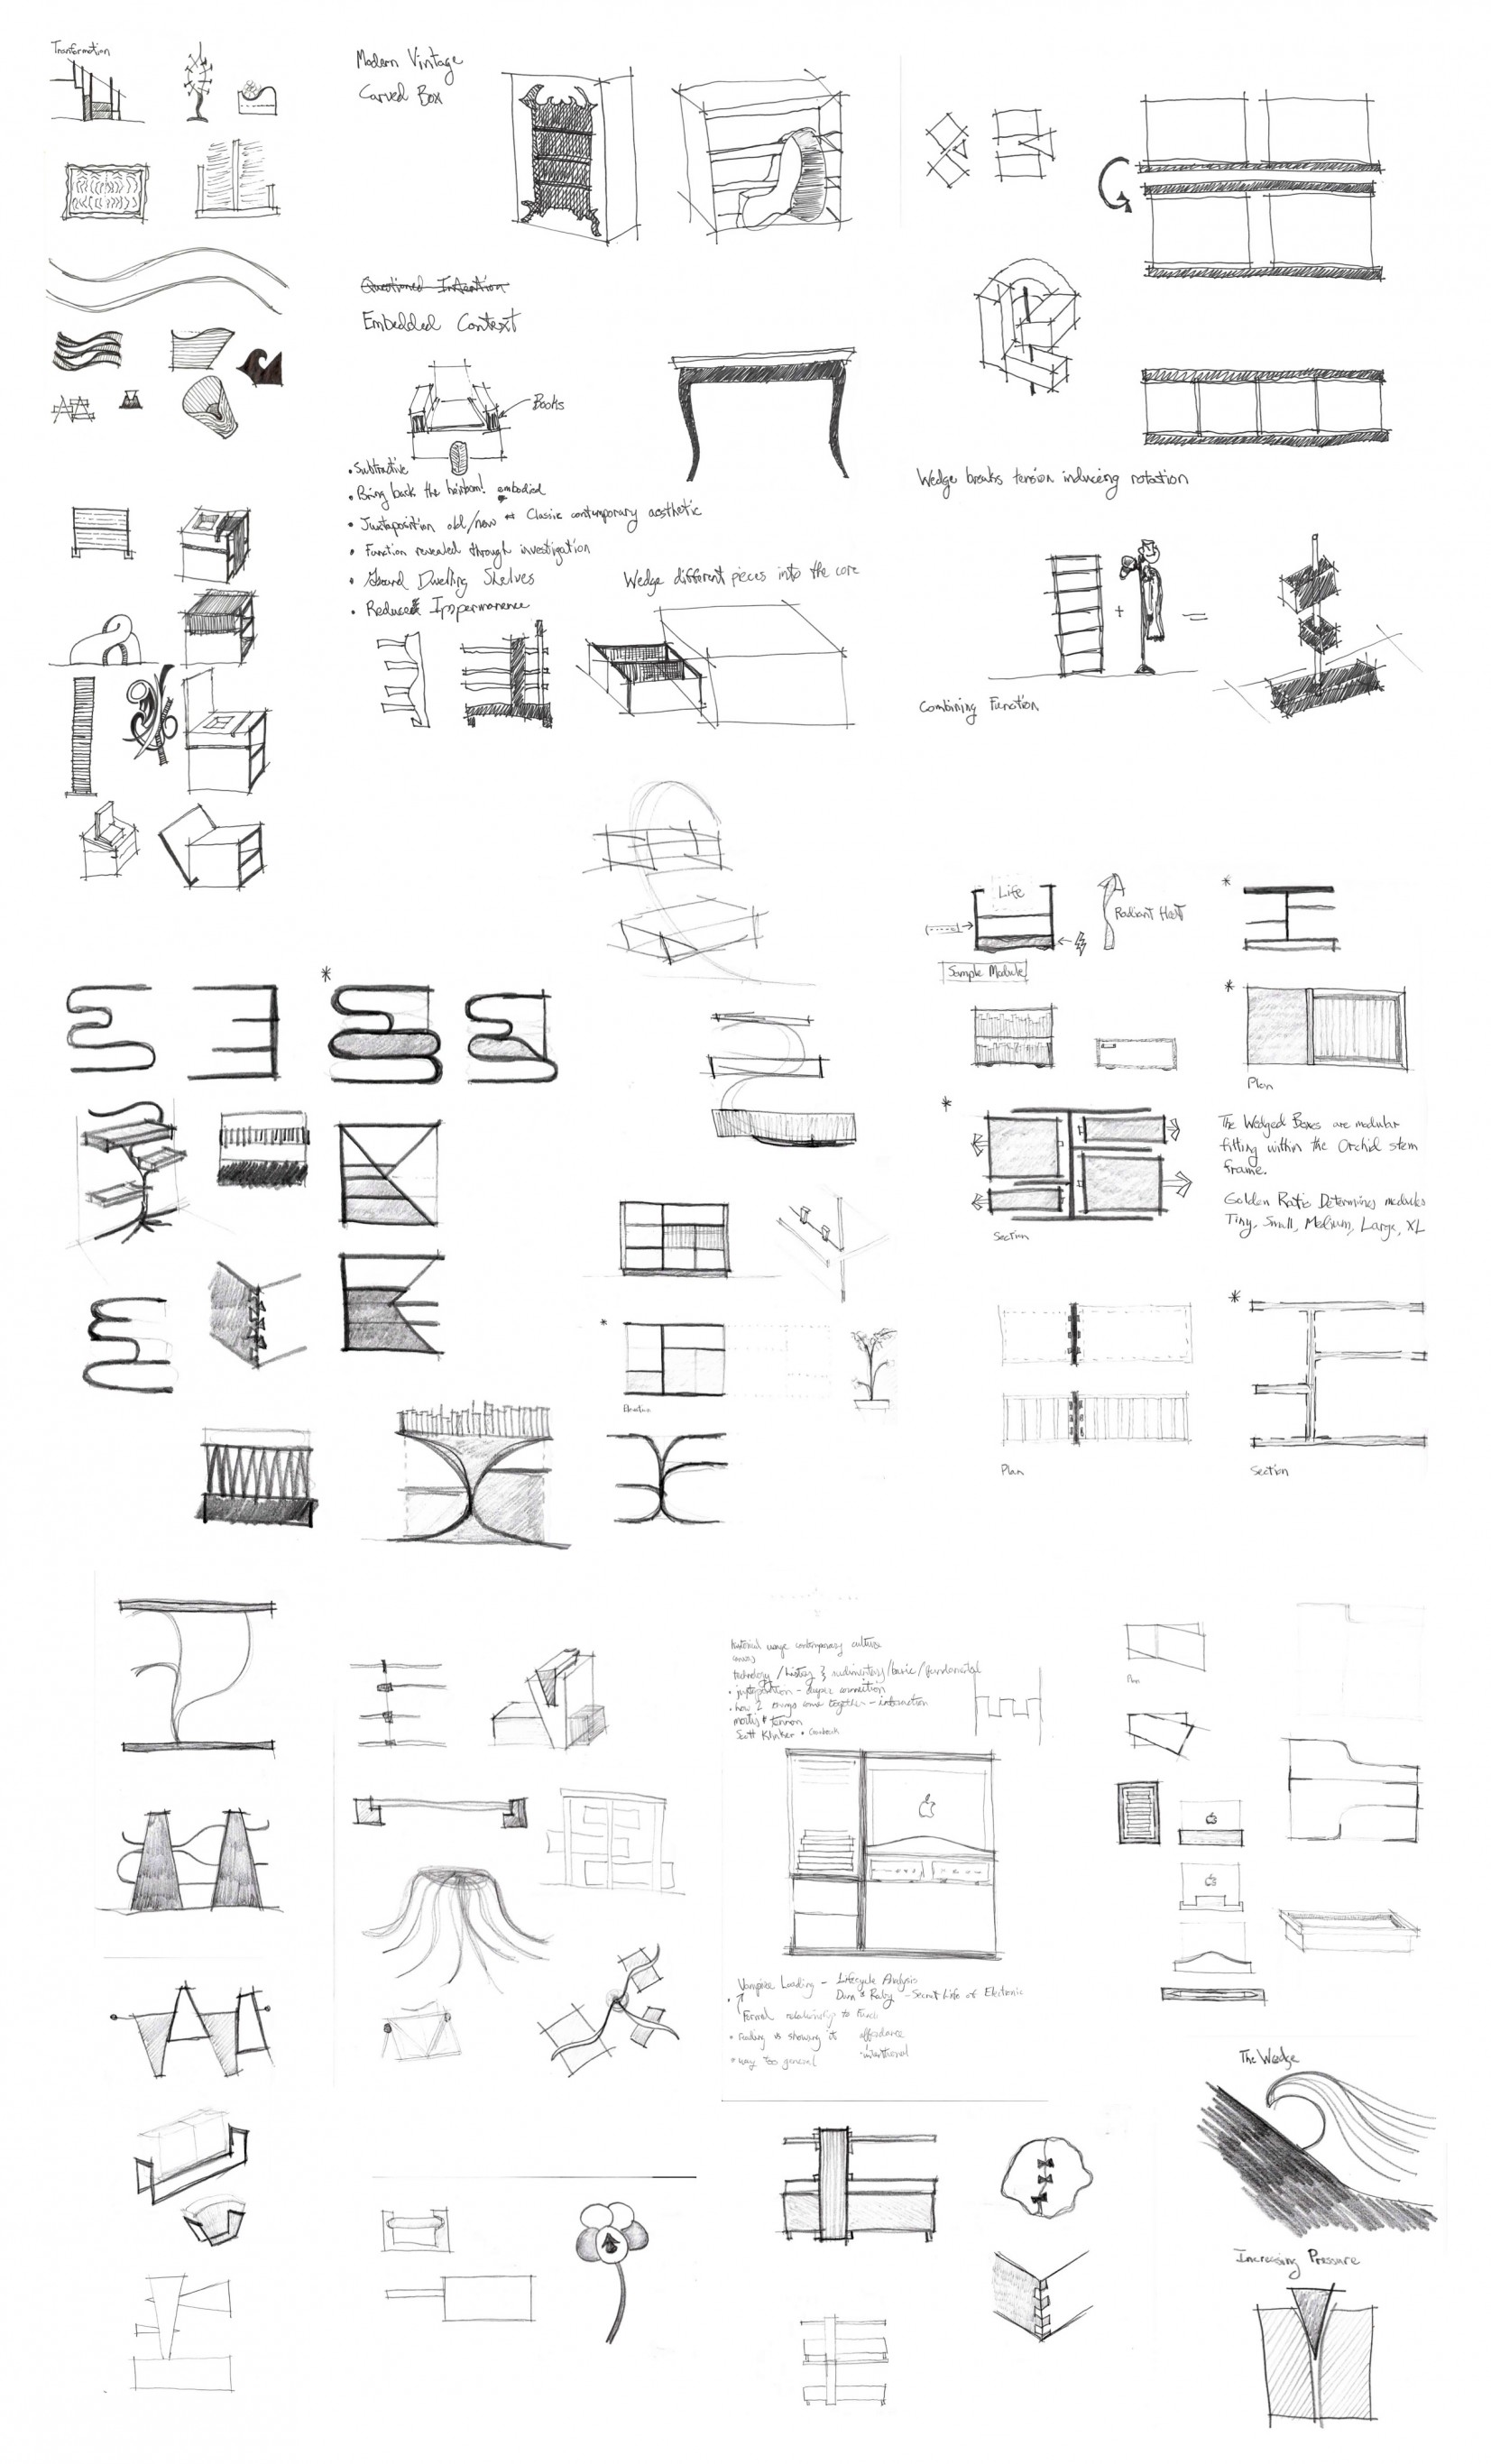
Our first design task was to make 50 sketches. Importantly, we shouldn't worry about the quality of each sketch: this is all about just getting the mental gears turning, the ideas flowing.
Eventually, enough sketching will lead to an idea. At the very least, it will lead all over the place, which isn't bad either. The trick is finding the right idea to follow and explore. Sketching as way to develop ideas wasn't really something I did a lot of before architecture school, but I've been devoting time to it, and I think it's coming along.
Beyond the sketches, there are some words and phrases that I've been scribbling down, that I think hold the kernel of some ideas to pursue. There should be an embedded context, and a balance of old and new, of contemporary and classic. I like the idea of being able to build something with my own hands that will become an heirloom. There isn't as much produced at that level of quality anymore, and it's a cultural loss. At this point, I'm not sure where it's all heading, but this is where it starts: with sketches. If it ends with an heirloom, well, then I couldn't be more pleased.
Sketched Evolution
Iterate and play: tracking even small alterations in sketch form helps to find the right direction forward.
April 11, 2011
Scheme One
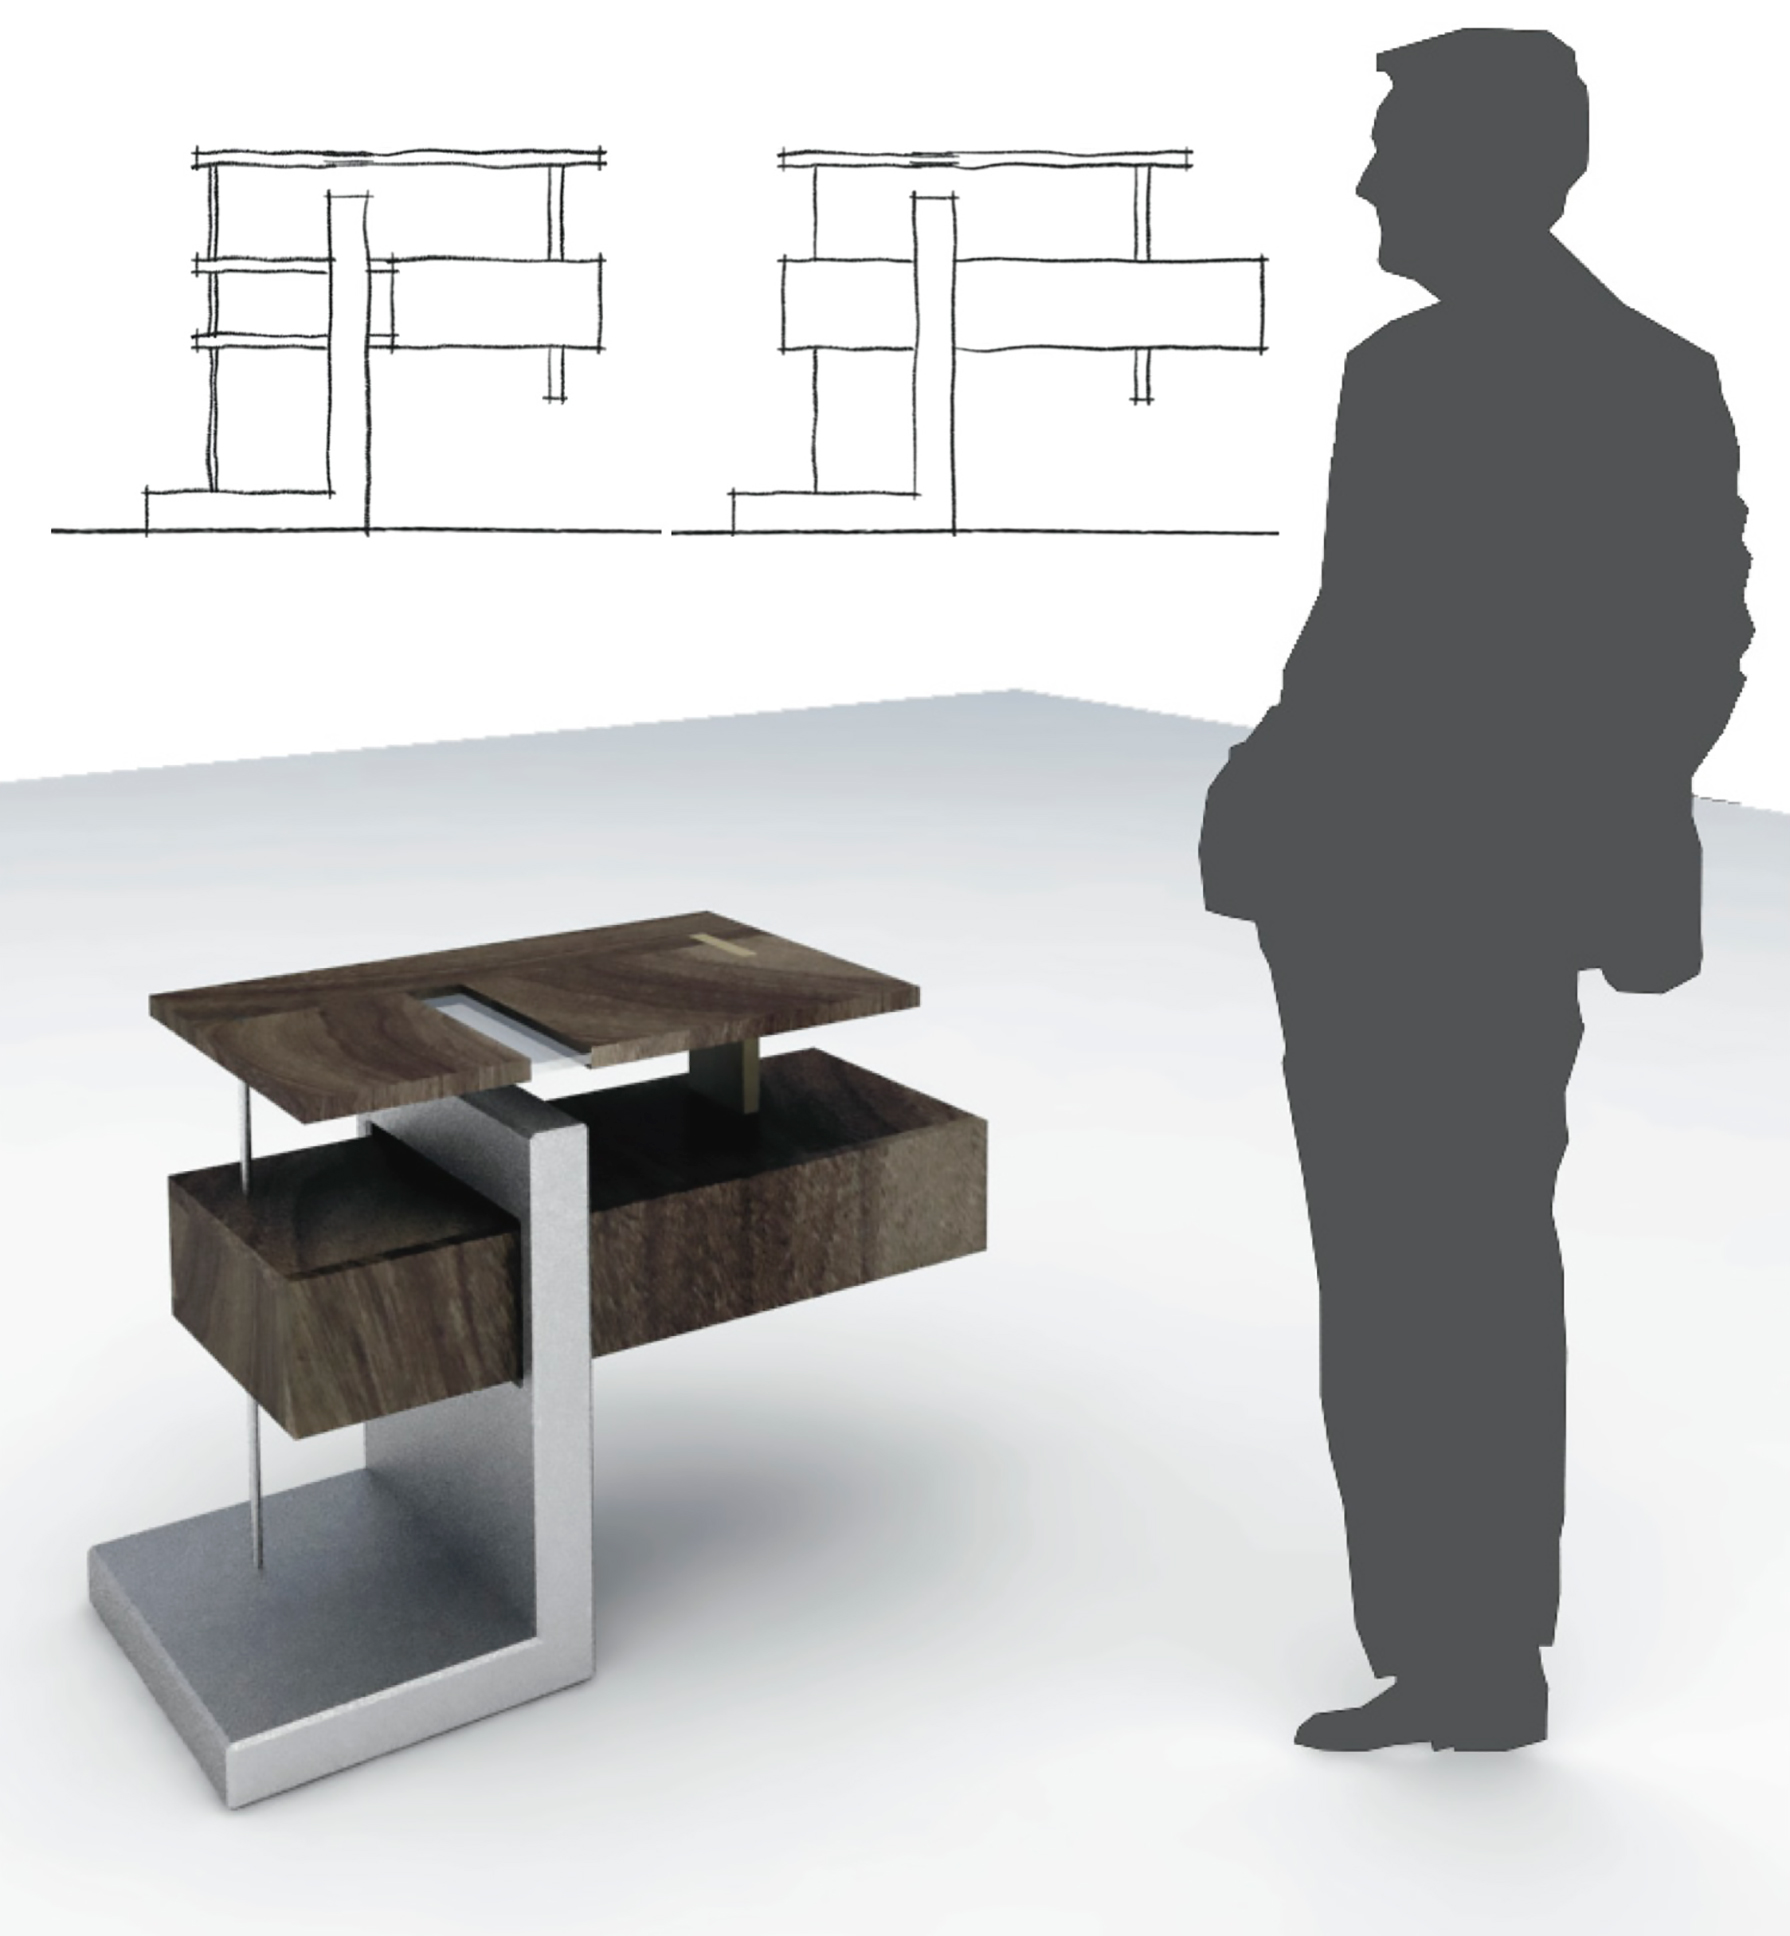
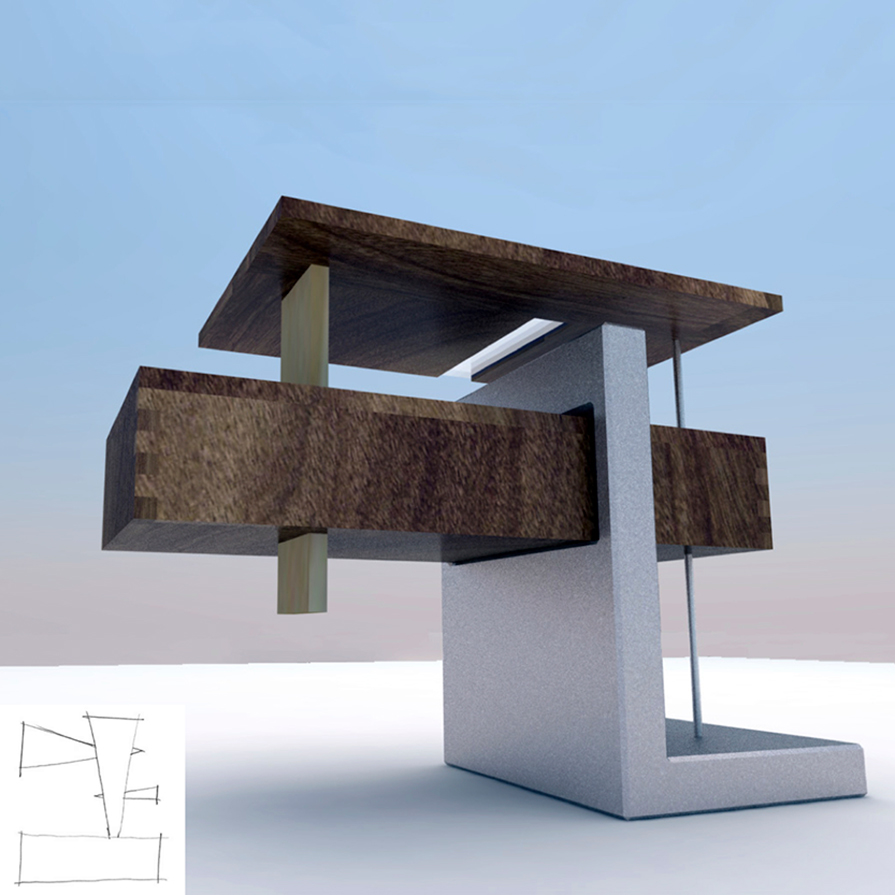
Scheme One: Image A
Composed of walnut, birch, concrete, glass, and brushed steel, the wood sections of the asymmetrically balanced piece extend in a dramatic cantilever.
Now, at the wrap of week two, I've made some progress on my two leading schemes, which I will present to the studio for critique. Admittedly, I am partial to Scheme One. It is composed of a series of complementary linear and volumetric elements. These elements are offset from one another, intersecting, segmenting, and hinting at space hidden within. Together, they form an asymmetric balance. In terms of materials, this scheme includes walnut, birch, concrete, glass, and brushed steel. The hardwood components “float” above the ground, the steel rod acts in tension to anchor the dramatic cantilever, and the concrete provides the substantial weight needed to keep the unit stable, even when loaded.

Scheme One: Image B
The scheme derives from the sketched idea of a wedge inserting and, well, wedging between two other pieces.

Scheme One: Image C
Another of the process sketches illustrates an idea of stacked horizontal elements, linked at a common core.
I am attracted to the idea of keeping some aspects of the piece hidden. That is to say, that while the piece is aesthetically appealing at a glance, its function (storage) is not so immediately evident. Instead, function would be revealed through investigation: perhaps there is a hidden compartment, and perhaps there is an unconventional way to access it.
Scheme One: Image D
In this thumbnail sketch, the conceptual wedge comes in from above, wedging into the base.
Scheme One: Image E
Another conceptual interpretation of the wedge shows all but the base as wedge elements.
Many of the sketches that have been the drivers for this scheme circle around the idea of a wedge. There are a number of ways this could manifest: perhaps a wedge through a core, a cantilever as a wedge, or a wedge as an element in a keystone reliant system.
Scheme Two
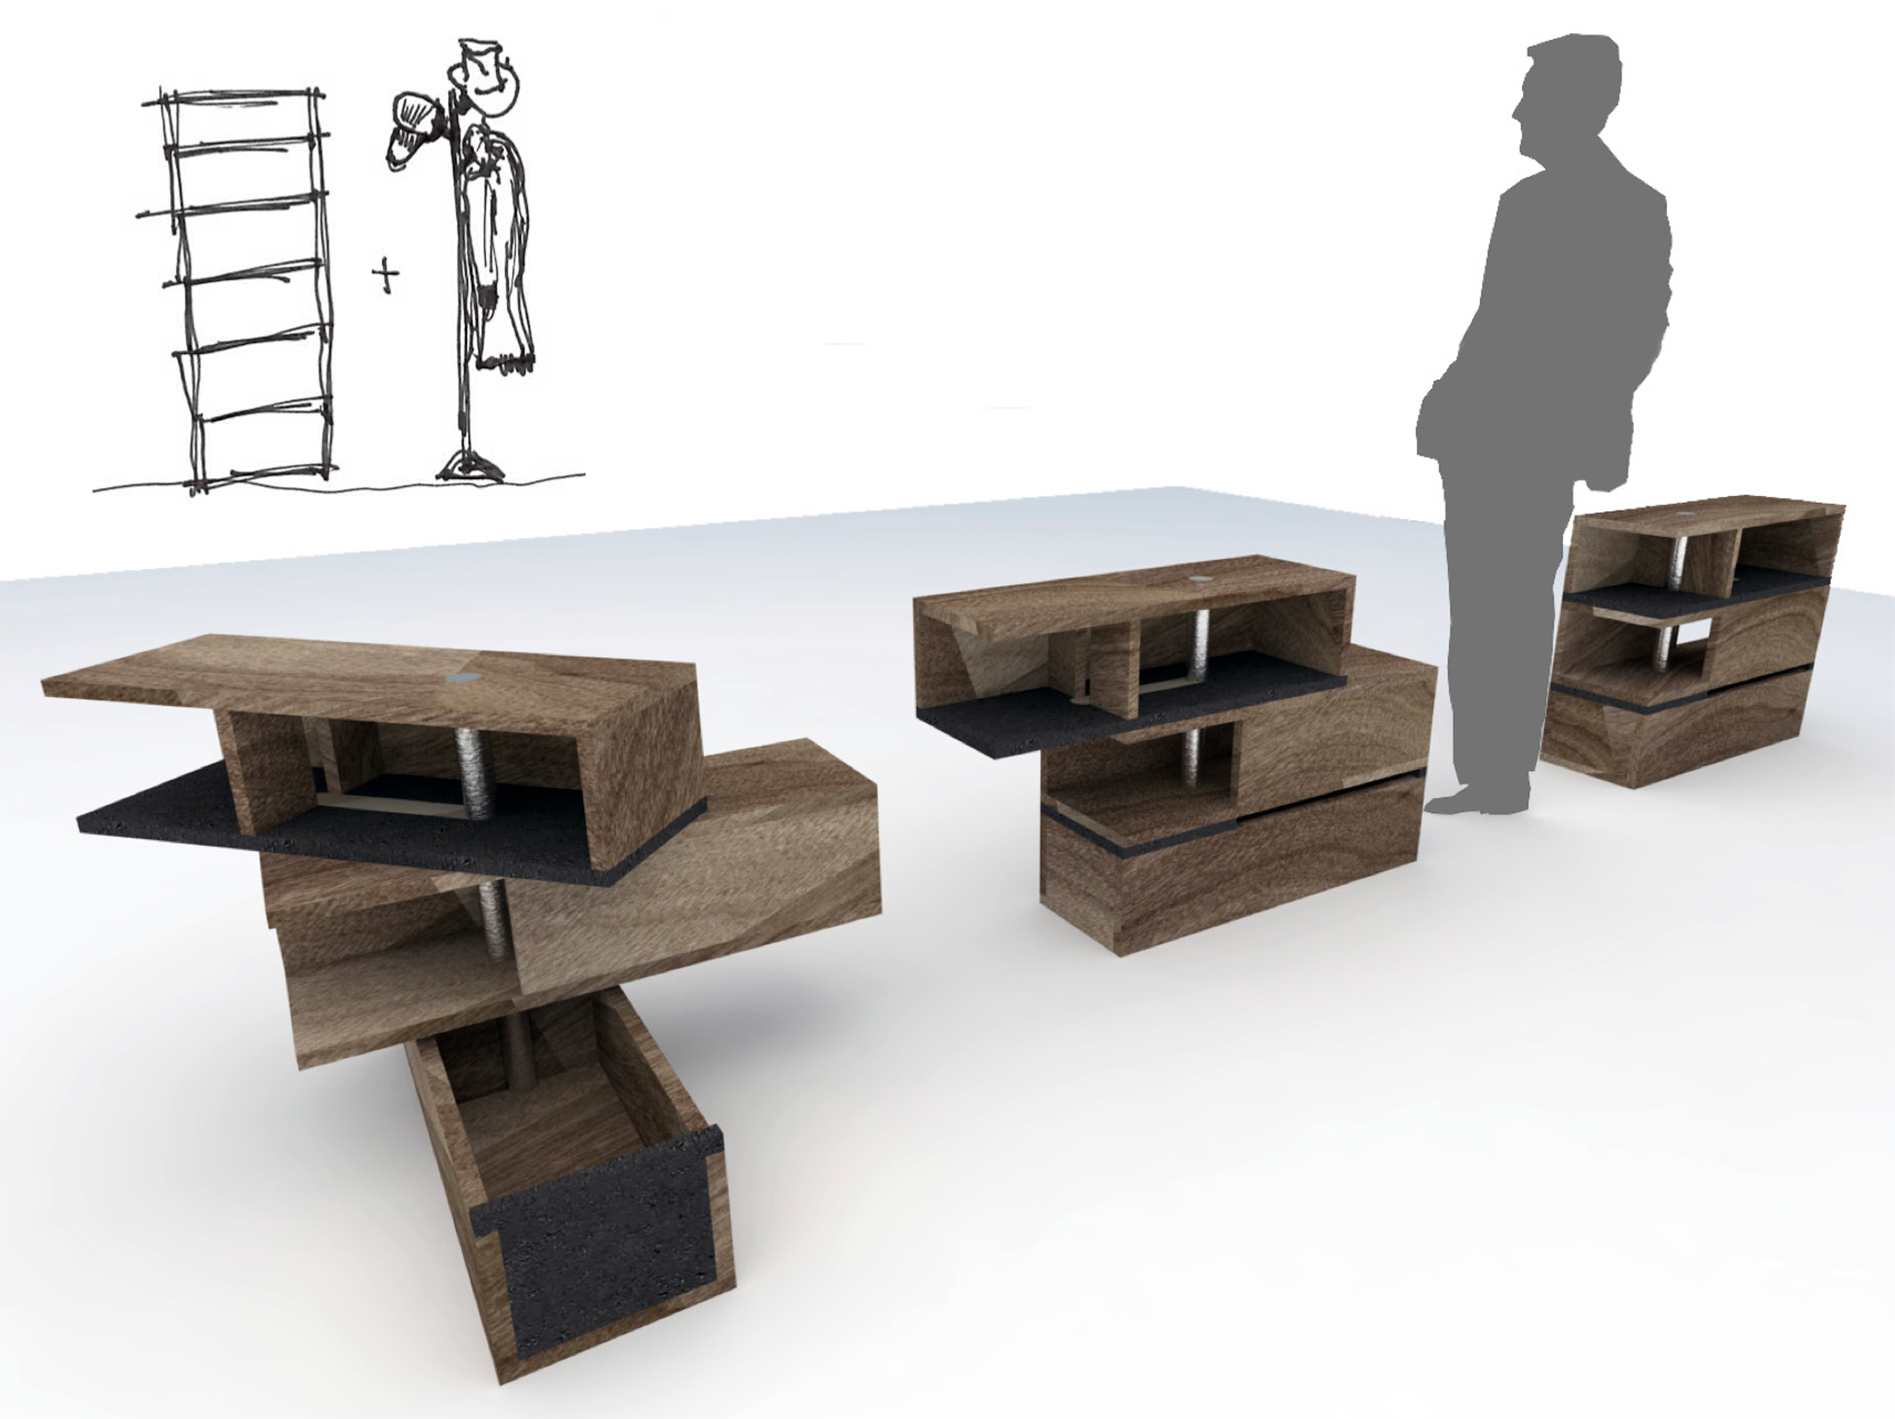
Scheme Two: Image A
Composed of walnut boxes on a steel axis, the upper wood boxes can be rotated and shifted dynamically.
This scheme is a riff on some of your more typical storage systems: chests, shelving, and drawers. It, too, features function revealed through investigation, but perhaps in a more dynamic way. Rather than remaining static like conventional furniture, this unit can be rearranged not just in location, but also in shape. Scheme Two is composed of three wooden box elements, stacked and linked by a vertical steel axis. The top two boxes can rotate on the axis, and the top-most box can also slide horizontally.
Scheme Two: Image D
In its most compact state, the shelf units are stacked and aligned.
Scheme Two: Image B
If a more dramatic configuration suits, the units can be rotated on the steel axis.
Scheme Two: Image C
Even just a slide along a notch brings more flexibility to the storage solution.
With these features, the piece can shift easily between something more in line with your standard rectangular storage chest, and something a bit more unconventional.
April 18, 2011
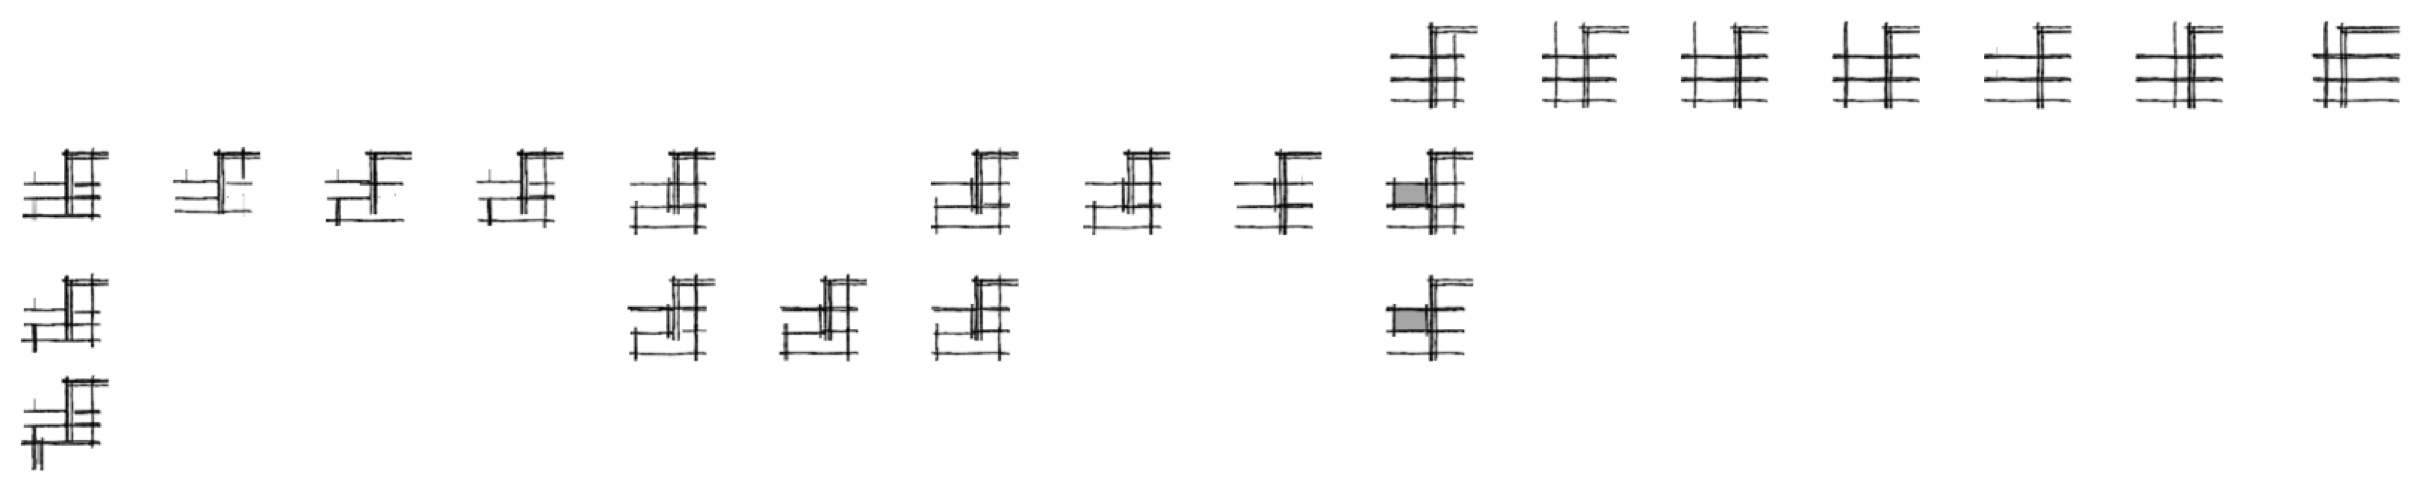
Working it Out Digitally
Iteration is everything, and using 3D modeling software to do it is an incredibly fast way to manage it. These thumbnails document some of the exploration that evolved into Scheme One. Sometimes the progression is linear, sometimes not, but the process is always informative.
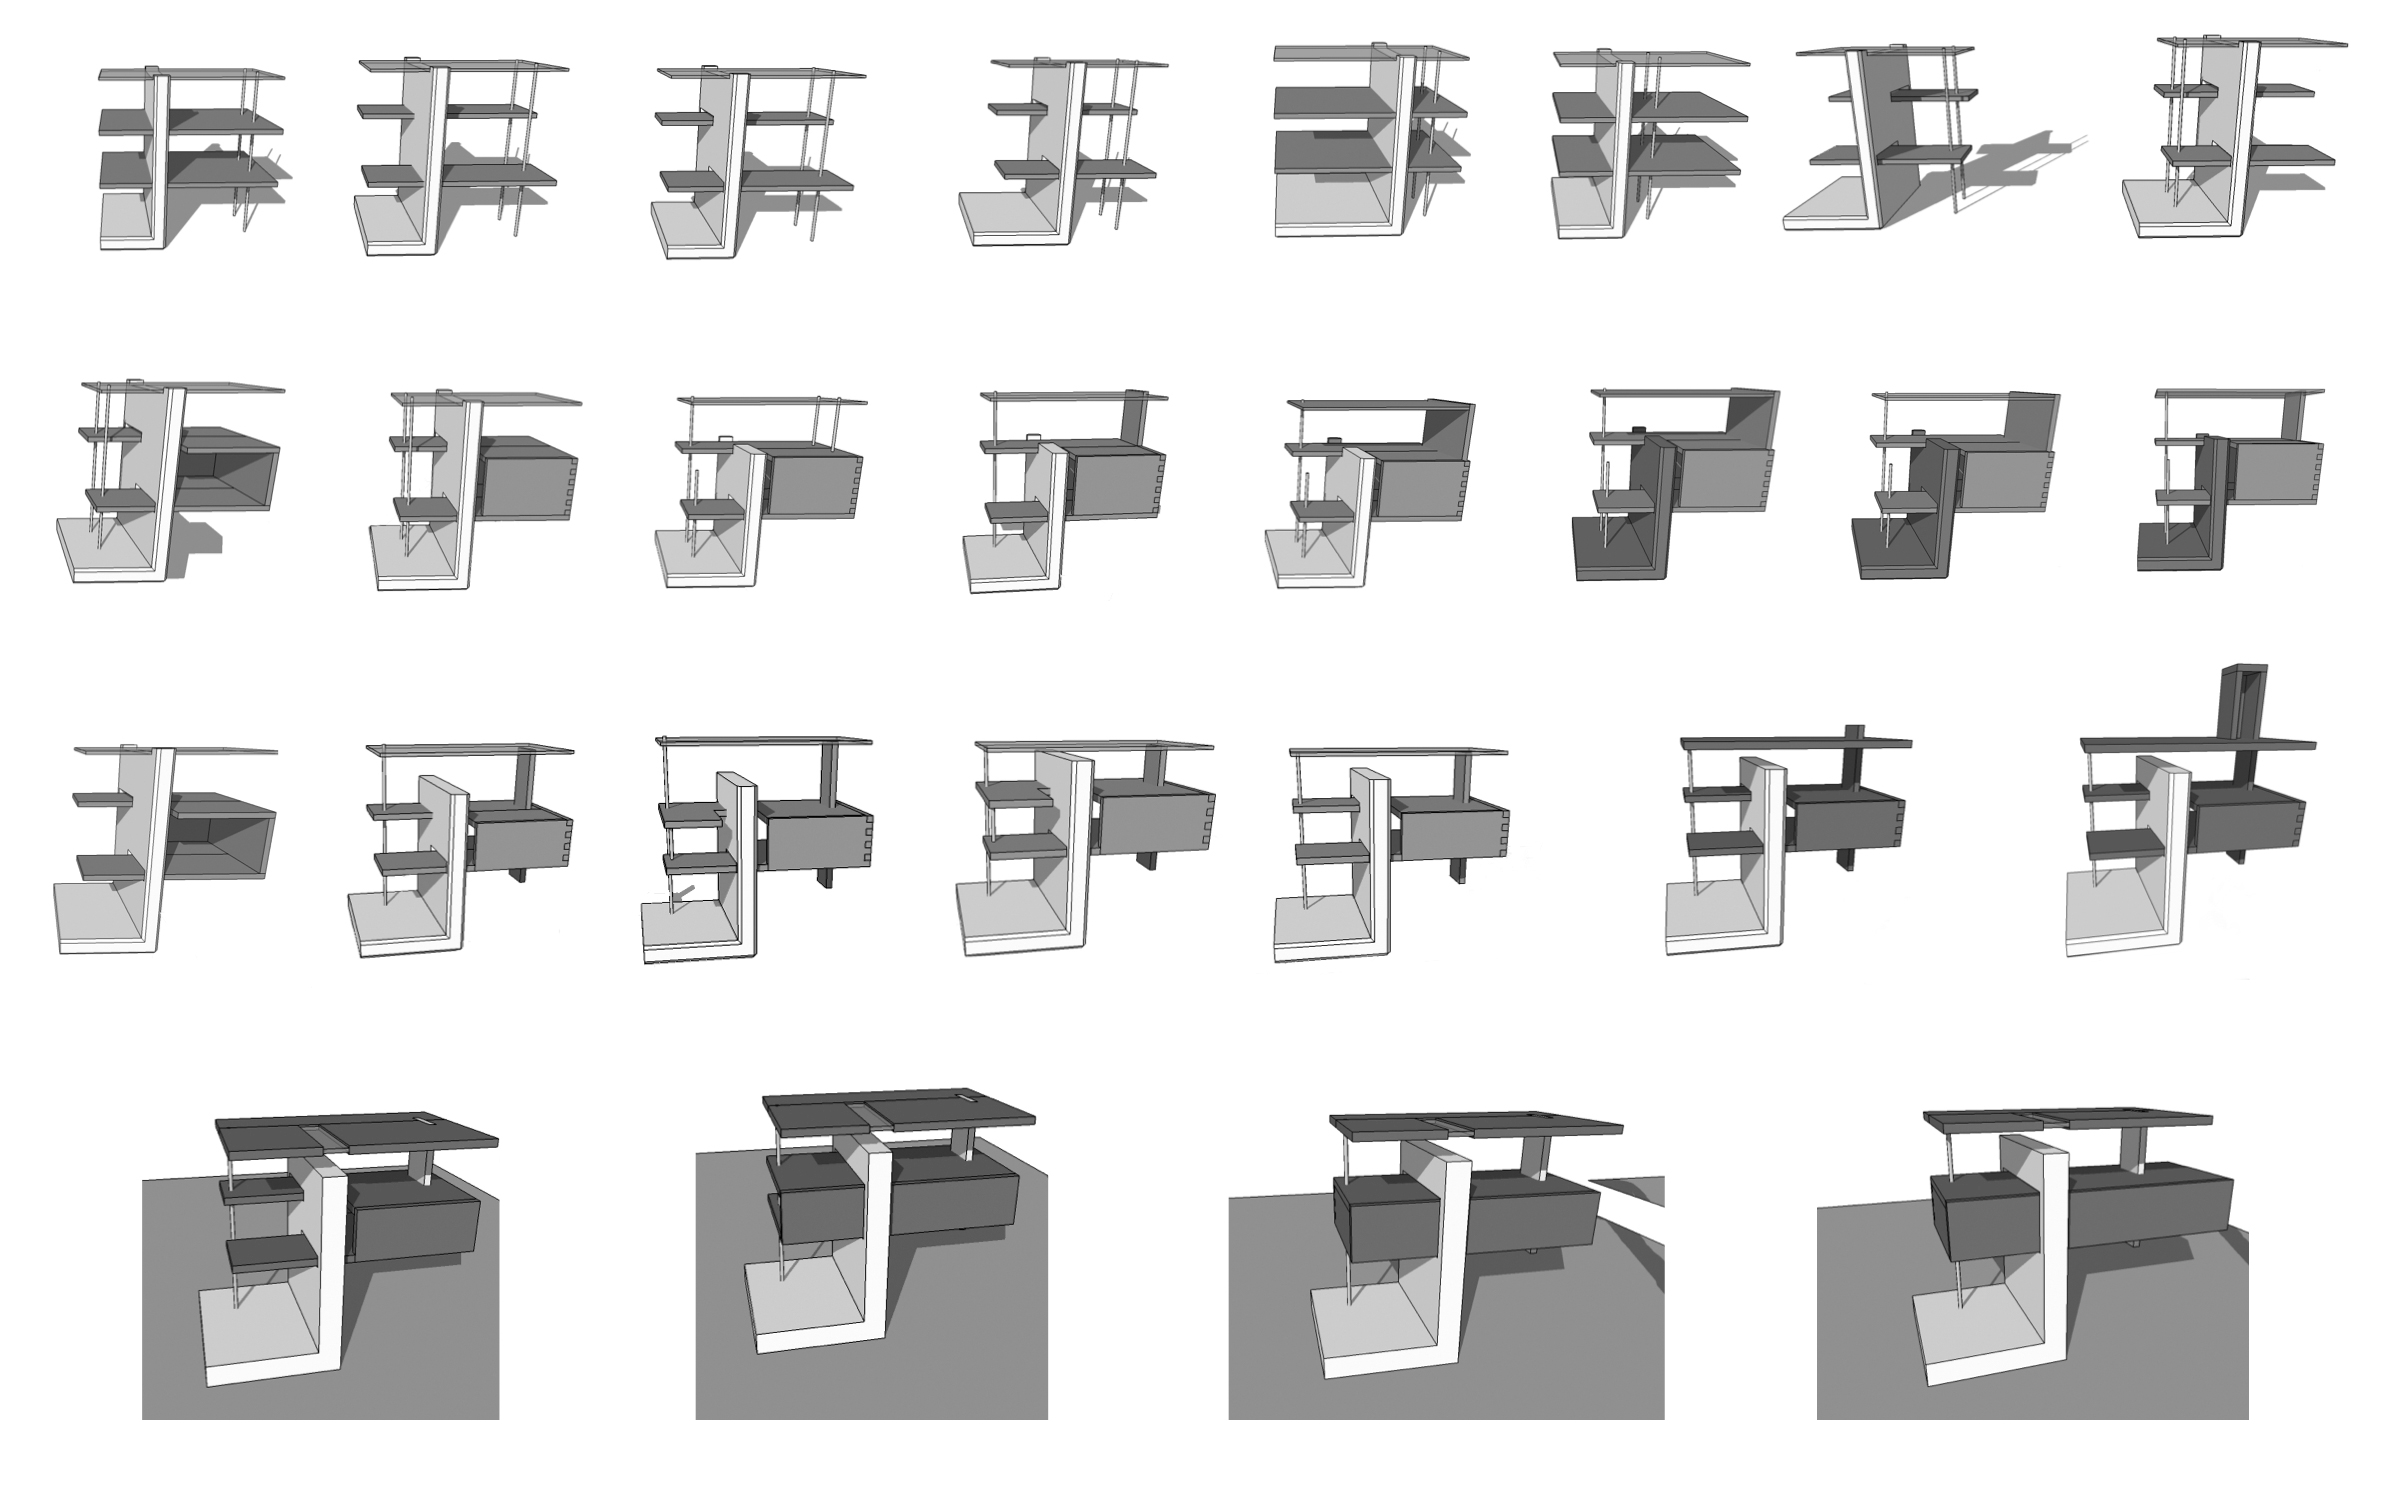
Digital Iteration & Exploration
Since it is so easy to iterate in a 3D modeling program, many explorations can be made in little time.
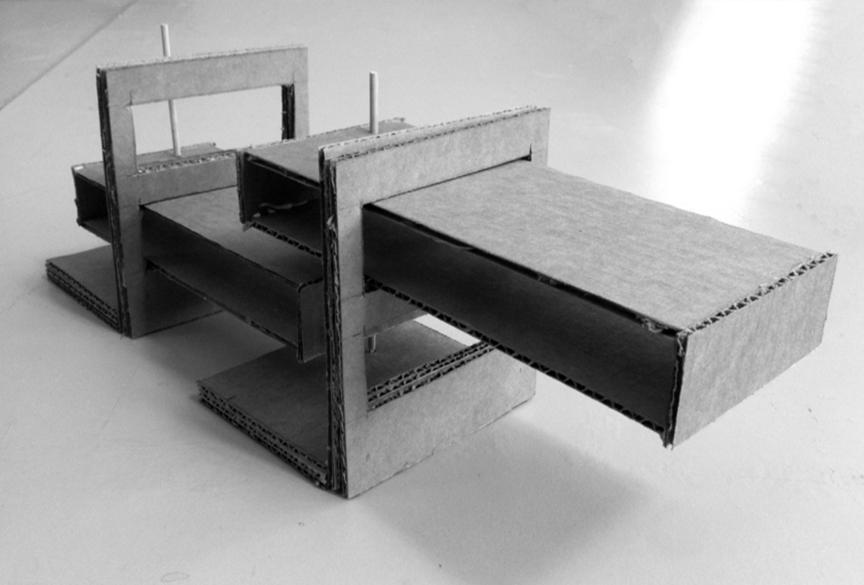
Working it Out Physically
Back to the Sketchbook
These sketches explore the potential of a modular unit that could be linked together into a chain.
Of course, we all may love our 3D modeling software, but sometimes, a physical model is also a helpful tool. The concept I'm working on now involves modular components that link at pivot points. The idea is that you can chain a series of units together, which can then be arranged in a sinuous line, or at precise angles at each joint. For example, imagine three units combined into a gently bending room divider, but instead of just dividing space, they provide an opportunity for storage. Or, imagine a pair of units wrapping around a corner: suddenly what was once awkward dead space between two bookshelves is activated and functional. By modularizing the furniture, it also provides flexibility for the varied spaces we occupy as we move through life: what worked in your first apartment might not work in the next, but perhaps a different configuration of the modules will be the perfect solution.
In a Row
Two modular units could be aligned to extend in a straight line.
Around a Corner
Or, the same two modular units could be aligned to wrap a corner.
Corrugated cardboard from a box in the recycling bin and bamboo skewers from my kitchen maybe don't have the caché of walnut and brushed steel, but certainly they work excellently for a little quick modeling.
April 22, 2011
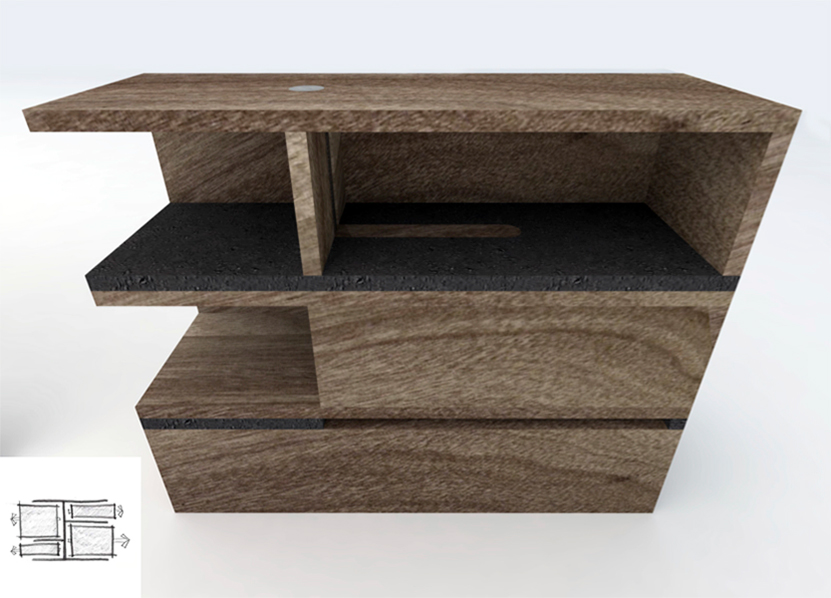
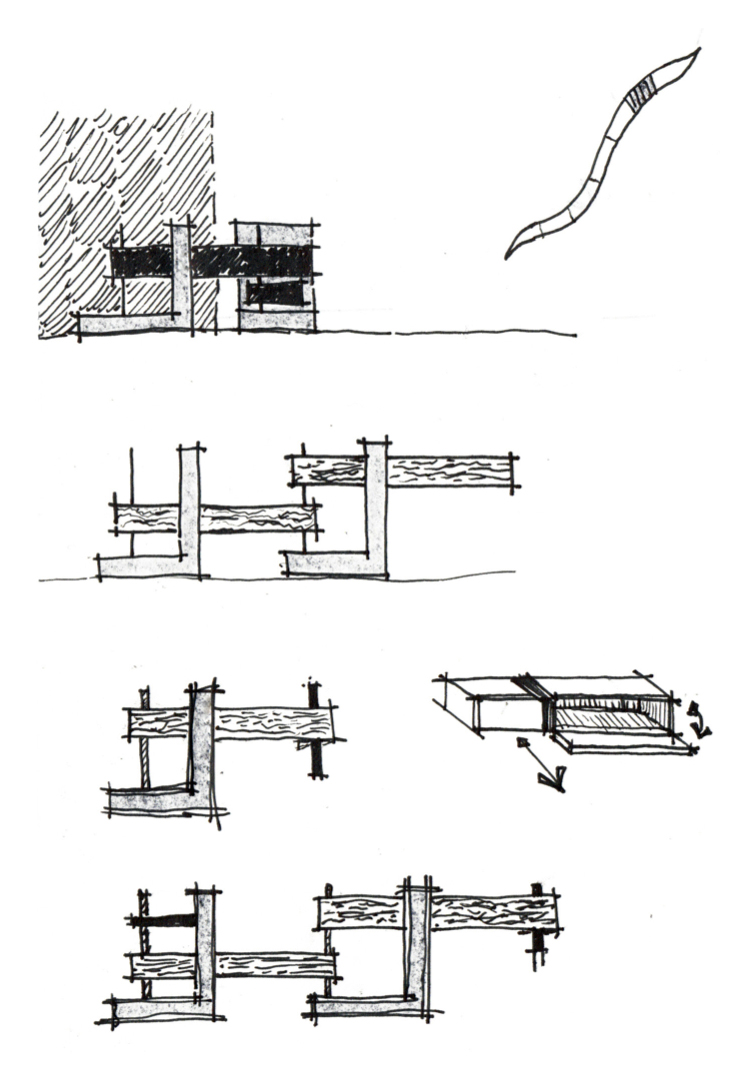
Refinement
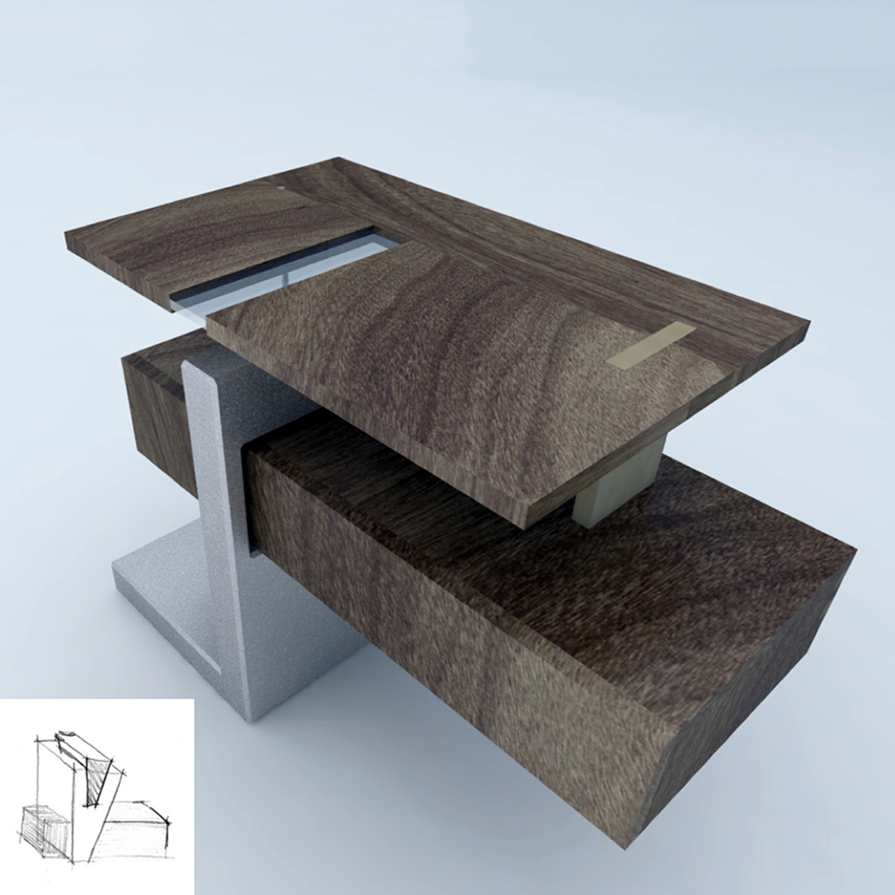
Teasing the Eye
Though it appears unstable, and that the thin strips are too fragile to support the top, in theory, the steel rod will anchor the cantilever and the thin strips will act as a unit to support the box above.
Back in the digital world, I've refined the lines of the piece. Now, the vertical component is composed of a framework of thin pieces that pierce through the elevated box, rather than the box piercing through the concrete “L.” This light frame composition teases the eye by appearing to be too fragile to support the heavy wood box above it, but in theory, the thin strips act together as a larger column, and the steel rod keeps the cantilever anchored and the piece stable. This is another case where a physical model will be helpful because, of course, sometimes our eyes are right. I guess we'll see about that.
April 23, 2011
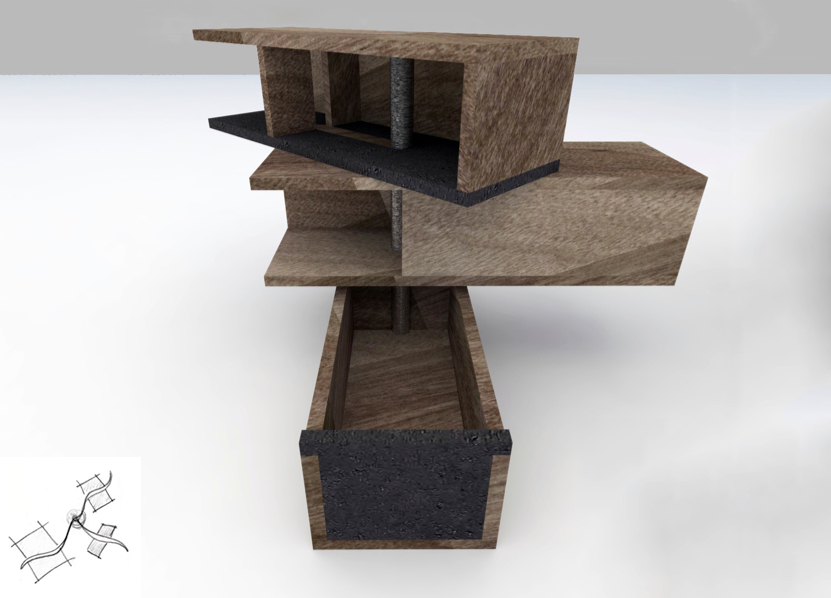
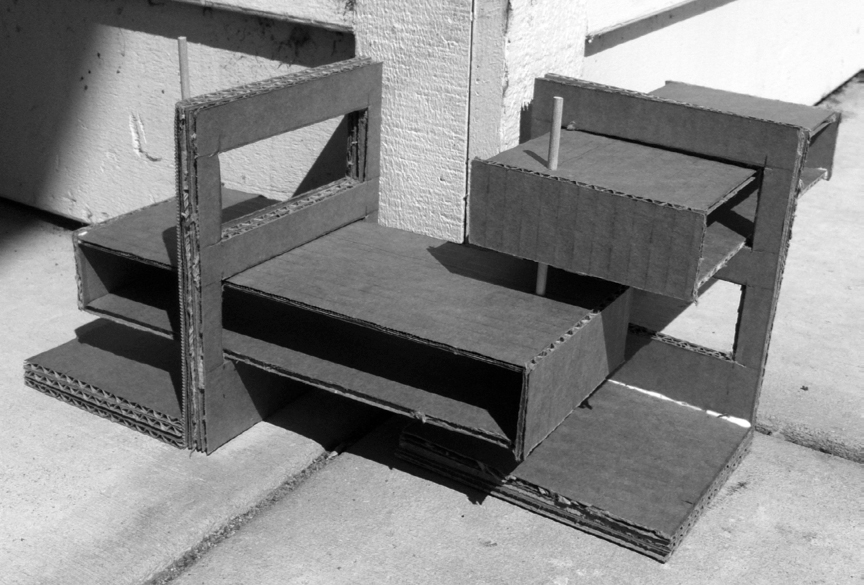
Full Scale Prototype
From 3D Model to Real Life
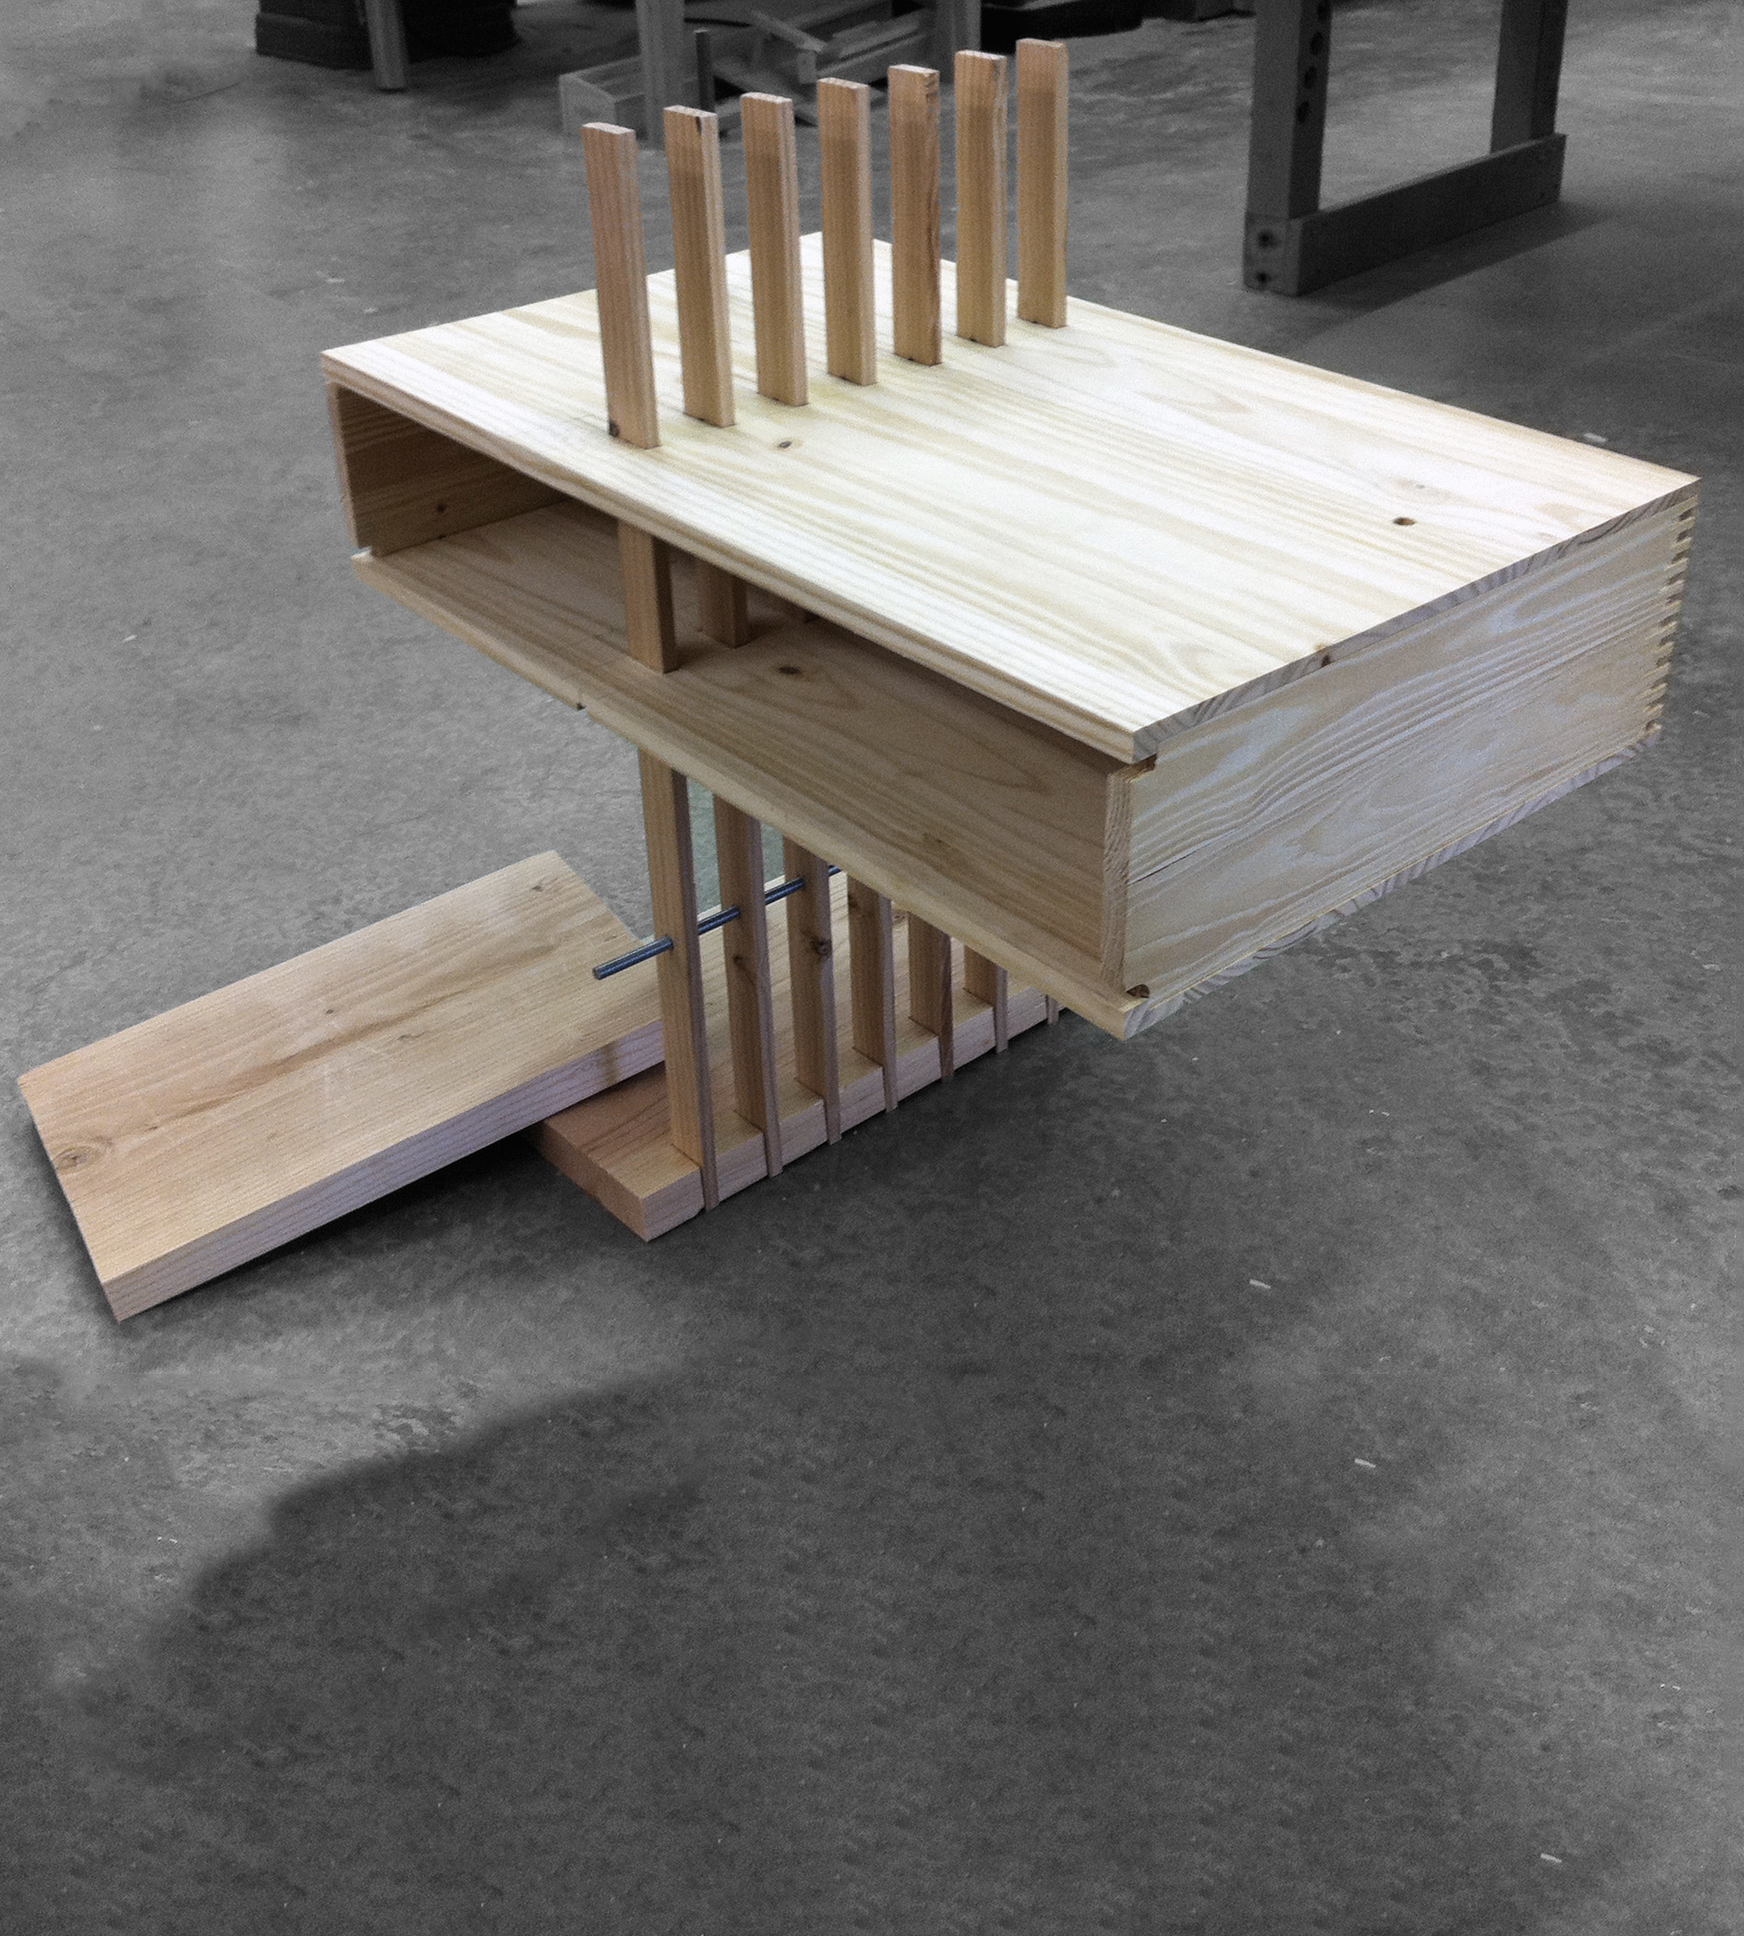
Unfortunately, the force of gravity we are subject to in real life render this prototype unstable, hence the board that would be the extension of the base, lying instead on top of it to supply the weight needed to keep the unit from tipping.
Well, I've completed the first full-scale prototype. It took approximately 11.5 hours to complete, and does not have any glue, nails, or screws holding it together. Maybe you've noticed that in every one of these pictures, there is something extra sitting on the base of the piece? Yep, as I feared, the cantilever weighs too much for the rest of the piece, and renders the overall unit unstable. An integrated solution to weighing down the base will be a requirement for the next iteration. Already, I am brainstorming potential solutions: perhaps heavy ball bearings displayed within the base under a transparent panel, or perhaps a thick steel plate hidden underneath. The main difference between those two ideas is in communication: should (or should it not) be revealed how the piece functions? And, some of it is already revealed: the steel rod. It, by the way, works perfectly, relieving the moment stress on the wood slats where they meet in finger joints with the base.
Considering the Details
The back corners of the box are formed with finger joints, which pick up the thin visual aesthetic of the vertical slats.
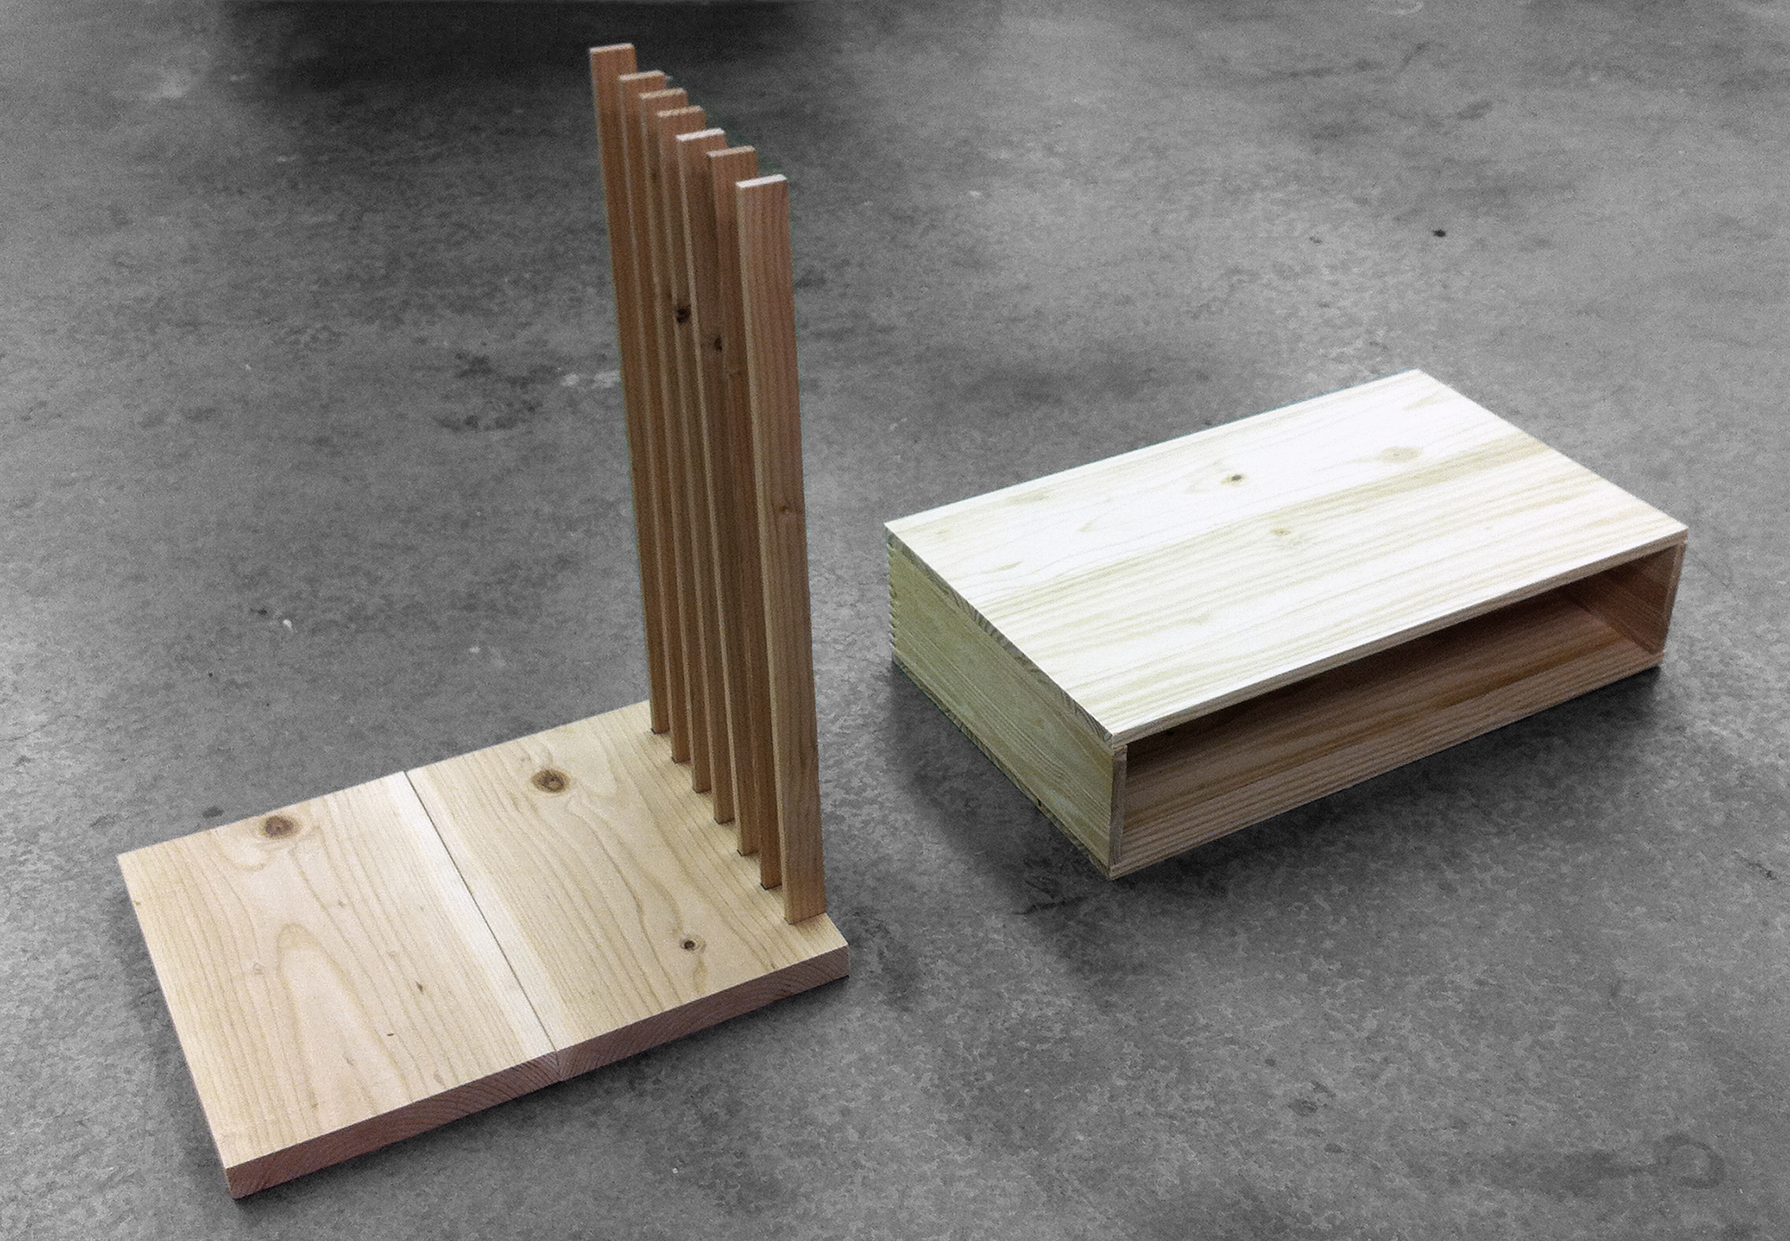
Two Elements in Form
The piece is composed of two separate wood components: the “L” and the box.
The “L” form of the model is built from a Douglas Fir 2x10 board, which was milled down to make both the base and slats. The rectangular volume is made with laminated pine boards. This portion of the piece utilizes finger joints and rabbit joints, although, I messed up the routing of the rabbit joints. Obviously, I won't make that mistake again.
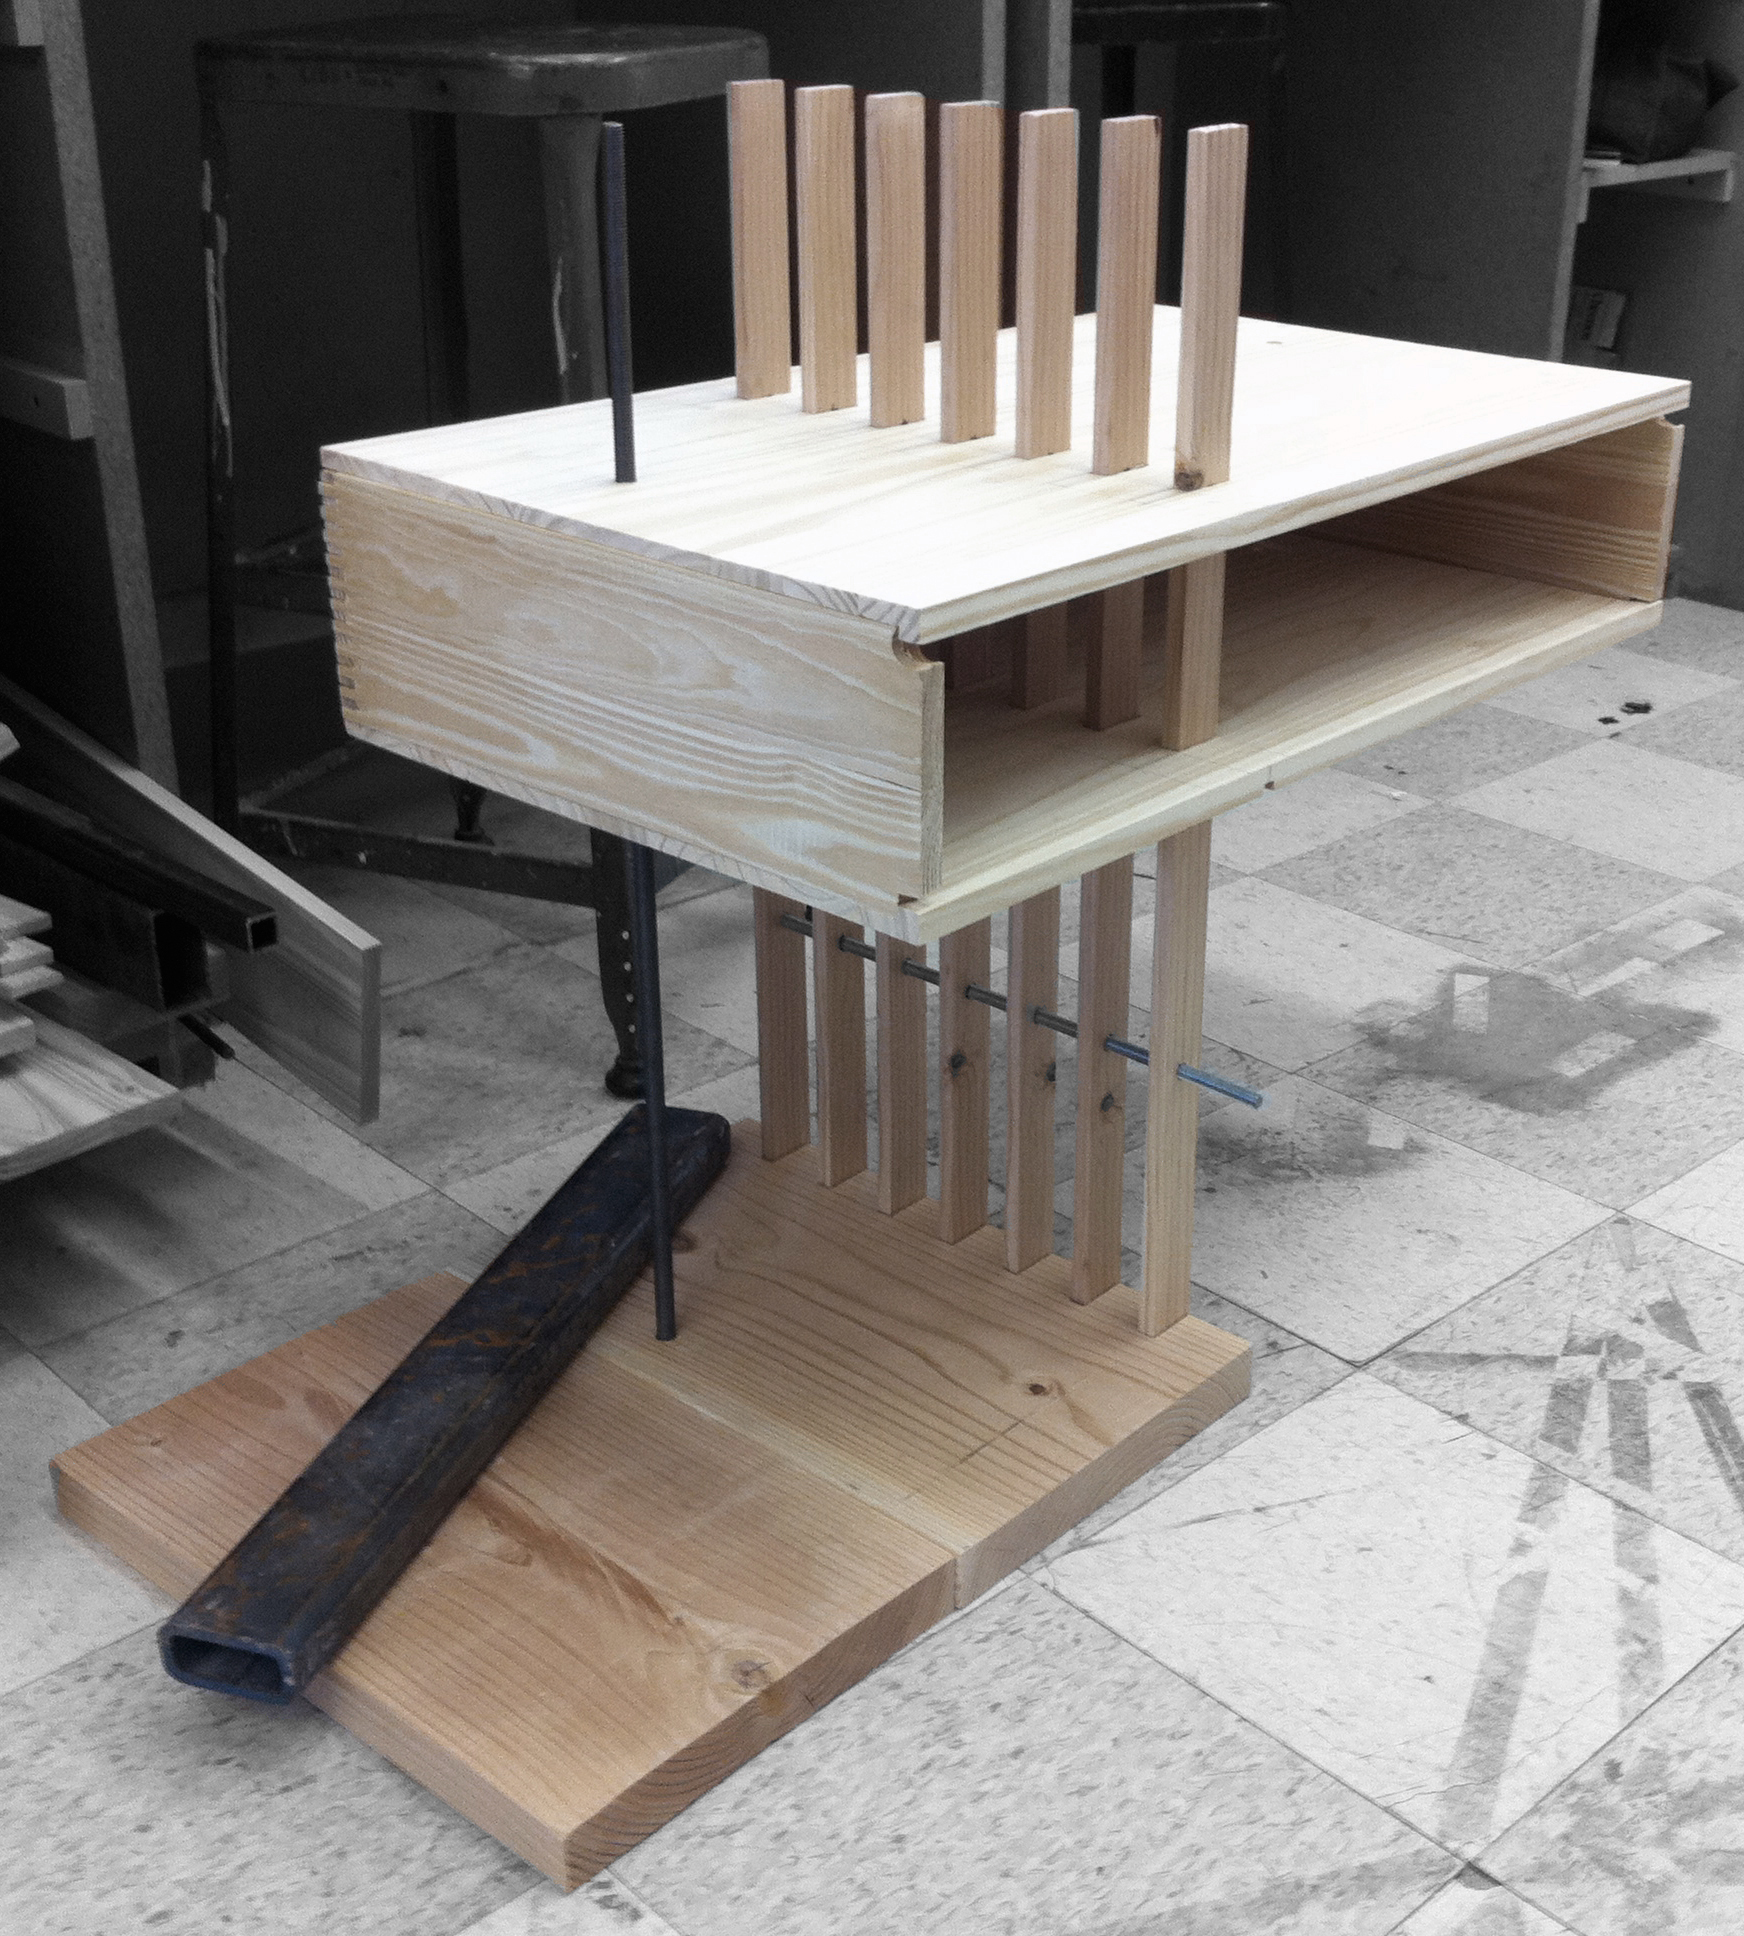
Weighing It Down
When both pieces of the base are in their proper location, the piece requires the weight of a steel tube to keep it from tipping.
One Way, or Another
Besides solving the balance problem, the final piece will have a front panel that hides the slats penetrating the box, helping the box to appear as “floating” volume.
The final piece will have a door that flips down on the front, which will complete the effect of the floating rectangular volume. The joints between the rectangular volume and the wood slats will also be adjusted. For the prototype, they were constructed using a drill, a hammer, and a chisel. I am considering a more oval shape for the final, which will ease its function. The rectangular volume piece should be able to easily slide up and down along the slats, coming to rest on the steel dowels threaded through them.
Some Fine-Tuning
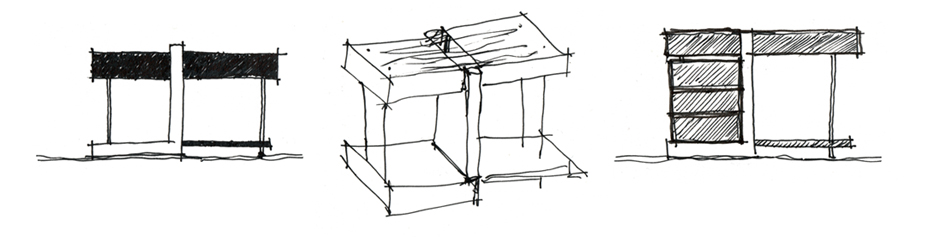
These latest sketches begin to explore some routes to solve the issues found in the prototype: in particular, a way for the piece to remain balanced, even if constructed entirely with wood.
All in all, this was a very informative exercise. Not only did I get more time to hone my skills in the wood shop, but I've revealed crucial areas of the design that need some fine-tuning before I make the final piece. Already, my mind is churning and I'm making sketches towards that end.
May 5, 2011
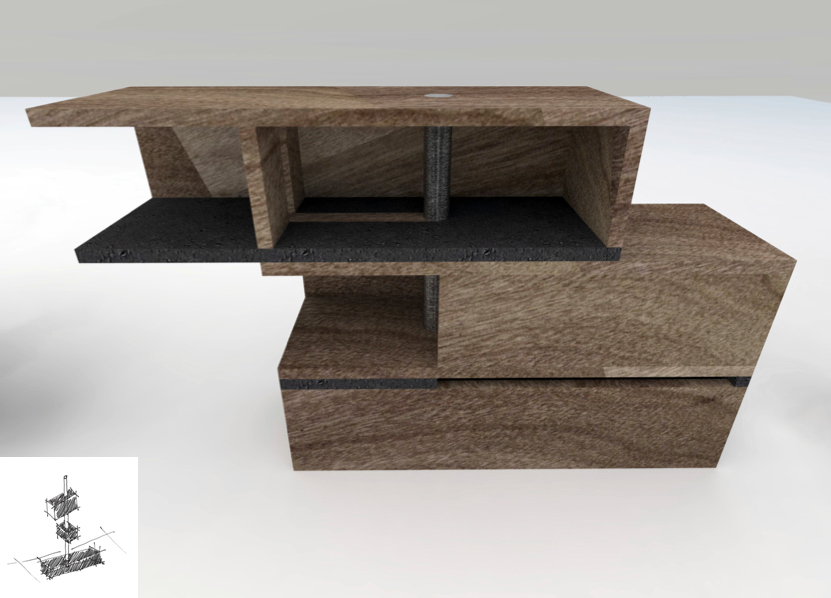
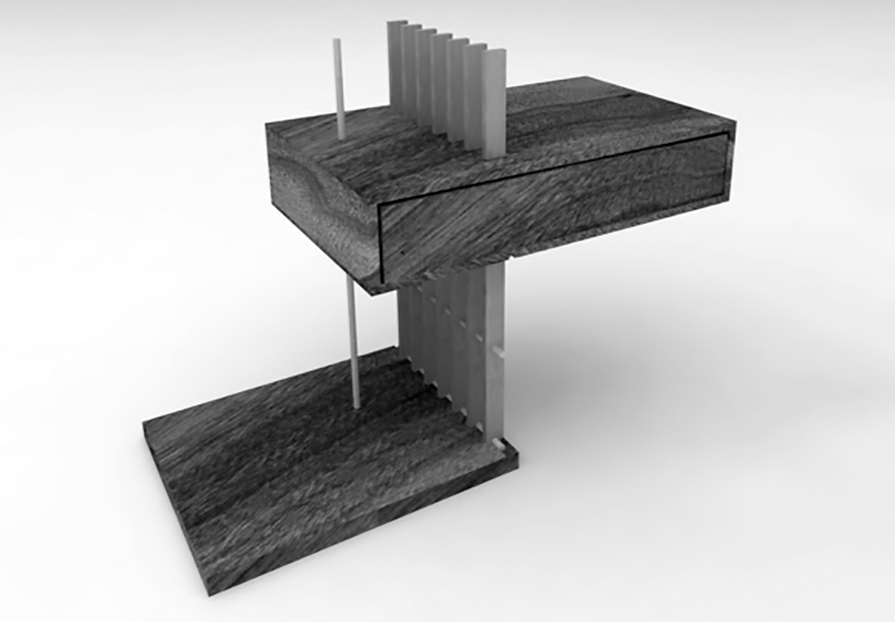
Proposed Final Design
And, here it is: the final design for my piece in furniture studio. BOOM. Walnut hardwood, painted MDF, and steel dowels. It's an evolution from all that's come before, but simple, clean, and balanced. The drawer slides are located on the underside of each drawer, and the top drawer pulls out both the left and right side as one unit.
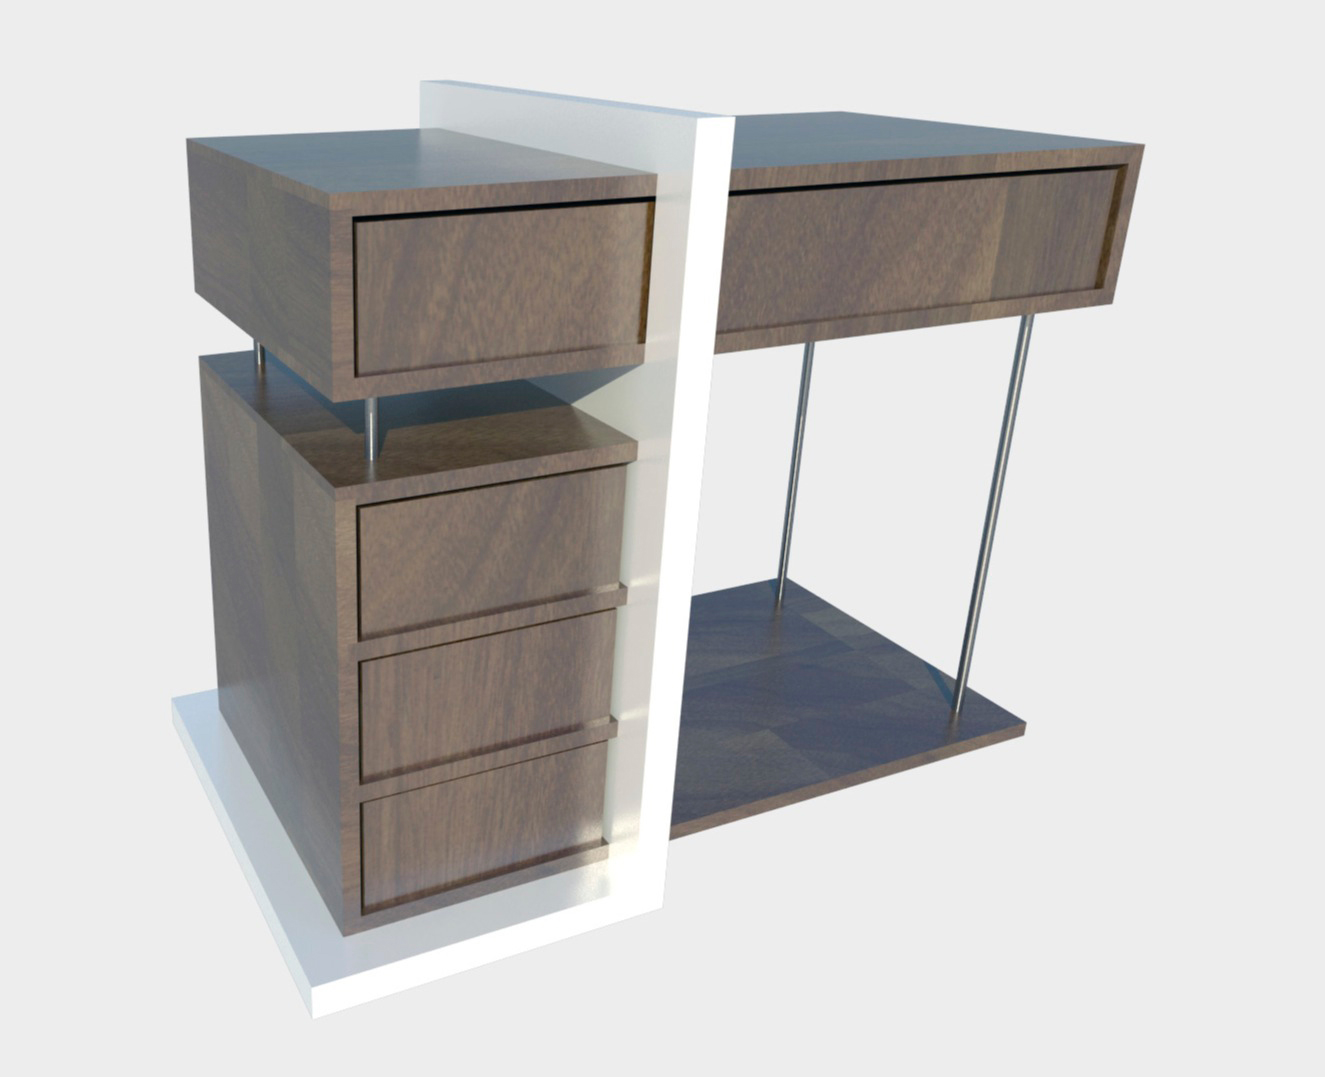
The Final Design, Rendered
Simple, clean, balanced, and with a touch of both modern and classic, at last, this is the piece that I will build over the next few weeks.
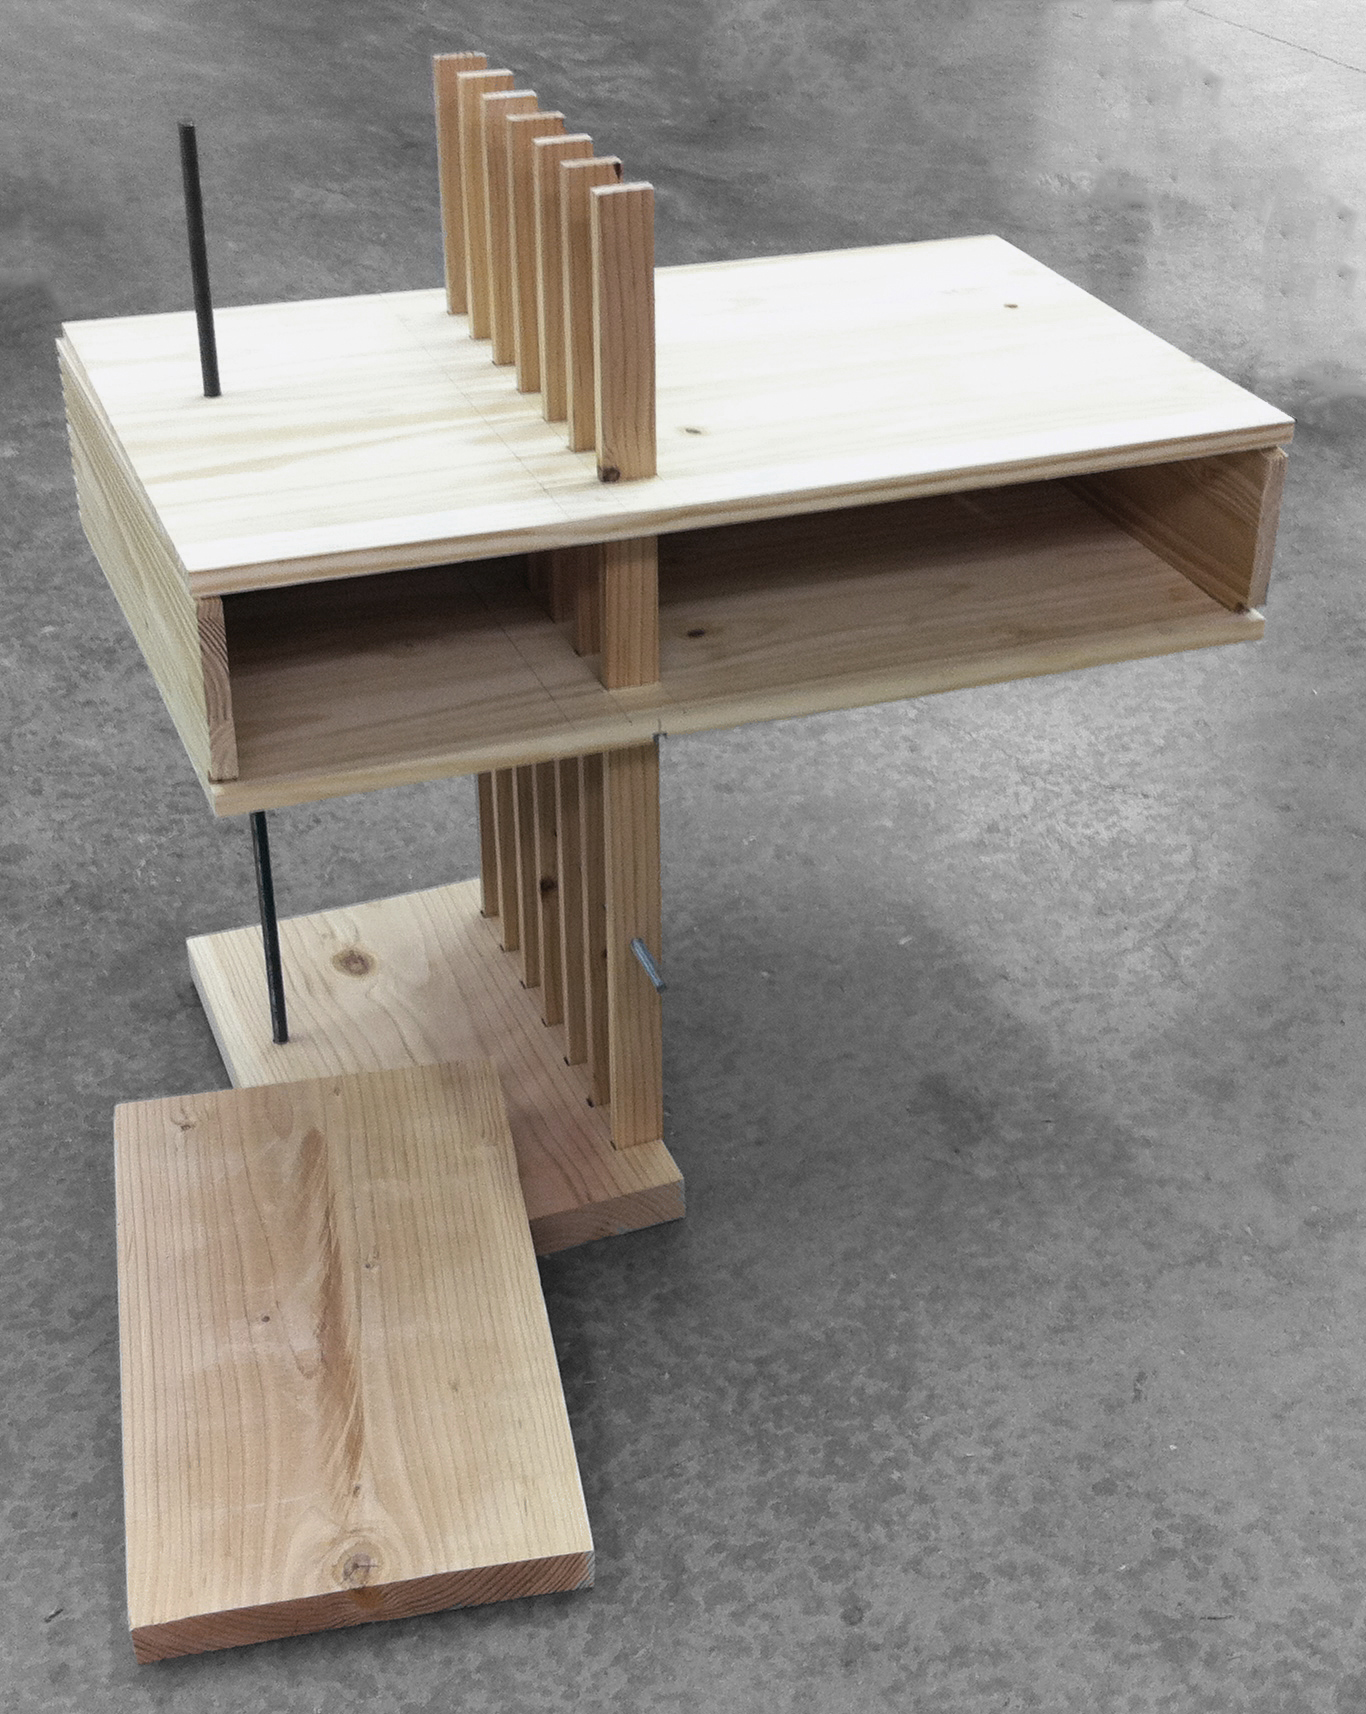
However, considering the time available for construction, I will likely have to finish the drawer construction and installation during the summer. But, the piece will stand beautifully on its own with open cubbies, if not drawers. I am still working out the specifics of the build on the calendar for the next 4+ weeks of construction; it's going to be quite a push to get it all done. Stay tuned!
Well, that's it for the design process posts for the Wedged Walnut Cabinet, but you must be curious about what happens now, right? Well, you're in luck because I've also pulled together the separate blog entries from the construction process into one post:
Wedged Walnut Cabinet: The Build.
Or, if you just want to lay your eyes on the completed project, then you can head straight on over to the portfolio spreads.


